・2018/04/30
 Windowsの QEMUエミュレータでラズパイの Raspbian OSを動かす方法
(Windowsの QEMUエミュレータで Raspbian OSを動かしてみる(実用性は無し))
Tags: [Raspberry Pi], [電子工作]
● Windowsの QEMUエミュレータでラズパイの Raspbian OSを動かす方法
Windowsの QEMUエミュレータで Raspbian OSを動かせる事を知り、動かしてみました。
(動くだけで実用性は全く有りません。そこに Windowsと QEMUと Raspbian OSが有るからみたいな。)
QEMU the FAST! processor emulator
QEMUエミュレータを動かす Windowsは Windows 10 Pro 64bit版を使用しました。
Raspbian OSは下記の 3種類で確認しました。
・2012-07-15 Raspbian Wheezy 2012-07-15-wheezy-raspbian
・2017-07-05 Raspbian Jessie 2017-07-05-raspbian-jessie
・2017-11-29 Raspbian Stretch 2017-11-29-raspbian-stretch
他の QEMU動作の手順に有る /etc/ld.so.preloadの 1行目をコメント化とか、/etc/udev/rules.d/90-qemu.rulesの作成とかは不要です。(そもそも、この QEMUで動かす Raspbian OSを真面目に使うつもりは無いから)
● Raspbian OSの旧バージョンをダウンロードする方法
下記にまとめました。
・2017/08/17

Raspberry Piの過去の古いバージョンの Raspbian OSのイメージファイルをダウンロードする方法
How to Download old version of Raspbian OS image for Raspberry Pi
● 2012-07-15 Raspbian Wheezyを Windowsの QEMUエミュレータで動かす
Raspberry Pi emulation for Windows
Simple Raspberry Pi qemu emulation in Windows for beginners
ここの Fileエリアから
qemu.zip 2012-07-19 529.4MB
をダウンロードして、解凍して run.batを実行するだけ。
ラズパイを動かす手法としては -M versatilepb方式となります。
なお、QEMUのエミューレータ本体を最新の 2.12版に差し替えても動きました。
QEMU 2.12.0 Apr 24th 2018
QEMU Binaries for Windows (64 bit)
qemu-w64-setup-20180424.exe 2018-04-24 21:52 101M QEMU Installer for Windows (64 bit)
rem 2012-07-15-wheezy-raspbian.img
qemu-system-arm.exe -M versatilepb -cpu arm1176 -hda 2012-07-15-wheezy-raspbian.img -kernel kernel-qemu -m 256 -append "root=/dev/sda2"
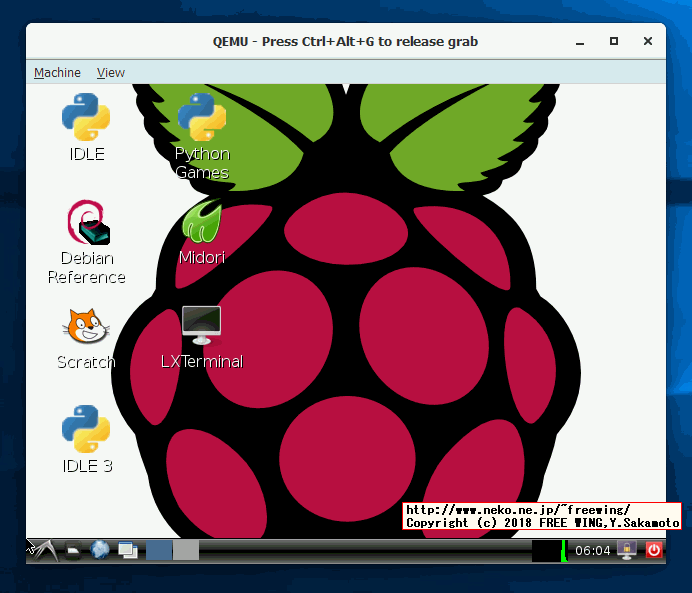
初期設定が完了後に startxで X11の GUI画面が起動します。
動作は遅く実用にはなりません。
● 2017-07-05 Raspbian Jessieを Windowsの QEMUエミュレータで動かす
2017-07-05 Raspbian Jessie Linux version 4.9.35-v7+
dhruvvyas90/qemu-rpi-kernel
から
kernel-qemu-4.4.34-jessie
をダウンロードして、QEMUのコマンドラインの -kernelに指定する。
rem 2017-07-05-raspbian-jessie.img
rem https://github.com/cnsdytzy/qemu-rpi-kernel
rem kernel-qemu-4.4.34-jessie
qemu-system-arm.exe -M versatilepb -cpu arm1176 -hda 2017-07-05-raspbian-jessie.img -kernel kernel-qemu-4.4.34-jessie -m 256 -append "root=/dev/sda2"
-net nic -net user,hostfwd=tcp::10022-:22
を付けると IPアドレス 127.0.0.1の localhostの port 10022で SSH接続できます。
※ 2017-07-05 Raspbian Jessieは SSH接続が無効化されているのでメニューの Preference - Raspberry Pi Configurationで SSHを Enableに設定して有効にする必要が有ります。
ssh 127.0.0.1:10022
ssh localhost:10022
 指定例:
qemu-system-arm.exe -M versatilepb -cpu arm1176 -hda 2017-07-05-raspbian-jessie.img -kernel kernel-qemu-4.4.34-jessie -m 256 -append "root=/dev/sda2" -net nic -net user,hostfwd=tcp::10022-:22
-netの代わりに -redir "tcp:10022::22"を指定する方法も有ります。
 指定例:
qemu-system-arm.exe -M versatilepb -cpu arm1176 -hda 2017-07-05-raspbian-jessie.img -kernel kernel-qemu-4.4.34-jessie -m 256 -append "root=/dev/sda2" -redir "tcp:10022::22"
● 2017-11-29 Raspbian Stretchを Windowsの QEMUエミュレータで動かす
2017-11-29 Raspbian Stretch Linux version 4.9.59-v7+
Raspbian OSの 2017-11-29-raspbian-stretch.imgを SDカードに書き込み、bootの中の
kernel7.img
bcm2709-rpi-2-b.dtb
をコピー(サルベージ)して、QEMUのコマンドラインの -kernelと -dtbに指定する。
また、QEMUの -Mで raspi2を指定する。
rem 2017-11-29-raspbian-stretch.img
qemu-system-arm.exe -M raspi2 -sd 2017-11-29-raspbian-stretch.img -kernel kernel7.img -m 512 -dtb bcm2709-rpi-2-b.dtb -append "root=/dev/mmcblk0p2 rootwait"
※ サルベージ版は X11のデスクトップ画面は表示しますが動きません。
●下記の様にラズパイ自身で上記の 2ファイルをビルドして QEMUしてみる
KERNEL BUILDING
# Local building
sudo apt-get update

# First install Git and the build dependencies
sudo apt-get -y install git bc

# Next get the sources, which will take some time
git clone git://github.com/raspberrypi/linux.git --branch rpi-4.9.y-stable --single-branch --depth 1
#// git clone https://github.com/raspberrypi/tools.git

# RASPBERRY PI 2, PI 3, AND COMPUTE MODULE 3 DEFAULT BUILD CONFIGURATION
cd linux
KERNEL=kernel7
make clean
make bcm2709_defconfig

# Build and install the kernel, modules, and Device Tree blobs;
# this step takes a long time:
make menuconfig
# .config - Linux/arm 4.9.80 Kernel Configuration
# わからないので何もせずに Exitで抜ける

# Note: On a Raspberry Pi 2/3, the -j4 flag splits the work between all four cores,
# speeding up compilation significantly.
make -j4 zImage dtbs

ls -l ./arch/arm/boot/
# -rwxr-xr-x 1 pi pi  4606760 May  6 10:58 zImage

ls -l ./arch/arm/boot/dts/bcm2709*
# -rw-r--r-- 1 pi pi   407 May  6 10:14 ./arch/arm/boot/dts/bcm2709.dtsi
# -rw-r--r-- 1 pi pi 16758 May  6 10:54 ./arch/arm/boot/dts/bcm2709-rpi-2-b.dtb
# -rw-r--r-- 1 pi pi  2912 May  6 10:14 ./arch/arm/boot/dts/bcm2709-rpi-2-b.dts

cp ./arch/arm/boot/zImage ~/kernel7.img
cp ./arch/arm/boot/dts/bcm2709-rpi-2-b.dtb ~/bcm2709-rpi-2-b.dtb

# Created
# kernel7.img
# bcm2709-rpi-2-b.dtb
cd
ls -l
# -rw-r--r--  1 pi pi   16758 May  6 11:06 bcm2709-rpi-2-b.dtb
# -rwxr-xr-x  1 pi pi 4606760 May  6 11:06 kernel7.img
rem 2017-11-29-raspbian-stretch.img
qemu-system-arm.exe -M raspi2 -sd 2017-11-29-raspbian-stretch.img -kernel kernel7.img -m 512 -dtb bcm2709-rpi-2-b.dtb -append "root=/dev/mmcblk0p2 rootwait"
※ 動くかな? >> 動きません。
● -M versatilepbで動かした場合も何か変でした。(マウスカーソルは動くが、画面上部に Raspbianのメニューバーを表示しない。)
versatile-pb.dtb
kernel-qemu-4.9.59-stretch
を指定
qemu-system-arm.exe -M versatilepb -cpu arm1176 -dtb versatile-pb.dtb -hda 2017-11-29-raspbian-stretch.img -kernel kernel-qemu-4.9.59-stretch -m 256 -append "root=/dev/sda2" -net nic -net user,hostfwd=tcp::10022-:22
● libncurses5-devが必要
pi@raspberrypi:~/linux $ make menuconfig
  HOSTCC  scripts/kconfig/mconf.o
In file included from scripts/kconfig/mconf.c:23:0:
scripts/kconfig/lxdialog/dialog.h:38:20: fatal error: curses.h: No such file or directory
 #include CURSES_LOC
                    ^
compilation terminated.
scripts/Makefile.host:124: recipe for target 'scripts/kconfig/mconf.o' failed
make[1]: *** [scripts/kconfig/mconf.o] Error 1
Makefile:541: recipe for target 'menuconfig' failed
make: *** [menuconfig] Error 2

sudo apt-get -y install libncurses5-dev
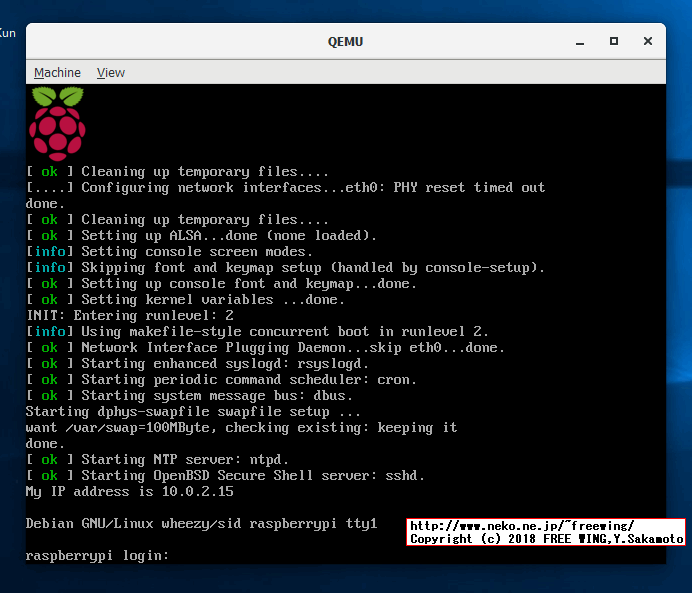
● Windowsの QEMUで Raspbian OSを動かした所
● 2012-07-15-wheezy-raspbian.img
・Windowsの QEMUで Raspbian OSを動かした所 2012-07-15-wheezy-raspbian.img
・Windowsの QEMUで Raspbian OSを動かした所 2012-07-15-wheezy-raspbian.img
・Windowsの QEMUで Raspbian OSを動かした所 2012-07-15-wheezy-raspbian.img
・Windowsの QEMUで Raspbian OSを動かした所 2012-07-15-wheezy-raspbian.img
・Windowsの QEMUで Raspbian OSを動かした所 2012-07-15-wheezy-raspbian.img
・Windowsの QEMUで Raspbian OSを動かした所 2012-07-15-wheezy-raspbian.img
・Windowsの QEMUで Raspbian OSを動かした所 2012-07-15-wheezy-raspbian.img
・Windowsの QEMUで Raspbian OSを動かした所 2012-07-15-wheezy-raspbian.img
●使用した QEMUのバージョン(Windows版)
C:> qemu-system-arm.exe --version
QEMU emulator version 2.12.0 (v2.12.0-11709-gdc835a52d5-dirty)
Copyright (c) 2003-2017 Fabrice Bellard and the QEMU Project developers
C:> qemu-system-arm.exe -h
QEMU emulator version 2.12.0 (v2.12.0-11709-gdc835a52d5-dirty)
Copyright (c) 2003-2017 Fabrice Bellard and the QEMU Project developers
usage: qemu-system-arm.exe [options] [disk_image]

'disk_image' is a raw hard disk image for IDE hard disk 0

Standard options:
-h or -help     display this help and exit
-version        display version information and exit
-machine [type=]name[,prop[=value][,...]]
                selects emulated machine ('-machine help' for list)
                property accel=accel1[:accel2[:...]] selects accelerator
                supported accelerators are kvm, xen, hax, hvf, whpx or tcg (default: tcg)
                kernel_irqchip=on|off|split controls accelerated irqchip support (default=off)
                vmport=on|off|auto controls emulation of vmport (default: auto)
                kvm_shadow_mem=size of KVM shadow MMU in bytes
                dump-guest-core=on|off include guest memory in a core dump (default=on)
                mem-merge=on|off controls memory merge support (default: on)
                igd-passthru=on|off controls IGD GFX passthrough support (default=off)
                aes-key-wrap=on|off controls support for AES key wrapping (default=on)
                dea-key-wrap=on|off controls support for DEA key wrapping (default=on)
                suppress-vmdesc=on|off disables self-describing migration (default=off)
                nvdimm=on|off controls NVDIMM support (default=off)
                enforce-config-section=on|off enforce configuration section migration (default=off)
                s390-squash-mcss=on|off (deprecated) controls support for squashing into default css (default=off)
                memory-encryption=@var{} memory encryption object to use (default=none)
-cpu cpu        select CPU ('-cpu help' for list)
-accel [accel=]accelerator[,thread=single|multi]
                select accelerator (kvm, xen, hax, hvf, whpx or tcg; use 'help' for a list)
                thread=single|multi (enable multi-threaded TCG)-smp [cpus=]n[,maxcpus=cpus][,cores=cores][,threads=threads][,sockets=sockets]
                set the number of CPUs to 'n' [default=1]
                maxcpus= maximum number of total cpus, including
                offline CPUs for hotplug, etc
                cores= number of CPU cores on one socket
                threads= number of threads on one CPU core
                sockets= number of discrete sockets in the system
-numa node[,mem=size][,cpus=firstcpu[-lastcpu]][,nodeid=node]
-numa node[,memdev=id][,cpus=firstcpu[-lastcpu]][,nodeid=node]
-numa dist,src=source,dst=destination,val=distance
-numa cpu,node-id=node[,socket-id=x][,core-id=y][,thread-id=z]
-add-fd fd=fd,set=set[,opaque=opaque]
                Add 'fd' to fd 'set'
-set group.id.arg=value
                set <arg> parameter for item <id> of type <group>
                i.e. -set drive.$id.file=/path/to/image
-global driver.property=value
-global driver=driver,property=property,value=value
                set a global default for a driver property
-boot [order=drives][,once=drives][,menu=on|off]
      [,splash=sp_name][,splash-time=sp_time][,reboot-timeout=rb_time][,strict=on|off]
                'drives': floppy (a), hard disk (c), CD-ROM (d), network (n)
                'sp_name': the file's name that would be passed to bios as logo picture, if menu=on
                'sp_time': the period that splash picture last if menu=on, unit is ms
                'rb_timeout': the timeout before guest reboot when boot failed, unit is ms
-m [size=]megs[,slots=n,maxmem=size]
                configure guest RAM
                size: initial amount of guest memory
                slots: number of hotplug slots (default: none)
                maxmem: maximum amount of guest memory (default: none)
NOTE: Some architectures might enforce a specific granularity
-mem-path FILE  provide backing storage for guest RAM
-mem-prealloc   preallocate guest memory (use with -mem-path)
-k language     use keyboard layout (for example 'fr' for French)
-audio-help     print list of audio drivers and their options
-soundhw c1,... enable audio support
                and only specified sound cards (comma separated list)
                use '-soundhw help' to get the list of supported cards
                use '-soundhw all' to enable all of them
-balloon virtio[,addr=str]
                enable virtio balloon device (deprecated)
-device driver[,prop[=value][,...]]
                add device (based on driver)
                prop=value,... sets driver properties
                use '-device help' to print all possible drivers
                use '-device driver,help' to print all possible properties
-name string1[,process=string2][,debug-threads=on|off]
                set the name of the guest
                string1 sets the window title and string2 the process name (on Linux)
                When debug-threads is enabled, individual threads are given a separate name (on Linux)
                NOTE: The thread names are for debugging and not a stable API.
-uuid %08x-%04x-%04x-%04x-%012x
                specify machine UUID

Block device options:
-fda/-fdb file  use 'file' as floppy disk 0/1 image
-hda/-hdb file  use 'file' as IDE hard disk 0/1 image
-hdc/-hdd file  use 'file' as IDE hard disk 2/3 image
-cdrom file     use 'file' as IDE cdrom image (cdrom is ide1 master)
-blockdev [driver=]driver[,node-name=N][,discard=ignore|unmap]
          [,cache.direct=on|off][,cache.no-flush=on|off]
          [,read-only=on|off][,detect-zeroes=on|off|unmap]
          [,driver specific parameters...]
                configure a block backend
-drive [file=file][,if=type][,bus=n][,unit=m][,media=d][,index=i]
       [,cyls=c,heads=h,secs=s[,trans=t]][,snapshot=on|off]
       [,cache=writethrough|writeback|none|directsync|unsafe][,format=f]
       [,serial=s][,addr=A][,rerror=ignore|stop|report]
       [,werror=ignore|stop|report|enospc][,id=name][,aio=threads|native]
       [,readonly=on|off][,copy-on-read=on|off]
       [,discard=ignore|unmap][,detect-zeroes=on|off|unmap]
       [[,bps=b]|[[,bps_rd=r][,bps_wr=w]]]
       [[,iops=i]|[[,iops_rd=r][,iops_wr=w]]]
       [[,bps_max=bm]|[[,bps_rd_max=rm][,bps_wr_max=wm]]]
       [[,iops_max=im]|[[,iops_rd_max=irm][,iops_wr_max=iwm]]]
       [[,iops_size=is]]
       [[,group=g]]
                use 'file' as a drive image
-mtdblock file  use 'file' as on-board Flash memory image
-sd file        use 'file' as SecureDigital card image
-pflash file    use 'file' as a parallel flash image
-snapshot       write to temporary files instead of disk image files
-fsdev fsdriver,id=id[,path=path,][security_model={mapped-xattr|mapped-file|passthrough|none}]
 [,writeout=immediate][,readonly][,socket=socket|sock_fd=sock_fd][,fmode=fmode][,dmode=dmode]
 [[,throttling.bps-total=b]|[[,throttling.bps-read=r][,throttling.bps-write=w]]]
 [[,throttling.iops-total=i]|[[,throttling.iops-read=r][,throttling.iops-write=w]]]
 [[,throttling.bps-total-max=bm]|[[,throttling.bps-read-max=rm][,throttling.bps-write-max=wm]]]
 [[,throttling.iops-total-max=im]|[[,throttling.iops-read-max=irm][,throttling.iops-write-max=iwm]]]
 [[,throttling.iops-size=is]]
-virtfs local,path=path,mount_tag=tag,security_model=[mapped-xattr|mapped-file|passthrough|none]
        [,id=id][,writeout=immediate][,readonly][,socket=socket|sock_fd=sock_fd][,fmode=fmode][,dmode=dmode]
-virtfs_synth Create synthetic file system image
-iscsi [user=user][,password=password]
       [,header-digest=CRC32C|CR32C-NONE|NONE-CRC32C|NONE
       [,initiator-name=initiator-iqn][,id=target-iqn]
       [,timeout=timeout]
                iSCSI session parameters

USB options:
-usb            enable the USB driver (if it is not used by default yet)
-usbdevice name add the host or guest USB device 'name'

Display options:
-display sdl[,frame=on|off][,alt_grab=on|off][,ctrl_grab=on|off]
            [,window_close=on|off][,gl=on|off]
-display gtk[,grab_on_hover=on|off][,gl=on|off]|
-display vnc=<display>[,<optargs>]
-display curses
-display none                select display type
The default display is equivalent to
        "-display gtk"
-nographic      disable graphical output and redirect serial I/Os to console
-curses         shorthand for -display curses
-no-frame       open SDL window without a frame and window decorations
-alt-grab       use Ctrl-Alt-Shift to grab mouse (instead of Ctrl-Alt)
-ctrl-grab      use Right-Ctrl to grab mouse (instead of Ctrl-Alt)
-no-quit        disable SDL window close capability
-sdl            shorthand for -display sdl
-spice [port=port][,tls-port=secured-port][,x509-dir=<dir>]
       [,x509-key-file=<file>][,x509-key-password=<file>]
       [,x509-cert-file=<file>][,x509-cacert-file=<file>]
       [,x509-dh-key-file=<file>][,addr=addr][,ipv4|ipv6|unix]
       [,tls-ciphers=<list>]
       [,tls-channel=[main|display|cursor|inputs|record|playback]]
       [,plaintext-channel=[main|display|cursor|inputs|record|playback]]
       [,sasl][,password=<secret>][,disable-ticketing]
       [,image-compression=[auto_glz|auto_lz|quic|glz|lz|off]]
       [,jpeg-wan-compression=[auto|never|always]]
       [,zlib-glz-wan-compression=[auto|never|always]]
       [,streaming-video=[off|all|filter]][,disable-copy-paste]
       [,disable-agent-file-xfer][,agent-mouse=[on|off]]
       [,playback-compression=[on|off]][,seamless-migration=[on|off]]
       [,gl=[on|off]][,rendernode=<file>]
   enable spice
   at least one of {port, tls-port} is mandatory
-portrait       rotate graphical output 90 deg left (only PXA LCD)
-rotate <deg>   rotate graphical output some deg left (only PXA LCD)
-vga [std|cirrus|vmware|qxl|xenfb|tcx|cg3|virtio|none]
                select video card type
-full-screen    start in full screen
-vnc <display>  shorthand for -display vnc=<display>
-no-acpi        disable ACPI
-smbios file=binary
                load SMBIOS entry from binary file
-smbios type=0[,vendor=str][,version=str][,date=str][,release=%d.%d]
              [,uefi=on|off]
                specify SMBIOS type 0 fields
-smbios type=1[,manufacturer=str][,product=str][,version=str][,serial=str]
              [,uuid=uuid][,sku=str][,family=str]
                specify SMBIOS type 1 fields
-smbios type=2[,manufacturer=str][,product=str][,version=str][,serial=str]
              [,asset=str][,location=str]
                specify SMBIOS type 2 fields
-smbios type=3[,manufacturer=str][,version=str][,serial=str][,asset=str]
              [,sku=str]
                specify SMBIOS type 3 fields
-smbios type=4[,sock_pfx=str][,manufacturer=str][,version=str][,serial=str]
              [,asset=str][,part=str]
                specify SMBIOS type 4 fields
-smbios type=17[,loc_pfx=str][,bank=str][,manufacturer=str][,serial=str]
               [,asset=str][,part=str][,speed=%d]
                specify SMBIOS type 17 fields

Network options:
-netdev user,id=str[,ipv4[=on|off]][,net=addr[/mask]][,host=addr]
         [,ipv6[=on|off]][,ipv6-net=addr[/int]][,ipv6-host=addr]
         [,restrict=on|off][,hostname=host][,dhcpstart=addr]
         [,dns=addr][,ipv6-dns=addr][,dnssearch=domain][,tftp=dir]
         [,bootfile=f][,hostfwd=rule][,guestfwd=rule]                configure a user mode network backend with ID 'str',
                its DHCP server and optional services
-netdev tap,id=str,ifname=name
                configure a host TAP network backend with ID 'str'
-netdev socket,id=str[,fd=h][,listen=[host]:port][,connect=host:port]
                configure a network backend to connect to another network
                using a socket connection
-netdev socket,id=str[,fd=h][,mcast=maddr:port[,localaddr=addr]]
                configure a network backend to connect to a multicast maddr and port
                use 'localaddr=addr' to specify the host address to send packets from
-netdev socket,id=str[,fd=h][,udp=host:port][,localaddr=host:port]
                configure a network backend to connect to another network
                using an UDP tunnel
-netdev hubport,id=str,hubid=n[,netdev=nd]
                configure a hub port on QEMU VLAN 'n'
--nic [tap|bridge|user|socket][,option][,...][mac=macaddr]
                initialize an on-board / default host NIC (using MAC address
                macaddr) and connect it to the given host network backend
--nic none      use it alone to have zero network devices (the default is to
                provided a 'user' network connection)
-net nic[,vlan=n][,netdev=nd][,macaddr=mac][,model=type][,name=str][,addr=str][,vectors=v]
                configure or create an on-board (or machine default) NIC and
                connect it either to VLAN 'n' or the netdev 'nd' (for pluggable
                NICs please use '-device devtype,netdev=nd' instead)
-net [user|tap|bridge|socket][,vlan=n][,option][,option][,...]
                old way to initialize a host network interface
                (use the -netdev option if possible instead)

Character device options:
-chardev help
-chardev null,id=id[,mux=on|off][,logfile=PATH][,logappend=on|off]
-chardev socket,id=id[,host=host],port=port[,to=to][,ipv4][,ipv6][,nodelay][,reconnect=seconds]
         [,server][,nowait][,telnet][,reconnect=seconds][,mux=on|off]
         [,logfile=PATH][,logappend=on|off][,tls-creds=ID] (tcp)
-chardev socket,id=id,path=path[,server][,nowait][,telnet][,reconnect=seconds]
         [,mux=on|off][,logfile=PATH][,logappend=on|off] (unix)
-chardev udp,id=id[,host=host],port=port[,localaddr=localaddr]
         [,localport=localport][,ipv4][,ipv6][,mux=on|off]
         [,logfile=PATH][,logappend=on|off]
-chardev msmouse,id=id[,mux=on|off][,logfile=PATH][,logappend=on|off]
-chardev vc,id=id[[,width=width][,height=height]][[,cols=cols][,rows=rows]]
         [,mux=on|off][,logfile=PATH][,logappend=on|off]
-chardev ringbuf,id=id[,size=size][,logfile=PATH][,logappend=on|off]
-chardev file,id=id,path=path[,mux=on|off][,logfile=PATH][,logappend=on|off]
-chardev pipe,id=id,path=path[,mux=on|off][,logfile=PATH][,logappend=on|off]
-chardev console,id=id[,mux=on|off][,logfile=PATH][,logappend=on|off]
-chardev serial,id=id,path=path[,mux=on|off][,logfile=PATH][,logappend=on|off]

Bluetooth(R) options:
-bt hci,null    dumb bluetooth HCI - doesn't respond to commands
-bt hci,host[:id]
                use host's HCI with the given name
-bt hci[,vlan=n]
                emulate a standard HCI in virtual scatternet 'n'
-bt vhci[,vlan=n]
                add host computer to virtual scatternet 'n' using VHCI
-bt device:dev[,vlan=n]
                emulate a bluetooth device 'dev' in scatternet 'n'

TPM device options:
-tpmdev passthrough,id=id[,path=path][,cancel-path=path]
                use path to provide path to a character device; default is /dev/tpm0
                use cancel-path to provide path to TPM's cancel sysfs entry; if
                not provided it will be searched for in /sys/class/misc/tpm?/device
-tpmdev emulator,id=id,chardev=dev
                configure the TPM device using chardev backend

Linux/Multiboot boot specific:
-kernel bzImage use 'bzImage' as kernel image
-append cmdline use 'cmdline' as kernel command line
-initrd file    use 'file' as initial ram disk
-dtb    file    use 'file' as device tree image

Debug/Expert options:
-fw_cfg [name=]<name>,file=<file>
                add named fw_cfg entry with contents from file
-fw_cfg [name=]<name>,string=<str>
                add named fw_cfg entry with contents from string
-serial dev     redirect the serial port to char device 'dev'
-parallel dev   redirect the parallel port to char device 'dev'
-monitor dev    redirect the monitor to char device 'dev'
-qmp dev        like -monitor but opens in 'control' mode
-qmp-pretty dev like -qmp but uses pretty JSON formatting
-mon [chardev=]name[,mode=readline|control][,pretty[=on|off]]
-debugcon dev   redirect the debug console to char device 'dev'
-pidfile file   write PID to 'file'
-singlestep     always run in singlestep mode
-S              freeze CPU at startup (use 'c' to start execution)
-realtime [mlock=on|off]
                run qemu with realtime features
                mlock=on|off controls mlock support (default: on)
-gdb dev        wait for gdb connection on 'dev'
-s              shorthand for -gdb tcp::1234
-d item1,...    enable logging of specified items (use '-d help' for a list of log items)
-D logfile      output log to logfile (default stderr)
-dfilter range,..  filter debug output to range of addresses (useful for -d cpu,exec,etc..)
-L path         set the directory for the BIOS, VGA BIOS and keymaps
-bios file      set the filename for the BIOS
-enable-kvm     enable KVM full virtualization support
-xen-domid id   specify xen guest domain id
-xen-create     create domain using xen hypercalls, bypassing xend
                warning: should not be used when xend is in use
-xen-attach     attach to existing xen domain
                xend will use this when starting QEMU
-xen-domid-restrict     restrict set of available xen operations
                        to specified domain id. (Does not affect
                        xenpv machine type).
-no-reboot      exit instead of rebooting
-no-shutdown    stop before shutdown
-loadvm [tag|id]
                start right away with a saved state (loadvm in monitor)
-option-rom rom load a file, rom, into the option ROM space
-rtc [base=utc|localtime|date][,clock=host|rt|vm][,driftfix=none|slew]
                set the RTC base and clock, enable drift fix for clock ticks (x86 only)
-icount [shift=N|auto][,align=on|off][,sleep=on|off,rr=record|replay,rrfile=<filename>,rrsnapshot=<snapshot>]
                enable virtual instruction counter with 2^N clock ticks per
                instruction, enable aligning the host and virtual clocks
                or disable real time cpu sleeping
-watchdog model
                enable virtual hardware watchdog [default=none]
-watchdog-action reset|shutdown|poweroff|inject-nmi|pause|debug|none
                action when watchdog fires [default=reset]
-echr chr       set terminal escape character instead of ctrl-a
-virtioconsole c
                set virtio console
-show-cursor    show cursor
-tb-size n      set TB size
-incoming tcp:[host]:port[,to=maxport][,ipv4][,ipv6]
-incoming rdma:host:port[,ipv4][,ipv6]
-incoming unix:socketpath
                prepare for incoming migration, listen on
                specified protocol and socket address
-incoming fd:fd
-incoming exec:cmdline
                accept incoming migration on given file descriptor
                or from given external command
-incoming defer
                wait for the URI to be specified via migrate_incoming
-only-migratable     allow only migratable devices
-nodefaults     don't create default devices
-semihosting    semihosting mode
-semihosting-config [enable=on|off][,target=native|gdb|auto][,arg=str[,...]]
                semihosting configuration
-old-param      old param mode
-sandbox on[,obsolete=allow|deny][,elevateprivileges=allow|deny|children]
          [,spawn=allow|deny][,resourcecontrol=allow|deny]
                Enable seccomp mode 2 system call filter (default 'off').
                use 'obsolete' to allow obsolete system calls that are provided
                    by the kernel, but typically no longer used by modern
                    C library implementations.
                use 'elevateprivileges' to allow or deny QEMU process to elevate
                    its privileges by blacklisting all set*uid|gid system calls.
                    The value 'children' will deny set*uid|gid system calls for
                    main QEMU process but will allow forks and execves to run unprivileged
                use 'spawn' to avoid QEMU to spawn new threads or processes by
                     blacklisting *fork and execve
                use 'resourcecontrol' to disable process affinity and schedular priority
-readconfig <file>
-writeconfig <file>
                read/write config file
-no-user-config
                do not load default user-provided config files at startup
-trace-unassigned
                Trace unassigned memory or i/o accesses
-trace [[enable=]<pattern>][,events=<file>][,file=<file>]
                specify tracing options
-msg timestamp[=on|off]
                change the format of messages
                on|off controls leading timestamps (default:on)
-dump-vmstate <file>
                Output vmstate information in JSON format to file.
                Use the scripts/vmstate-static-checker.py file to
                check for possible regressions in migration code
                by comparing two such vmstate dumps.

Generic object creation:
-object TYPENAME[,PROP1=VALUE1,...]
                create a new object of type TYPENAME setting properties
                in the order they are specified.  Note that the 'id'
                property must be set.  These objects are placed in the
                '/objects' path.

During emulation, the following keys are useful:
ctrl-alt-f      toggle full screen
ctrl-alt-n      switch to virtual console 'n'
ctrl-alt        toggle mouse and keyboard grab

When using -nographic, press 'ctrl-a h' to get some help.

See <https://qemu.org/contribute/report-a-bug> for how to report bugs.
More information on the QEMU project at <https://qemu.org>.
C:> qemu-system-arm.exe -M help
Supported machines are:
akita                Sharp SL-C1000 (Akita) PDA (PXA270)
ast2500-evb          Aspeed AST2500 EVB (ARM1176)
bast                 Simtec Electronics BAST (S3C2410A, ARM920T)
borzoi               Sharp SL-C3100 (Borzoi) PDA (PXA270)
canon-a1100          Canon PowerShot A1100 IS
cheetah              Palm Tungsten|E aka. Cheetah PDA (OMAP310)
collie               Sharp SL-5500 (Collie) PDA (SA-1110)
connex               Gumstix Connex (PXA255)
cubieboard           cubietech cubieboard
emcraft-sf2          SmartFusion2 SOM kit from Emcraft (M2S010)
highbank             Calxeda Highbank (ECX-1000)
imx25-pdk            ARM i.MX25 PDK board (ARM926)
integratorcp         ARM Integrator/CP (ARM926EJ-S)
kzm                  ARM KZM Emulation Baseboard (ARM1136)
lm3s6965evb          Stellaris LM3S6965EVB
lm3s811evb           Stellaris LM3S811EVB
mainstone            Mainstone II (PXA27x)
mcimx7d-sabre        Freescale i.MX7 DUAL SABRE (Cortex A7)
midway               Calxeda Midway (ECX-2000)
mps2-an385           ARM MPS2 with AN385 FPGA image for Cortex-M3
mps2-an505           ARM MPS2 with AN505 FPGA image for Cortex-M33
mps2-an511           ARM MPS2 with AN511 DesignStart FPGA image for Cortex-M3
musicpal             Marvell 88w8618 / MusicPal (ARM926EJ-S)
n800                 Nokia N800 tablet aka. RX-34 (OMAP2420)
n810                 Nokia N810 tablet aka. RX-44 (OMAP2420)
netduino2            Netduino 2 Machine
none                 empty machine
nuri                 Samsung NURI board (Exynos4210)
palmetto-bmc         OpenPOWER Palmetto BMC (ARM926EJ-S)
raspi2               Raspberry Pi 2
realview-eb          ARM RealView Emulation Baseboard (ARM926EJ-S)
realview-eb-mpcore   ARM RealView Emulation Baseboard (ARM11MPCore)
realview-pb-a8       ARM RealView Platform Baseboard for Cortex-A8
realview-pbx-a9      ARM RealView Platform Baseboard Explore for Cortex-A9
romulus-bmc          OpenPOWER Romulus BMC (ARM1176)
sabrelite            Freescale i.MX6 Quad SABRE Lite Board (Cortex A9)
smdk2443             smdk2443 (ARM920-T)
smdkc210             Samsung SMDKC210 board (Exynos4210)
spitz                Sharp SL-C3000 (Spitz) PDA (PXA270)
sx1                  Siemens SX1 (OMAP310) V2
sx1-v1               Siemens SX1 (OMAP310) V1
terrier              Sharp SL-C3200 (Terrier) PDA (PXA270)
tosa                 Sharp SL-6000 (Tosa) PDA (PXA255)
tt                   OpenTom (ARM920-T)
tt666                OpenTom (ARM920-T)
verdex               Gumstix Verdex (PXA270)
versatileab          ARM Versatile/AB (ARM926EJ-S)
versatilepb          ARM Versatile/PB (ARM926EJ-S)
vexpress-a15         ARM Versatile Express for Cortex-A15
vexpress-a9          ARM Versatile Express for Cortex-A9
virt-2.10            QEMU 2.10 ARM Virtual Machine
virt-2.11            QEMU 2.11 ARM Virtual Machine
virt                 QEMU 2.12 ARM Virtual Machine (alias of virt-2.12)
virt-2.12            QEMU 2.12 ARM Virtual Machine
virt-2.6             QEMU 2.6 ARM Virtual Machine
virt-2.7             QEMU 2.7 ARM Virtual Machine
virt-2.8             QEMU 2.8 ARM Virtual Machine
virt-2.9             QEMU 2.9 ARM Virtual Machine
xilinx-zynq-a9       Xilinx Zynq Platform Baseboard for Cortex-A9
z2                   Zipit Z2 (PXA27x)
C:> qemu-system-arm.exe -cpu help
qemu-system-arm.exe: No machine specified, and there is no default
Use -machine help to list supported machines
Tags: [Raspberry Pi], [電子工作]
●関連するコンテンツ(この記事を読んだ人は、次の記事も読んでいます)
FWinSdCardImager SDカード イメージ書き込みアプリ、ラズパイの Raspbian OS、Jetson Nanoの Ubuntuの書き込みに便利
ラズパイや Jetson Nano等のワンボードマイコン等への OSイメージの書き込みが簡単にできる
FWinPiFinder ラズベリーパイ IPアドレス発見アプリ。ARPコマンドでラズパイの IPアドレスを探索発見する
Raspberry Piや NVIDIA Jetson Nano等の IPアドレスを MACアドレスの OUI部分を使用して発見する
Raspberry Pi 3系のトラブルであるある第一位の電源トラブル、低電圧警報に関する情報のまとめ
ラズパイ3B系での低電圧警報に関する情報まとめ、コマンドラインやログファイルから低電圧を検知する方法
Raspberry Piで CPUの脆弱性 Spectreと Meltdownの脆弱性をチェックする方法
ラズパイで 2018年初頭に大騒ぎになったスペクターとメルトダウンの CPUの脆弱性をチェックする方法
Raspberry Pi Zero Wを海外通販の Pimoroni等での購入方法、購入できる通販ショップ一覧まとめ
ラズパイゼロW ワイヤレスモデルを海外通販でサクッと簡単に個人輸入で入手。技適通過でも国内販売は常に品切れ
Raspberry Pi 3で安定して使える相性の無い最適な microSDカードの種類のまとめ
ラズパイ3で安定して使える microSDカードを購入する Teamと SanDiskは絶対に買わない
Raspberry Pi 3 Model Bに専用カメラモジュール RaspiCamを接続する方法
ラズパイに専用カメラモジュールを接続して Raspbianで写真の静止画撮影や動画を録画する方法
Raspberry Pi 3の Linuxコンソール上で使用する各種コマンドまとめ
ラズパイの Raspbian OSのコマンドラインで使用する便利コマンド、負荷試験や CPUシリアル番号の確認方法等も
Raspberry Pi 3公式フォーラムの FAQの内容の日本語訳
ラズパイ公式フォーラムの「The Raspberry Pi 3 Model B Q&A thread」の日本語訳
Raspberry Pi 3で GPIO端子の I2C機能を有効化する方法
ラズパイ3の GPIO端子の I2C機能を有効にして各種センサーを繋げる方法まとめ
大人気の CPUボード、Raspberry Pi 3 Model Bで作ってみよう
Raspberry Piの開発環境の構築やタッチパネル付き液晶ディスプレイや各種センサーの使い方まとめ
Raspberry Pi関連はこちらへまとめました
下記以外にも多数のラズパイ関係の記事が有ります。
(I2C制御、GPIO制御、1-Wire制御、シリアル通信、日本語音声合成、日本語音声認識、中国語音声合成、MeCab 形態素解析エンジン、赤外線リモコン制御、秋月 I2C液晶モジュール、KeDei 3.5インチ液晶、HDMI 5インチ液晶、NFCカードリーダ、コマンドライン操作方法等)
Espressif ESP8266 Arduino互換でスケッチが使える ESP-12Eモジュール基板
Espressif ESP8266 ESP-12-E NodeMCU V1 ESP12 CP2102
BangGood通販はドローン以外にも面白い商品がまだまだ有った(電子工作編)
レーザー彫刻機、カラー液晶の DIYオシロ、Arduinoや Raspberry Pi用の小型カラー液晶
[HOME]
|
[BACK]
リンクフリー(連絡不要、ただしトップページ以外は Web構成の変更で移動する場合があります)
Copyright (c)
2018 FREE WING,Y.Sakamoto
Powered by 猫屋敷工房 & HTML Generator
http://www.neko.ne.jp/~freewing/raspberry_pi/raspberry_pi_windows_qemu_raspbian_os/