・2016/12/31
 Raspberry Pi3で Tor WiFi AP(トーア、匿名通信システム)をインストールする
(Raspbian Jessieの新版で The Onion Routerをインストールして匿名通信 WiFiアクセスポイントとして動かす)
Tags: [Raspberry Pi], [電子工作]
● Raspberry Pi 3 Model Bを遂に購入
Raspberry Pi3 Model B RPI2 RPI3
大人気の CPUボードの Raspberry Piに WiFiと Bluetoothが搭載されたモデルが新発売となりました。
以前から Raspberry Pi 2を買おうかどうか迷っていましたが、Raspberry Pi 3 Model Bの発売を機に購入を決意してラズベリアンになる事にしました。
※ ラズパイの OS Raspbianはバージョンが上がる毎に過去の版と OSの内部の作りが変わり、過去に書かれた製作記事(例えば Raspbian Wheezyの時代の記事)がそのままではエラーが出たりして動かない事が有ります。
※ 当方のホームページのラズパイ記事は全て Raspberry Pi 3 Model Bと Raspbian Jessieの組み合わせで動作確認をしております。
(ただし、将来的に新しい Raspbian OSが出た場合に、当方の Raspbian Jessieを基にした内容がそのままでは動かない可能性が有ります。)
※ 2017/08/16から Raspbian OSは Raspbian Jessieから Raspbian Stretchに変わりました。
※ 2019/06/20から Raspbian OSは Raspbian Stretchから Raspbian Busterに変わりました。
Download Raspbian for Raspberry Pi
ちなみに、歴代のバージョンと名称は
| Debian | コードネーム | 年月 | 備考 | (参考)Ubuntuでの該当名称 |
| Debian 11 | Bullseye | 2021/08/14~ | 2021/11からラズパイにリリース | Focal Fossa 20.04 LTS ? |
| Debian 10 | Buster | 2019/06/20~ | 2019/06からラズパイ4対応 | Bionic 18.04 LTS |
| Debian 9 | Stretch | 2017/08/16~ | 2018/03からラズパイ3B+対応 | Xenial 16.04 LTS |
| Debian 8 | Jessie | 2015~ | 2016/02からラズパイ3対応 | Trusty 14.04 LTS |
| Debian 7 | Wheezy | 2013~2016 | | |
| Debian 6.0 | Squeeze | 2011~2014 | | |
| Debian GNU/Linux 5.0 | Lenny | 2009~2012 | | |
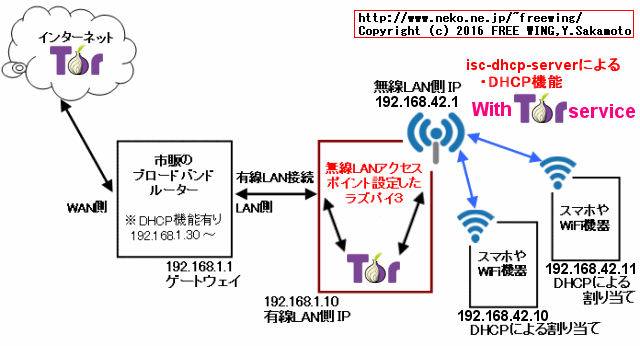
● Raspberry Pi3を Torルーター WiFiアクセスポイント(Onion Pi WiFi AP)として設定する方法 isc-dhcp-server編
Raspberry Pi3を Torルーター機能付き WiFiアクセスポイント(Onion Pi WiFi AP)として設定する方法。
2015年12月24日 20時00分00秒 匿名通信「Tor」はどういう仕組みなのか分かりやすく解説
2014年07月22日 21時00分23秒 匿名通信システム「Tor」を使うのに知っておくべき7つのこと
パッケージ: tor (0.2.5.12-4)
anonymizing overlay network for TCP
Tor on Debian stable, Debian sid, or Debian testing
● Option 1:
sudo apt-get install tor
● Option 2:
sudo nano /etc/apt/sources.list
# Add the following entry
deb http://deb.torproject.org/torproject.org jessie main
deb-src http://deb.torproject.org/torproject.org jessie main

# Add the gpg key
gpg --keyserver keys.gnupg.net --recv A3C4F0F979CAA22CDBA8F512EE8CBC9E886DDD89
gpg --export A3C4F0F979CAA22CDBA8F512EE8CBC9E886DDD89 | sudo apt-key add -

# apt-get
sudo apt-get -y update
sudo apt-get -y install build-essential fakeroot devscripts
sudo apt-get -y build-dep tor deb.torproject.org-keyring

# Build Tor
mkdir ~/debian-packages; cd ~/debian-packages
# tor-0.2.9.9
apt-get source tor
# ~/debian-packages/tor-0.2.9.9
cd tor-*
debuild -rfakeroot -uc -us
cd ..

# Install the new package Tor
sudo dpkg -i tor_*.deb
● Raspberry Pi3を Torルーター(Onion Pi)として設定する方法 isc-dhcp-server編
Raspberry Pi3の WiFi無線 LANを無線LANアクセスポイントとして設定して、Torをインストールして Torルーターとしてセットアップします。
下記の設定方法は最新の Raspberry Pi3の RASPBIAN JESSIE OSに対応しています。(動作確認済み 2016/12)
RASPBIAN JESSIE download
Full desktop image based on Debian Jessie
RASPBIAN JESSIE WITH PIXEL
Image with PIXEL desktop based on Debian Jessie
Version: November 2016
Release date: 2016-11-25
Kernel version: 4.4
・Raspberry Pi3を Torルーター WiFiアクセスポイントとして設定する方法

●まずはラズパイを通常の WiFiアクセスポイントとして動作する様にします
Adafruitの解説を元に設定します。
Setting up a Raspberry Pi as a WiFi access point
Make the most adorable little WiFi router
ping 8.8.8.8
ping 208.67.222.222
ifconfig -a
netstat -r
sudo apt-get update
# hostapdと isc-dhcp-serverをインストール
sudo apt-get install -y hostapd isc-dhcp-server
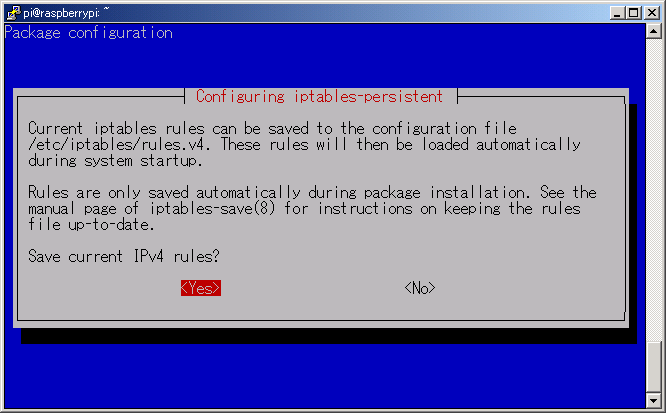
# Configuring iptables-persistent
sudo apt-get install -y iptables-persistent
# Save current IPv4 rules? - Yes (/etc/iptables/rules.v4)
# Save current IPv6 rules? - Yes (/etc/iptables/rules.v6)
・Save current IPv4 rules? - Yes (/etc/iptables/rules.v4)
・Save current IPv6 rules? - Yes (/etc/iptables/rules.v6)
sudo nano /etc/dhcp/dhcpd.conf

# Comment
#option domain-name "example.org";
#option domain-name-servers ns1.example.org, ns2.example.org;

# Un-Comment
authoritative;

# Add
subnet 192.168.42.0 netmask 255.255.255.0 {
	range 192.168.42.10 192.168.42.50;
	option broadcast-address 192.168.42.255;
	option routers 192.168.42.1;
	default-lease-time 600;
	max-lease-time 7200;
	option domain-name "local";
	option domain-name-servers 8.8.8.8, 8.8.4.4;
}

# Add お好みでこっち DNS設定 OpenDNS
subnet 192.168.42.0 netmask 255.255.255.0 {
	range 192.168.42.10 192.168.42.50;
	option broadcast-address 192.168.42.255;
	option routers 192.168.42.1;
	default-lease-time 600;
	max-lease-time 7200;
	option domain-name "local";
	option domain-name-servers 208.67.222.222, 208.67.220.220;
}
sudo nano /etc/default/isc-dhcp-server

INTERFACES="wlan0"
sudo ifdown wlan0
sudo nano /etc/network/interfaces

#auto wlan0
#iface wlan0 inet manual
#    wpa-conf /etc/wpa_supplicant/wpa_supplicant.conf

iface wlan0 inet static
  address 192.168.42.1
  netmask 255.255.255.0
sudo ifconfig wlan0 192.168.42.1
hostapd.conf
sudo nano /etc/hostapd/hostapd.conf

interface=wlan0
driver=nl80211
ssid=Pi_AP
country_code=US
hw_mode=g
channel=6
macaddr_acl=0
auth_algs=1
ignore_broadcast_ssid=0
wpa=2
wpa_passphrase=Raspberry
wpa_key_mgmt=WPA-PSK
wpa_pairwise=CCMP
wpa_group_rekey=86400
ieee80211n=1
wme_enabled=1
SSID: Pi_AP
PASSWORD: Raspberry
暗号化: WPA2 PSK AES
※ Raspberry Pi 3の場合は hostapd.confの driverには nl80211を指定して、driver=nl80211と設定します。
hostapdで Raspberry Pi 3に内蔵の WiFiを使用する場合は下記は無関係ですが、参考の為に書いておきます。
driver=rtl871xdrvは USB接続の WiFiアダプタの一部の品種で指定します。
また、RTL8192CU 8192cuベースの場合は 8192cuに対応した hostapdをインストールする必要が有ります。(上記の Adafruitの手順)
http://www.adafruit.com/downloads/adafruit_hostapd.zip
hostapd
sudo nano /etc/default/hostapd

DAEMON_CONF="/etc/hostapd/hostapd.conf"
sudo nano /etc/sysctl.conf

net.ipv4.ip_forward=1
sudo sh -c "echo 1 > /proc/sys/net/ipv4/ip_forward"
sudo reboot
 この状態で下記を実行すれば単純な WiFiアクセスポイントとして使用できます。

# isc-dhcp-server + iptables WiFi Access point
sudo iptables -F
sudo iptables -t nat -F

sudo sysctl -w net.ipv4.ip_forward=1
sudo iptables -t nat -A POSTROUTING -s 192.168.42.0/24 -o eth0 -j MASQUERADE

sudo iptables -t nat -L

sudo sh -c "iptables-save > /etc/iptables.ipv4.nat"
●その次に Tor(The Onion Router)をラズパイにインストールします
Onion Pi
Make a Raspberry Pi into a Anonymizing Tor Proxy!
Torのインストール自体は超簡単!
● Step 1. Torのインストール
sudo apt-get update
sudo apt-get -y install tor
● Step 2. Torの設定を行ないます。
sudo nano /etc/tor/torrc

Log notice file /var/log/tor/notices.log
VirtualAddrNetwork 10.192.0.0/10
AutomapHostsSuffixes .onion,.exit
AutomapHostsOnResolve 1
TransPort 9040
TransListenAddress 192.168.42.1
DNSPort 53
DNSListenAddress 192.168.42.1
# SSIDを Pi_APから Onion_Piに変更する(変更しなくても良い)
sudo nano /etc/hostapd/hostapd.conf

# ssid=Pi_AP
ssid=Onion_Pi
SSID: Onion_Pi
PASSWORD: Raspberry
sudo iptables -F
sudo iptables -t nat -F

sudo iptables -t nat -A PREROUTING -i wlan0 -p tcp --dport 22 -j REDIRECT --to-ports 22
sudo iptables -t nat -A PREROUTING -i wlan0 -p udp --dport 53 -j REDIRECT --to-ports 53
sudo iptables -t nat -A PREROUTING -i wlan0 -p tcp --syn -j REDIRECT --to-ports 9040

sudo iptables -t nat -L

sudo sh -c "iptables-save > /etc/iptables.ipv4.nat"
# iptablesの設定を確認する
$ sudo iptables -t nat -L
Chain PREROUTING (policy ACCEPT)
target     prot opt source               destination
REDIRECT   tcp  --  anywhere             anywhere             tcp dpt:ssh redir ports 22
REDIRECT   udp  --  anywhere             anywhere             udp dpt:domain redir ports 53
REDIRECT   tcp  --  anywhere             anywhere             tcp flags:FIN,SYN,RST,ACK/SYN redir ports 9040

Chain INPUT (policy ACCEPT)
target     prot opt source               destination

Chain OUTPUT (policy ACCEPT)
target     prot opt source               destination

Chain POSTROUTING (policy ACCEPT)
target     prot opt source               destination
sudo nano /etc/network/interfaces

pre-up iptables-restore < /etc/iptables.ipv4.nat
sudo touch /var/log/tor/notices.log
sudo chown debian-tor /var/log/tor/notices.log
sudo chmod 644 /var/log/tor/notices.log
sudo update-rc.d tor enable
$ which tor
/usr/local/bin/tor

$ ls -l  /usr/bin/tor
-rwxr-xr-x 1 root root 1731428 Dec 20 16:30 /usr/bin/tor
sudo reboot
sudo service tor start

sudo service tor status

Jan 29 05:49:05.655 [notice] Tor v0.2.5.12 (git-6350e21f2de7272f) running on Linux with Libevent 2.0.21-stable, OpenSSL 1.0.1t and Zlib 1.2.8.
Jan 29 05:49:05.655 [notice] Tor can't help you if you use it wrong! Learn how to be safe at https://www.torproject.org/download/download#warning
Jan 29 05:49:05.656 [notice] Read configuration file "/etc/tor/torrc".
・Raspberry Pi3を Torルーター(Onion Pi)として設定する方法
IP address information inet-ip.info
にアクセスして IPアドレスや Host Nameが Tor(接続しているプロバイダ以外)になっている事を確認します。
その他のグローバル IPアドレスの確認用サイト
httpbin(1): HTTP Request & Response Service
せっかく環境変数 env check
● Raspberry Pi3で Torをソースリストからビルドする方法
サービスとして実行する方法。
Tor on Debian stable, Debian sid, or Debian testing
の Option 2の手順を実行します。
その後、上記の Step 2. Torの設定から行ないます。
2017/02/04 現在 Tor 0.2.9.9 (git-1d8323c042800718)
● Option 2: Raspberry Pi3で Torをソースリストからビルドする方法
sudo nano /etc/apt/sources.list
# Add the following entry
deb http://deb.torproject.org/torproject.org jessie main
deb-src http://deb.torproject.org/torproject.org jessie main

# Add the gpg key
gpg --keyserver keys.gnupg.net --recv A3C4F0F979CAA22CDBA8F512EE8CBC9E886DDD89
gpg --export A3C4F0F979CAA22CDBA8F512EE8CBC9E886DDD89 | sudo apt-key add -

# apt-get
sudo apt-get -y update
sudo apt-get -y install build-essential fakeroot devscripts
sudo apt-get -y build-dep tor deb.torproject.org-keyring

# Build Tor
mkdir ~/debian-packages; cd ~/debian-packages
# tor-0.2.9.9
apt-get source tor
# ~/debian-packages/tor-0.2.9.9
cd tor-*
debuild -rfakeroot -uc -us
cd ..

# ls -l *.deb
# -rw-r--r-- 1 pi pi 1388876 Feb  4 08:24 tor_0.2.9.9-1~d80.jessie+1_armhf.deb
# -rw-r--r-- 1 pi pi 2767244 Feb  4 08:24 tor-dbg_0.2.9.9-1~d80.jessie+1_armhf.deb
# -rw-r--r-- 1 pi pi 1050600 Feb  4 08:24 tor-geoipdb_0.2.9.9-1~d80.jessie+1_all.deb

# Install the new package Tor
sudo dpkg -i tor_*.deb

# sudo dpkg -i tor_*.deb
# Selecting previously unselected package tor.
# (Reading database ... 127768 files and directories currently installed.)
# Preparing to unpack tor_0.2.9.9-1~d80.jessie+1_armhf.deb ...
# Unpacking tor (0.2.9.9-1~d80.jessie+1) ...
# Setting up tor (0.2.9.9-1~d80.jessie+1) ...
# Something or somebody made /var/lib/tor disappear.
# Creating one for you again.
# Something or somebody made /var/log/tor disappear.
# Creating one for you again.
# Processing triggers for systemd (215-17+deb8u6) ...
# Processing triggers for man-db (2.7.0.2-5) ...

$ which tor
/usr/sbin/tor

$ ls -l /usr/sbin/tor
lrwxrwxrwx 1 root root 10 Feb  4 08:23 /usr/sbin/tor -> ../bin/tor

$ ls -l /usr/bin/tor
-rwxr-xr-x 1 root root 2348224 Feb  4 08:24 /usr/bin/tor
● Raspberry Pi3で Torをソースリストからビルドする方法
サービスとして実行する方法が不明。
※ この方法はアプリからプロクシとして使用する方法みたいです。
https://gitweb.torproject.org/tor.git/tree/
https://gitweb.torproject.org/tor.git/tree/INSTALL
sudo apt-get install -y git build-essential automake libevent-dev libssl-dev

cd
# https://gitweb.torproject.org/tor.git
# git clone -b master https://git.torproject.org/tor.git
# git clone -b release-0.2.9 https://git.torproject.org/tor.git
# https://git.torproject.org/debian/tor.git
git clone -b debian-0.2.9 https://git.torproject.org/debian/tor.git

cd tor

./autogen.sh

./configure --disable-asciidoc


make

sudo make install

$ which tor
/usr/local/bin/tor

$ ls -l /usr/local/bin/tor
-rwxr-xr-x 1 root staff 7658092 Jan 29 06:29 /usr/local/bin/tor
git clone -b debian-0.2.9 https://git.torproject.org/debian/tor.git
 の場合、
./configure
 だと失敗するので
./configure --disable-asciidoc
 とする。

checking whether the compiler accepts -Wzero-length-array... no
==================================

Building Tor has failed since manpages cannot be built.

You need asciidoc installed to be able to build the manpages.
To build without manpages, use the --disable-asciidoc argument
when calling configure.

==================================
Tags: [Raspberry Pi], [電子工作]
●関連するコンテンツ(この記事を読んだ人は、次の記事も読んでいます)
FWinSdCardImager SDカード イメージ書き込みアプリ、ラズパイの Raspbian OS、Jetson Nanoの Ubuntuの書き込みに便利
ラズパイや Jetson Nano等のワンボードマイコン等への OSイメージの書き込みが簡単にできる
FWinPiFinder ラズベリーパイ IPアドレス発見アプリ。ARPコマンドでラズパイの IPアドレスを探索発見する
Raspberry Piや NVIDIA Jetson Nano等の IPアドレスを MACアドレスの OUI部分を使用して発見する
Raspberry Pi 3系のトラブルであるある第一位の電源トラブル、低電圧警報に関する情報のまとめ
ラズパイ3B系での低電圧警報に関する情報まとめ、コマンドラインやログファイルから低電圧を検知する方法
Raspberry Piで CPUの脆弱性 Spectreと Meltdownの脆弱性をチェックする方法
ラズパイで 2018年初頭に大騒ぎになったスペクターとメルトダウンの CPUの脆弱性をチェックする方法
Raspberry Pi Zero Wを海外通販の Pimoroni等での購入方法、購入できる通販ショップ一覧まとめ
ラズパイゼロW ワイヤレスモデルを海外通販でサクッと簡単に個人輸入で入手。技適通過でも国内販売は常に品切れ
Raspberry Pi 3で安定して使える相性の無い最適な microSDカードの種類のまとめ
ラズパイ3で安定して使える microSDカードを購入する Teamと SanDiskは絶対に買わない
Raspberry Pi 3 Model Bに専用カメラモジュール RaspiCamを接続する方法
ラズパイに専用カメラモジュールを接続して Raspbianで写真の静止画撮影や動画を録画する方法
Raspberry Pi 3の Linuxコンソール上で使用する各種コマンドまとめ
ラズパイの Raspbian OSのコマンドラインで使用する便利コマンド、負荷試験や CPUシリアル番号の確認方法等も
Raspberry Pi 3公式フォーラムの FAQの内容の日本語訳
ラズパイ公式フォーラムの「The Raspberry Pi 3 Model B Q&A thread」の日本語訳
Raspberry Pi 3で GPIO端子の I2C機能を有効化する方法
ラズパイ3の GPIO端子の I2C機能を有効にして各種センサーを繋げる方法まとめ
大人気の CPUボード、Raspberry Pi 3 Model Bで作ってみよう
Raspberry Piの開発環境の構築やタッチパネル付き液晶ディスプレイや各種センサーの使い方まとめ
Raspberry Pi関連はこちらへまとめました
下記以外にも多数のラズパイ関係の記事が有ります。
(I2C制御、GPIO制御、1-Wire制御、シリアル通信、日本語音声合成、日本語音声認識、中国語音声合成、MeCab 形態素解析エンジン、赤外線リモコン制御、秋月 I2C液晶モジュール、KeDei 3.5インチ液晶、HDMI 5インチ液晶、NFCカードリーダ、コマンドライン操作方法等)
Espressif ESP8266 Arduino互換でスケッチが使える ESP-12Eモジュール基板
Espressif ESP8266 ESP-12-E NodeMCU V1 ESP12 CP2102
BangGood通販はドローン以外にも面白い商品がまだまだ有った(電子工作編)
レーザー彫刻機、カラー液晶の DIYオシロ、Arduinoや Raspberry Pi用の小型カラー液晶
[HOME]
|
[BACK]
リンクフリー(連絡不要、ただしトップページ以外は Web構成の変更で移動する場合があります)
Copyright (c)
2016 FREE WING,Y.Sakamoto
Powered by 猫屋敷工房 & HTML Generator
http://www.neko.ne.jp/~freewing/raspberry_pi/raspberry_pi_3_tor_anonymous_proxy/