CMU-Perceptual-Computing-Lab/openpose
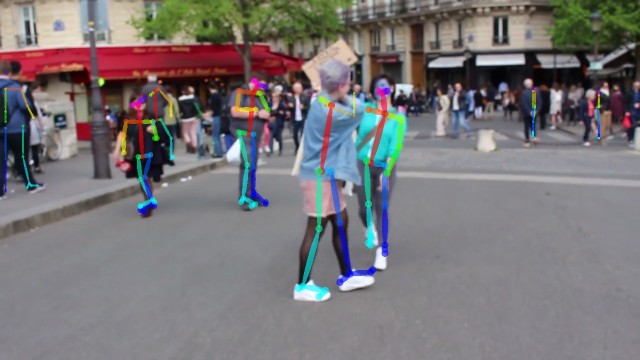
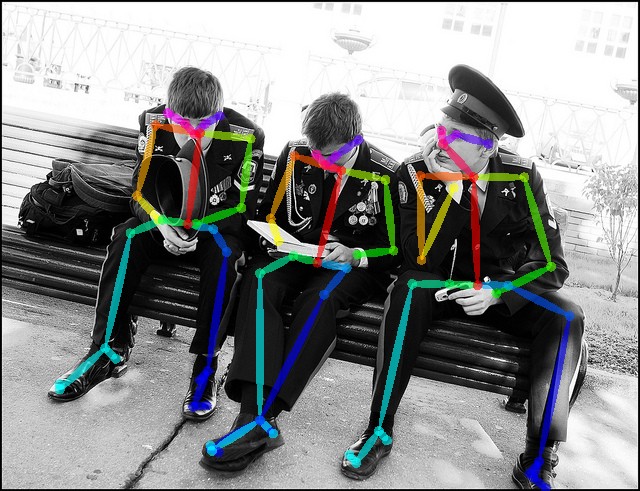
OpenPose represents the first real-time multi-person system to jointly detect human body, hand, facial, and foot keypoints (in total 135 keypoints) on single images.
ラズパイでは不可能だった OpenPoseを NVIDIA Jetson Nanoで動かします。
OpenPoseを動かすのに必要なリソース
・CUDA (Nvidia GPU) version
・GPU memory 1.6 GB
・空きメモリ 2.5 GB BODY_25 model
・空きメモリ 2.0 GB COCO model
・リソースの低減策 MPI and MPI_4 modelsを使用する
・--net_resolutionや scale_numberを使用して使用メモリを制限する
●今回動かした NVIDIA Jetson Nanoの Ubuntu OSのバージョン
user@user-desktop:~$ uname -a
Linux user-desktop 4.9.140-tegra #1 SMP PREEMPT Wed Mar 13 00:32:22 PDT 2019 aarch64 aarch64 aarch64 GNU/Linux
# CMake v3.17.3のビルド
# OpenPoseのビルドには最新の cmakeが必要なので cmakeをビルドする
# 上の記事を参照

# お決まりの sudo apt-get updateで最新状態に更新する
sudo apt-get update

# cmakeは入れない事!
sudo apt-get -y install git

# user@user-desktop:~$ cmake --version
# cmake version 3.10.2
# apt-get installの cmakeのバージョンは OpenPoseのビルドでエラーが出る
# CMake Error: The following variables are used in this project, but they are set to NOTFOUND.

# 動画を mp4形式で書き出す場合に FFmpegが必要
sudo apt-get -y install ffmpeg

# cmakeのバージョン確認
cmake --version
# cmake version 3.17.3
# CMake suite maintained and supported by Kitware (kitware.com/cmake).
# OpenPoseのビルド

# OpenPoseのソースリストをダウンロードする
cd
git clone https://github.com/CMU-Perceptual-Computing-Lab/openpose

cd
cd openpose
sudo bash ./scripts/ubuntu/install_deps.sh
mkdir build
cd build
cmake ..
make clean
# 4コアでビルドで時間短縮(30分)
time make -j4

# [100%] Linking CXX shared library libopenpose_wrapper.so
# [100%] Built target openpose_wrapper
# Built target openpose_lib
# real    29m30.898s
# user    85m27.724s
# sys     5m29.784s

sudo make install
● NVIDIA Jetson Nanoで OpenPoseを最適化して高速化する方法
NVIDIA環境用に OpenPoseを最適化して高速化する方法。
OpenPoseの Optional Settingsの所に書いて有る下記の項目。
・COCO and MPI Modelsを使用する
通常の設定ではダウンロードしないので、下記の設定を行なう必要が有る。
user@user-desktop:~/openpose$ ./build/examples/openpose/openpose.bin -help

openpose.bin: Warning: SetUsageMessage() never called

  Flags from /build/gflags-npgYqN/gflags-2.2.1/src/gflags.cc:
    -flagfile (load flags from file) type: string default: ""
    -fromenv (set flags from the environment [use 'export FLAGS_flag1=value'])
      type: string default: ""
    -tryfromenv (set flags from the environment if present) type: string
      default: ""
    -undefok (comma-separated list of flag names that it is okay to specify on
      the command line even if the program does not define a flag with that
      name.  IMPORTANT: flags in this list that have arguments MUST use the
      flag=value format) type: string default: ""

  Flags from /build/gflags-npgYqN/gflags-2.2.1/src/gflags_completions.cc:
    -tab_completion_columns (Number of columns to use in output for tab
      completion) type: int32 default: 80
    -tab_completion_word (If non-empty, HandleCommandLineCompletions() will
      hijack the process and attempt to do bash-style command line flag
      completion on this value.) type: string default: ""

  Flags from /build/gflags-npgYqN/gflags-2.2.1/src/gflags_reporting.cc:
    -help (show help on all flags [tip: all flags can have two dashes])
      type: bool default: false currently: true
    -helpfull (show help on all flags -- same as -help) type: bool
      default: false
    -helpmatch (show help on modules whose name contains the specified substr)
      type: string default: ""
    -helpon (show help on the modules named by this flag value) type: string
      default: ""
    -helppackage (show help on all modules in the main package) type: bool
      default: false
    -helpshort (show help on only the main module for this program) type: bool
      default: false
    -helpxml (produce an xml version of help) type: bool default: false
    -version (show version and build info and exit) type: bool default: false


  Flags from /home/user/openpose/include/openpose/flags.hpp:
    -3d (Running OpenPose 3-D reconstruction demo: 1) Reading from a stereo
      camera system. 2) Performing 3-D reconstruction from the multiple views.
      3) Displaying 3-D reconstruction results. Note that it will only display
      1 person. If multiple people is present, it will fail.) type: bool
      default: false
    -3d_min_views (Minimum number of views required to reconstruct each
      keypoint. By default (-1), it will require max(2, min(4, #cameras-1))
      cameras to see the keypoint in order to reconstruct it.) type: int32
      default: -1
    -3d_views (Complementary option for `--image_dir` or `--video`. OpenPose
      will read as many images per iteration, allowing tasks such as stereo
      camera processing (`--3d`). Note that `--camera_parameter_path` must be
      set. OpenPose must find as many `xml` files in the parameter folder as
      this number indicates.) type: int32 default: -1
    -alpha_heatmap (Blending factor (range 0-1) between heatmap and original
      frame. 1 will only show the heatmap, 0 will only show the frame. Only
      valid for GPU rendering.) type: double default: 0.69999999999999996
    -alpha_pose (Blending factor (range 0-1) for the body part rendering. 1
      will show it completely, 0 will hide it. Only valid for GPU rendering.)
      type: double default: 0.59999999999999998
    -body (Select 0 to disable body keypoint detection (e.g., for faster but
      less accurate face keypoint detection, custom hand detector, etc.), 1
      (default) for body keypoint estimation, and 2 to disable its internal
      body pose estimation network but still still run the greedy association
      parsing algorithm) type: int32 default: 1
    -caffemodel_path (The combination `--model_folder` + `--caffemodel_path`
      represents the whole path to the caffemodel file. If empty, it will use
      the default OpenPose CaffeModel file.) type: string default: ""
    -camera (The camera index for cv::VideoCapture. Integer in the range [0,
      9]. Select a negative number (by default), to auto-detect and open the
      first available camera.) type: int32 default: -1
    -camera_parameter_path (String with the folder where the camera parameters
      are located. If there is only 1 XML file (for single video, webcam, or
      images from the same camera), you must specify the whole XML file path
      (ending in .xml).) type: string default: "models/cameraParameters/flir/"
    -camera_resolution (Set the camera resolution (either `--camera` or
      `--flir_camera`). `-1x-1` will use the default 1280x720 for `--camera`,
      or the maximum flir camera resolution available for `--flir_camera`)
      type: string default: "-1x-1"
    -cli_verbose (If -1, it will be disabled (default). If it is a positive
      integer number, it will print on the command line every `verbose` frames.
      If number in the range (0,1), it will print the progress every `verbose`
      times the total of frames.) type: double default: -1
    -disable_blending (If enabled, it will render the results (keypoint
      skeletons or heatmaps) on a black background, instead of being rendered
      into the original image. Related: `part_to_show`, `alpha_pose`, and
      `alpha_pose`.) type: bool default: false
    -disable_multi_thread (It would slightly reduce the frame rate in order to
      highly reduce the lag. Mainly useful for 1) Cases where it is needed a
      low latency (e.g., webcam in real-time scenarios with low-range GPU
      devices); and 2) Debugging OpenPose when it is crashing to locate the
      error.) type: bool default: false
    -display (Display mode: -1 for automatic selection; 0 for no display
      (useful if there is no X server and/or to slightly speed up the
      processing if visual output is not required); 2 for 2-D display; 3 for
      3-D display (if `--3d` enabled); and 1 for both 2-D and 3-D display.)
      type: int32 default: -1
    -face (Enables face keypoint detection. It will share some parameters from
      the body pose, e.g. `model_folder`. Note that this will considerable slow
      down the performance and increse the required GPU memory. In addition,
      the greater number of people on the image, the slower OpenPose will be.)
      type: bool default: false
    -face_alpha_heatmap (Analogous to `alpha_heatmap` but applied to face.)
      type: double default: 0.69999999999999996
    -face_alpha_pose (Analogous to `alpha_pose` but applied to face.)
      type: double default: 0.59999999999999998
    -face_detector (Kind of face rectangle detector. Select 0 (default) to
      select OpenPose body detector (most accurate one and fastest one if body
      is enabled), 1 to select OpenCV face detector (not implemented for
      hands), 2 to indicate that it will be provided by the user, or 3 to also
      apply hand tracking (only for hand). Hand tracking might improve hand
      keypoint detection for webcam (if the frame rate is high enough, i.e., >7
      FPS per GPU) and video. This is not person ID tracking, it simply looks
      for hands in positions at which hands were located in previous frames,
      but it does not guarantee the same person ID among frames.) type: int32
      default: 0
    -face_net_resolution (Multiples of 16 and squared. Analogous to
      `net_resolution` but applied to the face keypoint detector. 320x320
      usually works fine while giving a substantial speed up when multiple
      faces on the image.) type: string default: "368x368"
    -face_render (Analogous to `render_pose` but applied to the face. Extra
      option: -1 to use the same configuration that `render_pose` is using.)
      type: int32 default: -1
    -face_render_threshold (Analogous to `render_threshold`, but applied to the
      face keypoints.) type: double default: 0.40000000000000002
    -flir_camera (Whether to use FLIR (Point-Grey) stereo camera.) type: bool
      default: false
    -flir_camera_index (Select -1 (default) to run on all detected flir cameras
      at once. Otherwise, select the flir camera index to run, where 0
      corresponds to the detected flir camera with the lowest serial number,
      and `n` to the `n`-th lowest serial number camera.) type: int32
      default: -1
    -fps_max (Maximum processing frame rate. By default (-1), OpenPose will
      process frames as fast as possible. Example usage: If OpenPose is
      displaying images too quickly, this can reduce the speed so the user can
      analyze better each frame from the GUI.) type: double default: -1
    -frame_first (Start on desired frame number. Indexes are 0-based, i.e., the
      first frame has index 0.) type: uint64 default: 0
    -frame_flip (Flip/mirror each frame (e.g., for real time webcam
      demonstrations).) type: bool default: false
    -frame_last (Finish on desired frame number. Select -1 to disable. Indexes
      are 0-based, e.g., if set to 10, it will process 11 frames (0-10).)
      type: uint64 default: 18446744073709551615
    -frame_rotate (Rotate each frame, 4 possible values: 0, 90, 180, 270.)
      type: int32 default: 0
    -frame_step (Step or gap between processed frames. E.g., `--frame_step 5`
      would read and process frames 0, 5, 10, etc..) type: uint64 default: 1
    -frame_undistort (If false (default), it will not undistort the image, if
      true, it will undistortionate them based on the camera parameters found
      in `camera_parameter_path`) type: bool default: false
    -frames_repeat (Repeat frames when finished.) type: bool default: false
    -fullscreen (Run in full-screen mode (press f during runtime to toggle).)
      type: bool default: false
    -hand (Enables hand keypoint detection. It will share some parameters from
      the body pose, e.g. `model_folder`. Analogously to `--face`, it will also
      slow down the performance, increase the required GPU memory and its speed
      depends on the number of people.) type: bool default: false
    -hand_alpha_heatmap (Analogous to `alpha_heatmap` but applied to hand.)
      type: double default: 0.69999999999999996
    -hand_alpha_pose (Analogous to `alpha_pose` but applied to hand.)
      type: double default: 0.59999999999999998
    -hand_detector (Kind of hand rectangle detector. Analogous to
      `--face_detector`.) type: int32 default: 0
    -hand_net_resolution (Multiples of 16 and squared. Analogous to
      `net_resolution` but applied to the hand keypoint detector.) type: string
      default: "368x368"
    -hand_render (Analogous to `render_pose` but applied to the hand. Extra
      option: -1 to use the same configuration that `render_pose` is using.)
      type: int32 default: -1
    -hand_render_threshold (Analogous to `render_threshold`, but applied to the
      hand keypoints.) type: double default: 0.20000000000000001
    -hand_scale_number (Analogous to `scale_number` but applied to the hand
      keypoint detector. Our best results were found with `hand_scale_number` =
      6 and `hand_scale_range` = 0.4.) type: int32 default: 1
    -hand_scale_range (Analogous purpose than `scale_gap` but applied to the
      hand keypoint detector. Total range between smallest and biggest scale.
      The scales will be centered in ratio 1. E.g., if scaleRange = 0.4 and
      scalesNumber = 2, then there will be 2 scales, 0.8 and 1.2.) type: double
      default: 0.40000000000000002
    -heatmaps_add_PAFs (Same functionality as `add_heatmaps_parts`, but adding
      the PAFs.) type: bool default: false
    -heatmaps_add_bkg (Same functionality as `add_heatmaps_parts`, but adding
      the heatmap corresponding to background.) type: bool default: false
    -heatmaps_add_parts (If true, it will fill op::Datum::poseHeatMaps array
      with the body part heatmaps, and analogously face & hand heatmaps to
      op::Datum::faceHeatMaps & op::Datum::handHeatMaps. If more than one
      `add_heatmaps_X` flag is enabled, it will place then in sequential memory
      order: body parts + bkg + PAFs. It will follow the order on
      POSE_BODY_PART_MAPPING in `src/openpose/pose/poseParameters.cpp`. Program
      speed will considerably decrease. Not required for OpenPose, enable it
      only if you intend to explicitly use this information later.) type: bool
      default: false
    -heatmaps_scale (Set 0 to scale op::Datum::poseHeatMaps in the range
      [-1,1], 1 for [0,1]; 2 for integer rounded [0,255]; and 3 for no
      scaling.) type: int32 default: 2
    -identification (Experimental, not available yet. Whether to enable people
      identification across frames.) type: bool default: false
    -ik_threads (Experimental, not available yet. Whether to enable inverse
      kinematics (IK) from 3-D keypoints to obtain 3-D joint angles. By default
      (0 threads), it is disabled. Increasing the number of threads will
      increase the speed but also the global system latency.) type: int32
      default: 0
    -image_dir (Process a directory of images. Use `examples/media/` for our
      default example folder with 20 images. Read all standard formats (jpg,
      png, bmp, etc.).) type: string default: ""
    -ip_camera (String with the IP camera URL. It supports protocols like RTSP
      and HTTP.) type: string default: ""
    -keypoint_scale (Scaling of the (x,y) coordinates of the final pose data
      array, i.e., the scale of the (x,y) coordinates that will be saved with
      the `write_json` & `write_keypoint` flags. Select `0` to scale it to the
      original source resolution; `1`to scale it to the net output size (set
      with `net_resolution`); `2` to scale it to the final output size (set
      with `resolution`); `3` to scale it in the range [0,1], where (0,0) would
      be the top-left corner of the image, and (1,1) the bottom-right one; and
      4 for range [-1,1], where (-1,-1) would be the top-left corner of the
      image, and (1,1) the bottom-right one. Non related with `scale_number`
      and `scale_gap`.) type: int32 default: 0
    -logging_level (The logging level. Integer in the range [0, 255]. 0 will
      output any log() message, while 255 will not output any. Current OpenPose
      library messages are in the range 0-4: 1 for low priority messages and 4
      for important ones.) type: int32 default: 3
    -maximize_positives (It reduces the thresholds to accept a person
      candidate. It highly increases both false and true positives. I.e., it
      maximizes average recall but could harm average precision.) type: bool
      default: false
    -model_folder (Folder path (absolute or relative) where the models (pose,
      face, ...) are located.) type: string default: "models/"
    -model_pose (Model to be used. E.g., `COCO` (18 keypoints), `MPI` (15
      keypoints, ~10% faster), `MPI_4_layers` (15 keypoints, even faster but
      less accurate).) type: string default: "BODY_25"
    -net_resolution (Multiples of 16. If it is increased, the accuracy
      potentially increases. If it is decreased, the speed increases. For
      maximum speed-accuracy balance, it should keep the closest aspect ratio
      possible to the images or videos to be processed. Using `-1` in any of
      the dimensions, OP will choose the optimal aspect ratio depending on the
      user's input value. E.g., the default `-1x368` is equivalent to `656x368`
      in 16:9 resolutions, e.g., full HD (1980x1080) and HD (1280x720)
      resolutions.) type: string default: "-1x368"
    -no_gui_verbose (Do not write text on output images on GUI (e.g., number of
      current frame and people). It does not affect the pose rendering.)
      type: bool default: false
    -num_gpu (The number of GPU devices to use. If negative, it will use all
      the available GPUs in your machine.) type: int32 default: -1
    -num_gpu_start (GPU device start number.) type: int32 default: 0
    -number_people_max (This parameter will limit the maximum number of people
      detected, by keeping the people with top scores. The score is based in
      person area over the image, body part score, as well as joint score
      (between each pair of connected body parts). Useful if you know the exact
      number of people in the scene, so it can remove false positives (if all
      the people have been detected. However, it might also include false
      negatives by removing very small or highly occluded people. -1 will keep
      them all.) type: int32 default: -1
    -output_resolution (The image resolution (display and output). Use "-1x-1"
      to force the program to use the input image resolution.) type: string
      default: "-1x-1"
    -part_candidates (Also enable `write_json` in order to save this
      information. If true, it will fill the op::Datum::poseCandidates array
      with the body part candidates. Candidates refer to all the detected body
      parts, before being assembled into people. Note that the number of
      candidates is equal or higher than the number of final body parts (i.e.,
      after being assembled into people). The empty body parts are filled with
      0s. Program speed will slightly decrease. Not required for OpenPose,
      enable it only if you intend to explicitly use this information.)
      type: bool default: false
    -part_to_show (Prediction channel to visualize (default: 0). 0 for all the
      body parts, 1-18 for each body part heat map, 19 for the background heat
      map, 20 for all the body part heat maps together, 21 for all the PAFs,
      22-40 for each body part pair PAF.) type: int32 default: 0
    -process_real_time (Enable to keep the original source frame rate (e.g.,
      for video). If the processing time is too long, it will skip frames. If
      it is too fast, it will slow it down.) type: bool default: false
    -profile_speed (If PROFILER_ENABLED was set in CMake or Makefile.config
      files, OpenPose will show some runtime statistics at this frame number.)
      type: int32 default: 1000
    -prototxt_path (The combination `--model_folder` + `--prototxt_path`
      represents the whole path to the prototxt file. If empty, it will use the
      default OpenPose ProtoTxt file.) type: string default: ""
    -render_pose (Set to 0 for no rendering, 1 for CPU rendering (slightly
      faster), and 2 for GPU rendering (slower but greater functionality, e.g.,
      `alpha_X` flags). If -1, it will pick CPU if CPU_ONLY is enabled, or GPU
      if CUDA is enabled. If rendering is enabled, it will render both
      `outputData` and `cvOutputData` with the original image and desired body
      part to be shown (i.e., keypoints, heat maps or PAFs).) type: int32
      default: -1
    -render_threshold (Only estimated keypoints whose score confidences are
      higher than this threshold will be rendered. Generally, a high threshold
      (> 0.5) will only render very clear body parts; while small thresholds
      (~0.1) will also output guessed and occluded keypoints, but also more
      false positives (i.e., wrong detections).) type: double
      default: 0.050000000000000003
    -scale_gap (Scale gap between scales. No effect unless scale_number > 1.
      Initial scale is always 1. If you want to change the initial scale, you
      actually want to multiply the `net_resolution` by your desired initial
      scale.) type: double default: 0.25
    -scale_number (Number of scales to average.) type: int32 default: 1
    -tracking (Experimental, not available yet. Whether to enable people
      tracking across frames. The value indicates the number of frames where
      tracking is run between each OpenPose keypoint detection. Select -1
      (default) to disable it or 0 to run simultaneously OpenPose keypoint
      detector and tracking for potentially higher accurary than only
      OpenPose.) type: int32 default: -1
    -udp_host (Experimental, not available yet. IP for UDP communication. E.g.,
      `192.168.0.1`.) type: string default: ""
    -udp_port (Experimental, not available yet. Port number for UDP
      communication.) type: string default: "8051"
    -upsampling_ratio (Upsampling ratio between the `net_resolution` and the
      output net results. A value less or equal than 0 (default) will use the
      network default value (recommended).) type: double default: 0
    -video (Use a video file instead of the camera. Use
      `examples/media/video.avi` for our default example video.) type: string
      default: ""
    -write_bvh (Experimental, not available yet. E.g.,
      `~/Desktop/mocapResult.bvh`.) type: string default: ""
    -write_coco_json (Full file path to write people pose data with JSON COCO
      validation format. If foot, face, hands, etc. JSON is also desired
      (`--write_coco_json_variants`), they are saved with different file name
      suffix.) type: string default: ""
    -write_coco_json_variant (Currently, this option is experimental and only
      makes effect on car JSON generation. It selects the COCO variant for
      cocoJsonSaver.) type: int32 default: 0
    -write_coco_json_variants (Add 1 for body, add 2 for foot, 4 for face,
      and/or 8 for hands. Use 0 to use all the possible candidates. E.g., 7
      would mean body+foot+face COCO JSON.) type: int32 default: 1
    -write_heatmaps (Directory to write body pose heatmaps in PNG format. At
      least 1 `add_heatmaps_X` flag must be enabled.) type: string default: ""
    -write_heatmaps_format (File extension and format for `write_heatmaps`,
      analogous to `write_images_format`. For lossless compression, recommended
      `png` for integer `heatmaps_scale` and `float` for floating values.)
      type: string default: "png"
    -write_images (Directory to write rendered frames in `write_images_format`
      image format.) type: string default: ""
    -write_images_format (File extension and format for `write_images`, e.g.,
      png, jpg or bmp. Check the OpenCV function cv::imwrite for all compatible
      extensions.) type: string default: "png"
    -write_json (Directory to write OpenPose output in JSON format. It includes
      body, hand, and face pose keypoints (2-D and 3-D), as well as pose
      candidates (if `--part_candidates` enabled).) type: string default: ""
    -write_keypoint ((Deprecated, use `write_json`) Directory to write the
      people pose keypoint data. Set format with `write_keypoint_format`.)
      type: string default: ""
    -write_keypoint_format ((Deprecated, use `write_json`) File extension and
      format for `write_keypoint`: json, xml, yaml & yml. Json not available
      for OpenCV < 3.0, use `write_json` instead.) type: string default: "yml"
    -write_video (Full file path to write rendered frames in motion JPEG video
      format. It might fail if the final path does not finish in `.avi`. It
      internally uses cv::VideoWriter. Flag `write_video_fps` controls FPS.
      Alternatively, the video extension can be `.mp4`, resulting in a file
      with a much smaller size and allowing `--write_video_with_audio`.
      However, that would require: 1) Ubuntu or Mac system, 2) FFmpeg library
      installed (`sudo apt-get install ffmpeg`), 3) the creation temporarily of
      a folder with the same file path than the final video (without the
      extension) to storage the intermediate frames that will later be used to
      generate the final MP4 video.) type: string default: ""
    -write_video_3d (Analogous to `--write_video`, but applied to the 3D
      output.) type: string default: ""
    -write_video_adam (Experimental, not available yet. Analogous to
      `--write_video`, but applied to Adam model.) type: string default: ""
    -write_video_fps (Frame rate for the recorded video. By default, it will
      try to get the input frames producer frame rate (e.g., input video or
      webcam frame rate). If the input frames producer does not have a set FPS
      (e.g., image_dir or webcam if OpenCV not compiled with its support), set
      this value accordingly (e.g., to the frame rate displayed by the OpenPose
      GUI).) type: double default: -1
    -write_video_with_audio (If the input is video and the output is so too, it
      will save the video with audio. It requires the output video file path
      finishing in `.mp4` format (see `write_video` for details).) type: bool
      default: false


  Flags from src/logging.cc:
    -alsologtoemail (log messages go to these email addresses in addition to
      logfiles) type: string default: ""
    -alsologtostderr (log messages go to stderr in addition to logfiles)
      type: bool default: false
    -colorlogtostderr (color messages logged to stderr (if supported by
      terminal)) type: bool default: false
    -drop_log_memory (Drop in-memory buffers of log contents. Logs can grow
      very quickly and they are rarely read before they need to be evicted from
      memory. Instead, drop them from memory as soon as they are flushed to
      disk.) type: bool default: true
    -log_backtrace_at (Emit a backtrace when logging at file:linenum.)
      type: string default: ""
    -log_dir (If specified, logfiles are written into this directory instead of
      the default logging directory.) type: string default: ""
    -log_link (Put additional links to the log files in this directory)
      type: string default: ""
    -log_prefix (Prepend the log prefix to the start of each log line)
      type: bool default: true
    -logbuflevel (Buffer log messages logged at this level or lower (-1 means
      don't buffer; 0 means buffer INFO only; ...)) type: int32 default: 0
    -logbufsecs (Buffer log messages for at most this many seconds) type: int32
      default: 30
    -logemaillevel (Email log messages logged at this level or higher (0 means
      email all; 3 means email FATAL only; ...)) type: int32 default: 999
    -logfile_mode (Log file mode/permissions.) type: int32 default: 436
    -logmailer (Mailer used to send logging email) type: string
      default: "/bin/mail"
    -logtostderr (log messages go to stderr instead of logfiles) type: bool
      default: false
    -max_log_size (approx. maximum log file size (in MB). A value of 0 will be
      silently overridden to 1.) type: int32 default: 1800
    -minloglevel (Messages logged at a lower level than this don't actually get
      logged anywhere) type: int32 default: 0
    -stderrthreshold (log messages at or above this level are copied to stderr
      in addition to logfiles.  This flag obsoletes --alsologtostderr.)
      type: int32 default: 2
    -stop_logging_if_full_disk (Stop attempting to log to disk if the disk is
      full.) type: bool default: false

  Flags from src/utilities.cc:
    -symbolize_stacktrace (Symbolize the stack trace in the tombstone)
      type: bool default: true

  Flags from src/vlog_is_on.cc:
    -v (Show all VLOG(m) messages for m <= this. Overridable by --vmodule.)
      type: int32 default: 0
    -vmodule (per-module verbose level. Argument is a comma-separated list of
      <module name>=<log level>. <module name> is a glob pattern, matched
      against the filename base (that is, name ignoring .cc/.h./-inl.h). <log
      level> overrides any value given by --v.) type: string default: ""
● cmakeのバージョンが古い時に OpenPoseのビルドでエラーが出る
# user@user-desktop:~$ cmake --version
# cmake version 3.10.2
# この cmakeのバージョンは OpenPoseのビルドでエラーが出る

CMake Error: The following variables are used in this project, but they are set to NOTFOUND.
Please set them or make sure they are set and tested correctly in the CMake files:
CUDA_cublas_device_LIBRARY (ADVANCED)
    linked by target "caffe" in directory /home/user/openpose/3rdparty/caffe/src/caffe

-- Configuring incomplete, errors occurred!
See also "/home/user/openpose/build/caffe/src/openpose_lib-build/CMakeFiles/CMakeOutput.log".
See also "/home/user/openpose/build/caffe/src/openpose_lib-build/CMakeFiles/CMakeError.log".
CMakeFiles/openpose_lib.dir/build.make:105: recipe for target 'caffe/src/openpose_lib-stamp/openpose_lib-configure' failed
make[2]: *** [caffe/src/openpose_lib-stamp/openpose_lib-configure] Error 1
CMakeFiles/Makefile2:67: recipe for target 'CMakeFiles/openpose_lib.dir/all' failed
make[1]: *** [CMakeFiles/openpose_lib.dir/all] Error 2
Makefile:83: recipe for target 'all' failed
make: *** [all] Error 2


user@user-desktop:~/openpose/build$ tail /home/user/openpose/build/caffe/src/openpose_lib-build/CMakeFiles/CMakeError.log
/usr/bin/ld: cannot find -lpthreads
collect2: error: ld returned 1 exit status
CMakeFiles/cmTC_0fc19.dir/build.make:97: recipe for target 'cmTC_0fc19' failed
make[4]: *** [cmTC_0fc19] Error 1
make[4]: Leaving directory '/home/user/openpose/build/caffe/src/openpose_lib-build/CMakeFiles/CMakeTmp'
Makefile:126: recipe for target 'cmTC_0fc19/fast' failed
make[3]: *** [cmTC_0fc19/fast] Error 2
make[3]: Leaving directory '/home/user/openpose/build/caffe/src/openpose_lib-build/CMakeFiles/CMakeTmp'

# Solution
最新の cmakeをビルドしてインストールする
cmake --version
# cmake version 3.14.20190515-g66efdb
# CMake suite maintained and supported by Kitware (kitware.com/cmake).
● NVIDIA Jetson Nanoで OpenPoseをビルドする全自動 bashスクリプト
NVIDIA Jetson Nano semi-auto build and execute OpenPose bash script
#!/bin/sh

# Jetson Nano Maximum Performance
sudo nvpmodel -m 0
sudo jetson_clocks

sudo apt update
sudo apt -y install git
sudo apt -y install ffmpeg
sudo apt -y remove cmake

# build Newest Cmake
sudo apt -y install libcurl4-openssl-dev
cd
wget https://github.com/Kitware/CMake/archive/v3.14.0.zip
unzip v3.14.0.zip
cd CMake-3.14.0
./bootstrap --system-curl
time make -j4
sudo make install
● build_openpose_2nd.sh
build_openpose_2nd.sh
#!/bin/sh

# cmake version 3.14.0
cmake --version

# Jetson Nano Maximum Performance
sudo nvpmodel -m 0
sudo jetson_clocks

# build OpenPose
cd
git clone https://github.com/CMU-Perceptual-Computing-Lab/openpose
cd openpose
sudo bash ./scripts/ubuntu/install_deps.sh
mkdir build
cd build
cmake ..
make clean
time make -j4

sudo make install

# execute sample
cd
cd openpose
echo execute sample Video --net_resolution 320x-1
./build/examples/openpose/openpose.bin --video examples/media/video.avi --display 0 --model_folder ./models --write_video output_video.mp4 --net_resolution 320x-1 -fps_max 15

ls -l output_video.mp4

echo execute sample Picture --net_resolution -1x240 (-1x256 = NG Killed)
./build/examples/openpose/openpose.bin -image_dir ./examples/media/ --display 0 --model_folder ./models --write_images ./output/ --net_resolution -1x240

ls -l ./output/
# How to use

# 1st initialize
# apt update and install nano
# .bashrc force_color_prompt
# add CUDA environment variable
# see above

# 2nd initialize
# disable Auto Update and Upgrade
# see above

# 1st script
nano build_openpose_1st.sh
chmod 755 build_openpose_1st.sh
sudo ./build_openpose_1st.sh

# reboot
sudo reboot

# 2nd script
nano build_openpose_2nd.sh
chmod 755 build_openpose_2nd.sh
sudo ./build_openpose_2nd.sh

# OK !!
E: Could not get lock /var/lib/dpkg/lock-frontend - open (11: Resource temporarily unavailable)
E: Unable to acquire the dpkg frontend lock (/var/lib/dpkg/lock-frontend), is another process using it?

# delete lock file
sudo rm /var/lib/apt/lists/lock
sudo rm /var/lib/dpkg/lock
sudo rm /var/lib/dpkg/lock-frontend
sudo rm /var/cache/apt/archives/lock

# disable Auto Update and Upgrade
治ってねーよ!!! 2019/10/20

[  4%] Building NVCC (Device) object src/openpose/CMakeFiles/openpose.dir/pose/openpose_generated_renderPose.cu.o
/home/jetson/openpose/src/openpose/core/arrayCpuGpu.cpp:14:40: error: ‘TBlob’ is not a member of ‘caffe’
                 std::unique_ptr<caffe::TBlob<T>> upCaffeBlobT;
                                        ^~~~~
compilation terminated due to -Wfatal-errors.
src/openpose/core/CMakeFiles/openpose_core.dir/build.make:75: recipe for target 'src/openpose/core/CMakeFiles/openpose_core.dir/arrayCpuGpu.cpp.o' failed
make[2]: *** [src/openpose/core/CMakeFiles/openpose_core.dir/arrayCpuGpu.cpp.o] Error 1
CMakeFiles/Makefile2:352: recipe for target 'src/openpose/core/CMakeFiles/openpose_core.dir/all' failed
make[1]: *** [src/openpose/core/CMakeFiles/openpose_core.dir/all] Error 2
make[1]: *** Waiting for unfinished jobs....

---

[  7%] Building CXX object src/openpose/CMakeFiles/openpose.dir/core/cvMatToOpInput.cpp.o
/home/jetson/openpose/src/openpose/core/arrayCpuGpu.cpp:14:40: error: ‘TBlob’ is not a member of ‘caffe’
                 std::unique_ptr<caffe::TBlob<T>> upCaffeBlobT;
 Raspberry Pi Camera Module V2 ?
jetson@jetson:~/openpose$ ./build/examples/openpose/openpose.bin --model_folder ./models

Starting OpenPose demo...
Configuring OpenPose...
Starting thread(s)...
VIDEOIO ERROR: V4L2: Pixel format of incoming image is unsupported by OpenCV
OpenCV Error: Unspecified error (GStreamer: unable to start pipeline
) in cvCaptureFromCAM_GStreamer, file /home/nvidia/build_opencv/opencv/modules/videoio/src/cap_gstreamer.cpp, line 887
VIDEOIO(cvCreateCapture_GStreamer(CV_CAP_GSTREAMER_V4L2, reinterpret_cast<char *>(index))): raised OpenCV exception:

/home/nvidia/build_opencv/opencv/modules/videoio/src/cap_gstreamer.cpp:887: error: (-2) GStreamer: unable to start pipeline
 in function cvCaptureFromCAM_GStreamer

Error:
No camera found.

Coming from:
- /home/jetson/openpose/src/openpose/producer/producer.cpp:createProducer():464
- /home/jetson/openpose/src/openpose/producer/producer.cpp:createProducer():475
- /home/jetson/openpose/include/openpose/wrapper/wrapperAuxiliary.hpp:configureThreadManager():1188
- /home/jetson/openpose/include/openpose/wrapper/wrapper.hpp:exec():424