・2019/05/01
 NVIDIA Jetson Nanoの GPIOを動かして Lチカする方法
(NVIDIA Jetson Nanoに Python用の GPIOライブラリをインストールして Lチカする方法)
Tags: [Raspberry Pi], [電子工作], [ディープラーニング]
● NVIDIA Jetson Nanoで GPIOを使う方法
2020/6 追記
Jetson Nano Developer Kit 40-Pin Expansion Header Configuration 1.2 2019/08/07
This application note describes how to alter the function of pins on the 40-pin header by using the Jetson Nano Developer Kit Pinmux spreadsheet.
https://developer.nvidia.com/embedded/dlc/Jetson-Nano-40-Pin-Expansion-Header-1.1
● Download the L4T Driver Package and Source Files
On your Linux host, download and extract the L4T Jetson Driver Package.
Go to the directory Linux_for_Tegra and run the script source_sync.sh to download the various source trees. When prompted, enter the correct tag for the L4T version you are using. The release tag name can be found in the L4T Release Notes. For example, for L4T release 32.1, enter the tag tegra-l4t-r32.1.

$ cd Linux_for_Tegra/
$ ./source_sync.sh

● Update the U-Boot Pinmux
The pinmux configuration programmed by the U-Boot bootloader is stored in one of the U-Boot header files. Therefore, you must update the U-Boot header, rebuild U-Boot, and reflash. Note that the header file is generated using the tegra-pinmux-scripts tool to parse the CSV version of the pinmux spreadsheet. To generate the header file and update the U-Boot bootloader:
1. On your Linux host, obtain a copy of tegra-pinmux-scripts by cloning the following Git tree:

https://github.com/NVIDIA/tegra-pinmux-scripts.git

$ git clone https://github.com/NVIDIA/tegra-pinmux-scripts.git
2. On your Linux host, place a copy the CSV file in the tegra-pinmux-scripts/csv directory.
$ cd tegra-pinmux-scripts
$ mkdir csv
$ cp <path-to-csv>/jetson-nano-sd.csv csv/p3450-porg.csv
# Pull up/down options
_PUD_OFFSET = 20
PUD_OFF = 0 + _PUD_OFFSET
PUD_DOWN = 1 + _PUD_OFFSET
PUD_UP = 2 + _PUD_OFFSET

# jetson-gpio/lib/python/Jetson/GPIO/gpio.py

# Function used to setup individual pins or lists/tuples of pins as
# Input or Output. Param channels must an integer or list/tuple of integers,
# direction must be IN or OUT, pull_up_down must be PUD_OFF, PUD_UP or
# PUD_DOWN and is only valid when direction in IN, initial must be HIGH or LOW
# and is only valid when direction is OUT
def setup(channels, direction, pull_up_down=PUD_OFF, initial=None):
    ch_infos = _channels_to_infos(channels, need_gpio=True)
# Setting User Permissions
sudo groupadd -f -r gpio
# sudo usermod -a -G gpio your_user_name
# Using username "jetson"
sudo usermod -a -G gpio jetson

jetson@jetson-desktop:~ $ whoami
jetson

jetson@jetson-desktop:~ $ AA=`whoami`
jetson@jetson-desktop:~ $ echo $AA
jetson

# Setting User Permissions
sudo groupadd -f -r gpio
AA=`whoami`
sudo usermod -a -G gpio $AA
● NVIDIA Jetson Nanoで GPIOを使う方法
Jetson Nano GPIO table
please see this post from JetsonHacks
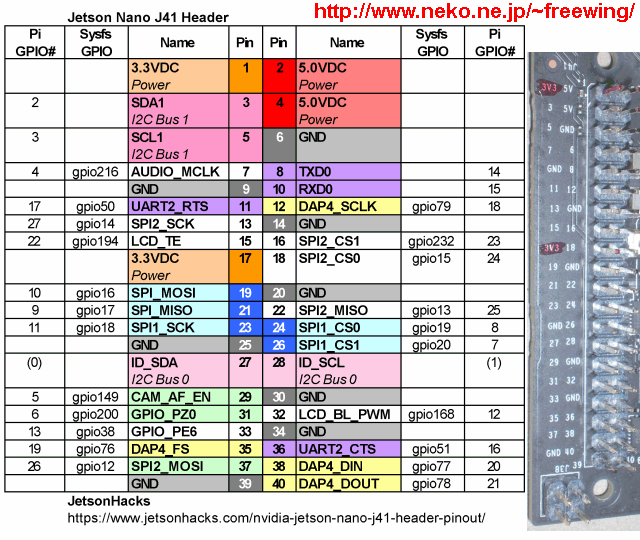
NVIDIA Jetson Nano J41 Header GPIO Pin layout
Interface signal pins.
All signals use 3.3V levels.
By default, all interface signal pins are configured as GPIOs,
except pins 3 and 5 and pins 27 and 28, which are I2C SDA and SCL,
and pins 8 and 10, which are UART TX and RX.
L4T provides a Python library, Jetson.GPIO, for controlling GPIOs.
The library has the same API as RPi.GPIO.
See
/opt/nvidia/jetson-gpio/doc/README.txt
on your Jetson system for details.
以下のピンは最初から I2Cや UART機能が有効になっています。
(つまり、GPIOとして使えない)
Pin 3 Pin 5 = I2C Bus 1
Pin 27 Pin 28 = I2C Bus 0
Pin 8 Pin 10 = UART TX and RX, Pin 8 = TXD0, Pin 10 = RXD0
NVIDIA Jetson Nanoの GPIOには内蔵プルアップ・内蔵プルダウンの指定が有りません。
なので外部回路側にプルアップ抵抗が必要です。
電源ピン +3.3V, +5V, GNDの配置は同じ。
GPIOの各種機能ピンの配置も同じ。I2C、SPI、UART、I2S、PWM等
一部の GPIOが Jetson Nano独自、Raspberry Pi独自となっている。
(下記の表で背景が白色の所が不一致と Pin 11、Pin 36)
・NVIDIA Jetson Nano J41 Header GPIO Pin layout

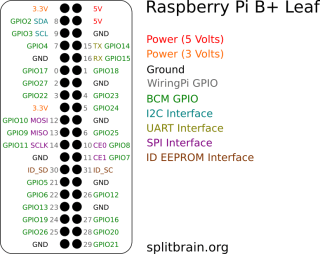
● Raspberry Pi B+ Pinout Leaf 基板のコネクタ部分にかぶせて使う。
紙に印刷して基板のコネクタのピンに差して使う。
(なので、原寸で印刷する必要がある)
Raspberry Pi GPIO
Raspberry Pi B+ Pinout Leaf
・Raspberry Pi B+ Pinout Leaf
● Jetson Nanoの GPIO
Jetson.GPIO - Linux for Tegra
NVIDIA/jetson-gpio
# Downloading the Library
cd
wget https://github.com/NVIDIA/jetson-gpio/archive/master.zip
sudo unzip master.zip -d /opt/nvidia/

ls -l /opt/nvidia/

sudo rm -rf /opt/nvidia/jetson-gpio

mv /opt/nvidia/jetson-gpio-master /opt/nvidia/jetson-gpio

ls -l /opt/nvidia/jetson-gpio

# Install Python Library
cd /opt/nvidia/jetson-gpio
# python3
sudo python3 setup.py install
# python2
sudo python setup.py install

# Setting User Permissions
sudo groupadd -f -r gpio
sudo usermod -a -G gpio user

# Install custom udev rules
cat /opt/nvidia/jetson-gpio/etc/99-gpio.rules
sudo cp /opt/nvidia/jetson-gpio/etc/99-gpio.rules /etc/udev/rules.d/

# Reload the udev rules
sudo udevadm control --reload-rules && sudo udevadm trigger
● import RPi.GPIO as GPIOは使えない
sudo python3

Python 3.6.7 (default, Oct 22 2018, 11:32:17)
[GCC 8.2.0] on linux
Type "help", "copyright", "credits" or "license" for more information.

>>> import RPi.GPIO as GPIO
Traceback (most recent call last):
  File "<stdin>", line 1, in <module>
  File "/home/user/.local/lib/python3.6/site-packages/RPi/GPIO/__init__.py", line 23, in <module>
    from RPi._GPIO import *
RuntimeError: This module can only be run on a Raspberry Pi!
>>>
● import Jetson.GPIO as GPIOを使う
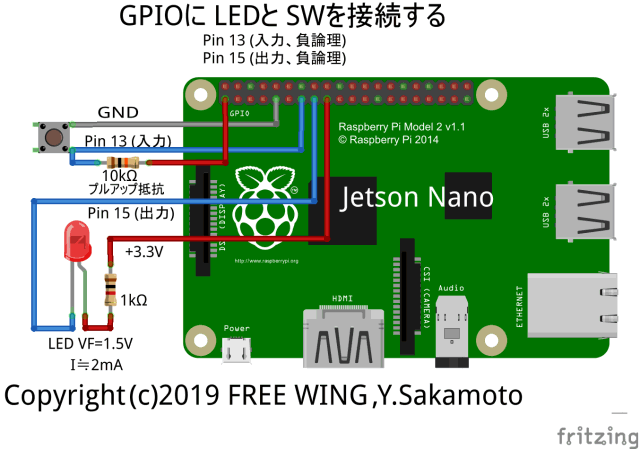
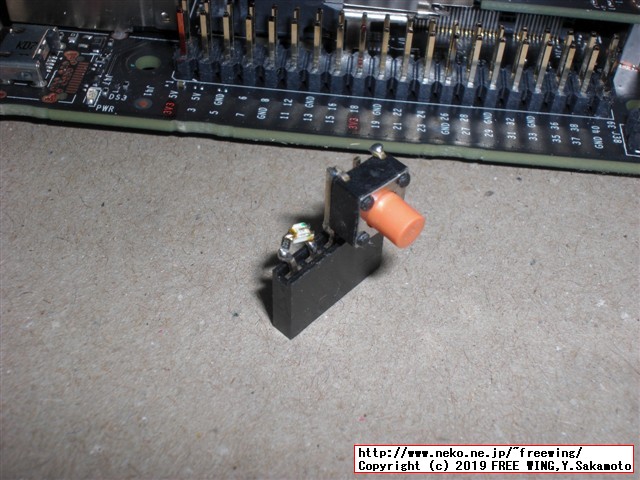
Jetson Nanoの GPIOを使う Lチカ、スイッチ入力のサンプル
・Jetson Nanoの GPIOを使う Lチカ、スイッチ入力のサンプル
# GPIOを出力に設定する
GPIO.setup(15, GPIO.OUT)
GPIO.output(15, GPIO.HIGH) # LEDが消える(負論理)
GPIO.output(15, GPIO.LOW) # LEDが点く(負論理)
# GPIOを入力に設定する
GPIO.input(13)
# ボタンを離している時 1(負論理)
# ボタンを押している時 0(負論理)
# 最後にクリーンアップする
GPIO.cleanup()
sudo python3

import Jetson.GPIO as GPIO
GPIO.setmode(GPIO.BOARD)
GPIO.setup(15, GPIO.OUT)
GPIO.output(15, GPIO.HIGH)
GPIO.output(15, GPIO.LOW)

GPIO.setup(13, GPIO.IN)
GPIO.input(13)
GPIO.cleanup()
python3でも python2でも両方使えました。
user@user-desktop:~$ sudo python3
Python 3.6.7 (default, Oct 22 2018, 11:32:17)
[GCC 8.2.0] on linux
Type "help", "copyright", "credits" or "license" for more information.


>>> import Jetson.GPIO as GPIO
>>> GPIO.setmode(GPIO.BOARD)
>>> GPIO.setup(15, GPIO.OUT)
>>> GPIO.output(15, GPIO.HIGH) # LEDが消える(負論理)
>>> GPIO.output(15, GPIO.LOW) # LEDが点く(負論理)
>>>
>>> GPIO.setup(13, GPIO.IN)
>>> GPIO.input(13) # ボタンを押した時(負論理)
0
>>> GPIO.input(13) # ボタンを離している時(負論理)
1
>>> GPIO.input(13) # ボタンを押した時(負論理)
0
>>> GPIO.cleanup()
python3でも python2でも両方使えました。
user@user-desktop:~$ sudo python
[sudo] password for user:
Python 2.7.15rc1 (default, Nov 12 2018, 14:31:15)
[GCC 7.3.0] on linux2
Type "help", "copyright", "credits" or "license" for more information.

>>> import Jetson.GPIO as GPIO
>>> GPIO.setmode(GPIO.BOARD)
>>> GPIO.setup(15, GPIO.OUT)
>>> GPIO.output(15, GPIO.HIGH)
>>> GPIO.output(15, GPIO.LOW)
>>>
>>> GPIO.setup(13, GPIO.IN)
>>> GPIO.input(13)
0
>>> GPIO.input(13)
1
>>> GPIO.input(13)
0
>>> GPIO.cleanup()
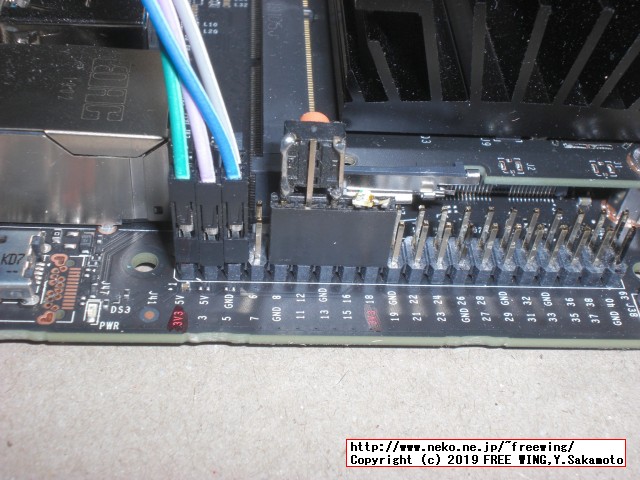
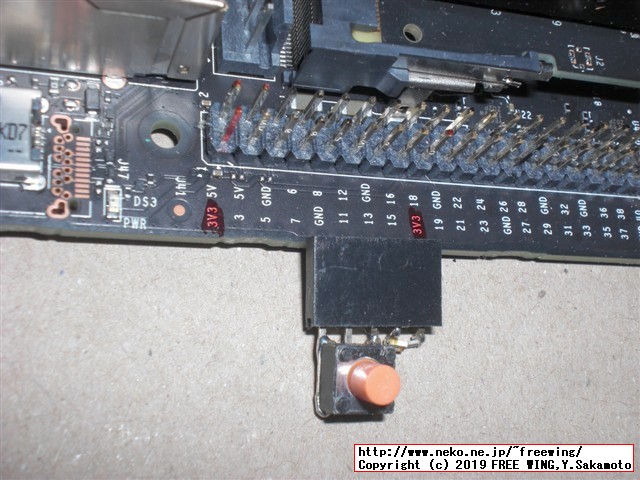
・Jetson Nanoの GPIOを使う Lチカ、スイッチ入力のサンプル
写真の物はプッシュボタン部分にプルアップ抵抗がありません。
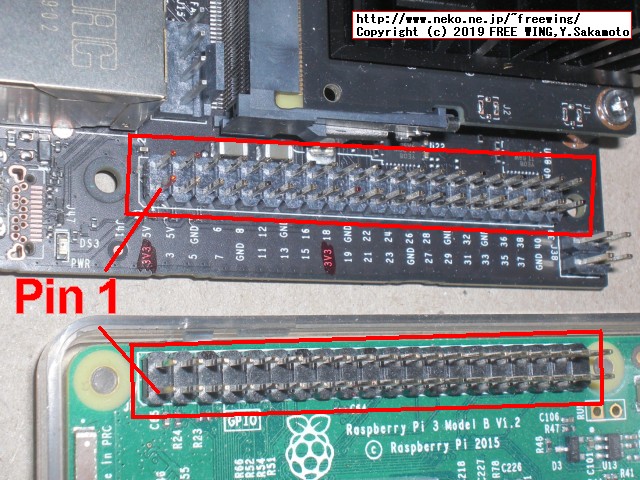
・Jetson Nanoの GPIOを使う Lチカ、スイッチ入力のサンプル
・Jetson Nanoの GPIOを使う Lチカ、スイッチ入力のサンプル
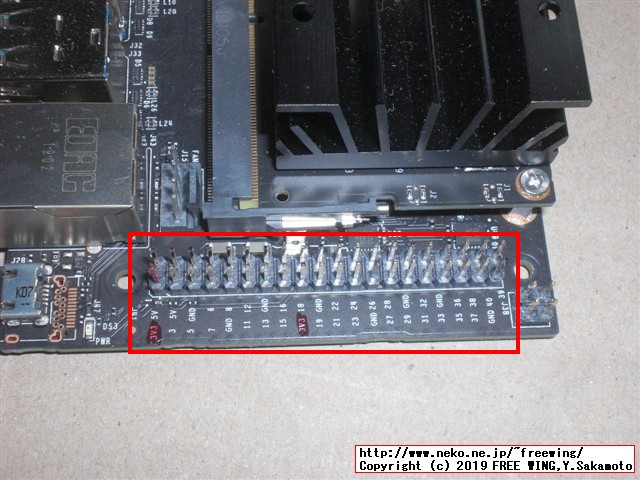
・Jetson Nanoの GPIO
・Jetson Nanoの GPIO
● /opt/nvidia/jetson-gpio/etc/99-gpio.rules
user@user-desktop:/opt/nvidia/jetson-gpio/samples$ cat /opt/nvidia/jetson-gpio/etc/99-gpio.rules
# Copyright (c) 2012-2017 Ben Croston <ben@croston.org>.
# Copyright (c) 2019, NVIDIA CORPORATION. All rights reserved.
#
# Permission is hereby granted, free of charge, to any person obtaining a
# copy of this software and associated documentation files (the "Software"),
# to deal in the Software without restriction, including without limitation
# the rights to use, copy, modify, merge, publish, distribute, sublicense,
# and/or sell copies of the Software, and to permit persons to whom the
# Software is furnished to do so, subject to the following conditions:
#
# The above copyright notice and this permission notice shall be included in
# all copies or substantial portions of the Software.
#
# THE SOFTWARE IS PROVIDED "AS IS", WITHOUT WARRANTY OF ANY KIND, EXPRESS OR
# IMPLIED, INCLUDING BUT NOT LIMITED TO THE WARRANTIES OF MERCHANTABILITY,
# FITNESS FOR A PARTICULAR PURPOSE AND NONINFRINGEMENT.  IN NO EVENT SHALL
# THE AUTHORS OR COPYRIGHT HOLDERS BE LIABLE FOR ANY CLAIM, DAMAGES OR OTHER
# LIABILITY, WHETHER IN AN ACTION OF CONTRACT, TORT OR OTHERWISE, ARISING
# FROM, OUT OF OR IN CONNECTION WITH THE SOFTWARE OR THE USE OR OTHER
# DEALINGS IN THE SOFTWARE.

SUBSYSTEM=="gpio", KERNEL=="gpiochip*", ACTION=="add", \
    PROGRAM="/bin/sh -c 'chown root:gpio /sys/class/gpio/export /sys/class/gpio/unexport; chmod 220 /sys/class/gpio/export /sys/class/gpio/unexport'"
SUBSYSTEM=="gpio", KERNEL=="gpio*", ACTION=="add", \
    PROGRAM="/bin/sh -c 'chown root:gpio /sys%p/active_low /sys%p/direction /sys%p/edge /sys%p/value; chmod 660 /sys%p/active_low /sys%p/direction /sys%p/edge /sys%p/value'"
● NVIDIA Jetson Nanoの GPIOには内蔵プルアップ・内蔵プルダウンの指定が有りません
NVIDIA Jetson Nanoの GPIOには内蔵プルアップ・内蔵プルダウンの指定が有りません。
なので外部回路側にプルアップ抵抗が必要です。
Change a GPIO pin internal pull-down to pull-up
見てもわからん。
● NVIDIA Jetson Nanoの SPI機能を有効にする方法
Enabling spidev on the jetson nano is hanging when flashing
Driving an Adafruit 2.8 with a Jetson Nano
For the SPI below link should be helpfully.
https://elinux.org/Jetson/TX1_SPI
Jetson/Nano/Upstream
thierryreding/u-boot p3450
user@user-desktop:~$ cat /boot/extlinux/extlinux.conf
TIMEOUT 30
DEFAULT primary

MENU TITLE p3450-porg eMMC boot options

LABEL primary
      MENU LABEL primary kernel
      LINUX /boot/Image
      INITRD /boot/initrd
      APPEND ${cbootargs} rootfstype=ext4 root=/dev/mmcblk0p1 rw rootwait
user@user-desktop:~$ ls -l /boot/
drwxr-xr-x 3 root root     4096  5月 21  2018 efi
drwxr-xr-x 2 root root     4096  3月 13 19:08 extlinux
drwxr-xr-x 2 root root     4096  5月  4 16:08 grub
-rw-r--r-- 1 root root 34048008  3月 13 19:08 Image
-rw-r--r-- 1 root root        0  3月 13 19:08 initrd
lrwxrwxrwx 1 root root       24  5月  4 16:06 initrd.img -> initrd.img-4.9.140-tegra
-rw-r--r-- 1 root root 19376042  5月  4 16:07 initrd.img-4.9.140-tegra
-rw-r--r-- 1 root root   485608  3月 13 16:45 tegra210-jetson-cv-base-p2597-2180-a00.dtb
-rw-r--r-- 1 root root   300111  3月 13 16:45 tegra210-jetson-e-base-p2595-0000-a00.dtb
-rw-r--r-- 1 root root   485732  3月 13 16:45 tegra210-jetson-tx1-p2597-2180-a01-devkit.dtb
-rw-r--r-- 1 root root   486261  3月 13 16:45 tegra210-jetson-tx1-p2597-2180-a02-devkit-24x7.dtb
-rw-r--r-- 1 root root   200826  3月 13 16:45 tegra210-p3448-0000-p3449-0000-a00.dtb
-rw-r--r-- 1 root root   200826  3月 13 16:45 tegra210-p3448-0000-p3449-0000-a01.dtb
-rw-r--r-- 1 root root   200900  3月 13 19:08 tegra210-p3448-0000-p3449-0000-a02.dtb
● Jetson Nano Audio I2S on 40 Pin Connector
I2Sを有効にして HiFi DACの接続とか。
Audio I2S on 40 Pin Connector
$ sudo grep "Name:\|J:\|BB:" /sys/kernel/debug/tegra_gpio
Name:Bank:Port CNF OE OUT IN INT_STA INT_ENB INT_LVL
 J: 2:1 f0 00 00 00 00 00 000000
BB: 6:3 01 00 00 00 00 00 000000
Modify I2S pin as GPIO
●あんまり役に立たない README.txt
cat /opt/nvidia/jetson-gpio/doc/README.txt

================================================================================
                            README-Jetson.GPIO
                             Linux for Tegra
          Using the Jetson GPIO Python Library and Sample Applications
================================================================================

Jetson TX1, TX2 and AGX Xavier development boards contain a 40 pin GPIO header,
similar to the 40 pin header in the Raspberry Pi. These GPIOs can be controlled
for digital input and output using the Python library provided in the Jetson
GPIO Library package. The library has the same API as the RPi.GPIO library for
Raspberry Pi in order to provide an easy way to move applications running on the
Raspberry Pi to the Jetson board.

This document walks through what is contained in The Jetson GPIO library
package, how to configure the system and run the provided sample applications,
and the library API.

--------------------------------------------------------------------------------
                            Package Components
--------------------------------------------------------------------------------

In addition to this document, the Jetson GPIO library package contains the
following:

1. The lib/python/ subdirectory contains the Python modules that implement all
   library functionality. The gpio.py module is the main component that will be
   imported into an application and provides the needed APIs. The gpio_event.py
   and gpio_pin_data.py modules are used by the gpio.py module and must not be
   imported directly in to an application.

2. The samples/ subdirectory contains sample applications to help in getting
   familiar with the library API and getting started on an application. The
   simple_input.py and simple_output.py applications show how to perform read
   and write to a GPIO pin respectively, while the button_led.py,
   button_event.py and button_interrupt.py show how a button press may be used
   to blink an LED using busy-waiting, blocking wait and interrupt callbacks
   respectively.

--------------------------------------------------------------------------------
              Configuring the system and running sample scripts
--------------------------------------------------------------------------------

In order to use the Jetson GPIO Library, the correct user permissions/groups must
be set first.

Create a new gpio user group. Then add your user to the newly created group.
        sudo groupadd -f -r gpio
        sudo usermod -a -G gpio your_user_name

Install custom udev rules by copying the 99-gpio.rules file into the rules.d
directory:
        sudo cp /opt/nvidia/jetson-gpio/etc/99-gpio.rules /etc/udev/rules.d/

Please note that for the new rule to take place, you may either need to reboot
or reload the udev rules by issuing this command:
        sudo udevadm control --reload-rules && sudo udevadm trigger

With the permissions set as needed, the sample applications provided in the
samples/ directory can be used. The following describes the operation of each
application:

1. simple_input.py: This application uses the BCM pin numbering mode and reads
   the value at pin 12 of the 40 pin header and prints the value to the
   screen.

2. simple_out.py: This application uses the BCM pin numbering mode from
   Raspberry Pi and outputs alternating high and low values at BCM pin 18 (or
   board pin 12 on the header) every 2 seconds.

3. button_led.py: This application uses the BOARD pin numbering. It requires a
   button connected to pin 18 and GND, a pull-up resistor connecting pin 18
   to 3V3 and an LED and current limiting resistor connected to pin 12. The
   application reads the button state and keeps the LED on for 1 second every
   time the button is pressed.

4. button_event.py: This application uses the BOARD pin numbering. It requires a
   button connected to pin 18 and GND, a pull-up resistor connecting the button
   to 3V3 and an LED and current limiting resistor connected to pin 12. The
   application performs the same function as the button_led.py but performs a
   blocking wait for the button press event instead of continuously checking the
   value of the pin in order to reduce CPU usage.

5. button_interrupt.py: This application uses the BOARD pin numbering. It
   requires a button connected to pin 18 and GND, a pull-up resistor connecting
   the button to 3V3, an LED and current limiting resistor connected to pin 12
   and a second LED and current limiting resistor connected to pin 13. The
   application slowly blinks the first LED continuously and rapidly blinks the
   second LED five times only when the button is pressed.

In order to set up the correct environment variables for Python, the
run_sample.sh script can be used to run these sample applications. This can be
done with the following command when in the samples/ directory:
        ./run_sample.sh <name_of_application_to_run>

The usage of the script can also be viewed by using:
        ./run_sample.sh -h
        ./run_sample.sh --help

--------------------------------------------------------------------------------
                           Complete library API
--------------------------------------------------------------------------------

The Jetson GPIO library provides all public APIs provided by the RPi.GPIO
library with the exception of the Software PWM APIs. The following discusses the
use of each API:

1. Importing the libary

To import the Jetson.GPIO module use:

    import Jetson.GPIO as GPIO

This way, you can refer to the module as GPIO throughout the rest of the
application. The module can also be imported using the name RPi.GPIO instead of
Jetson.GPIO for existing code using the RPi library.

2. Pin numbering

The Jetson GPIO library provides four ways of numbering the I/O pins. The first
two correspond to the modes provided by the RPi.GPIO library, i.e BOARD and BCM
which refer to the pin number of the 40 pin GPIO header and the Broadcom SoC
GPIO numbers respectively. The remaining two modes, CVM and TEGRA_SOC use
strings instead of numbers which correspond to signal names on the CVM/CVB
connector and the Tegra SoC respectively.

To specify which mode you are using (mandatory), use the following function
call:

    GPIO.setmode(GPIO.BOARD)
    # or
    GPIO.setmode(GPIO.BCM)
    # or
    GPIO.setmode(GPIO.CVM)
    # or
    GPIO.setmode(GPIO.TEGRA_SOC)

To check which mode has be set, you can call:

    mode = GPIO.getmode()

The mode must be one of GPIO.BOARD, GPIO.BCM, GPIO.CVM, GPIO.TEGRA_SOC or
None.

3. Warnings

It is possible that the GPIO you are trying to use is already being used
external to the current application. In such a condition, the Jetson GPIO
library will warn you if the GPIO being used is configured to anything but the
default direction (input). It will also warn you if you try cleaning up before
setting up the mode and channels. To disable warnings, call:

    GPIO.setwarnings(False)

4. Set up a channel

The GPIO channel must be set up before use as input or output. To configure
the channel as input, call:

    # (where channel is based on the pin numbering mode discussed above)
    GPIO.setup(channel, GPIO.IN)

To set up a channel as output, call:

    GPIO.setup(channel, GPIO.OUT)

It is also possible to specify an initial value for the output channel:

    GPIO.setup(channel, GPIO.OUT, initial=GPIO.HIGH)

When setting up a channel as output, it is also possible to set up more than one
channel at once:

    # add as many as channels as needed. You can also use tuples: (18,12,13)
    channels = [18, 12, 13]
    GPIO.setup(channels, GPIO.OUT)

5. Input

To read the value of a channel, use:

    GPIO.input(channel)

This will return either GPIO.LOW or GPIO.HIGH.

6. Output

To set the value of a pin configured as output, use:

    GPIO.output(channel, state)

where state can be GPIO.LOW or GPIO.HIGH.

You can also output to a list or tuple of channels:

    channels = [18, 12, 13] # or use tuples
    GPIO.output(channels, GPIO.HIGH) # or GPIO.LOW
    # set first channel to HIGH and rest to LOW
    GPIO.output(channel, (GPIO.LOW, GPIO.HIGH, GPIO.HIGH))

7. Clean up

At the end of the program, it is good to clean up the channels so that all pins
are set in their default state. To clean up all channels used, call:

    GPIO.cleanup()

If you don't want to clean all channels, it is also possible to clean up
individual channels or a list or tuple of channels:

    GPIO.cleanup(chan1) # cleanup only chan1
    GPIO.cleanup([chan1, chan2]) # cleanup only chan1 and chan2
    GPIO.cleanup((chan1, chan2)  # does the same operation as previous statement

8. Jetson Board Information and library version

To get information about the Jetson module, use/read:

    GPIO.JETSON_INFO

This provides a Python dictionary with the following keys: P1_REVISION, RAM,
REVISION, TYPE, MANUFACTURER and PROCESSOR. All values in the dictionary are
strings with the exception of P1_REVISION which is an integer.

To get information about the library version, use/read:

    GPIO.VERSION

This provides a string with the X.Y.Z version format.

9. Interrupts

Aside from busy-polling, the library provides three additional ways of
monitoring an input event:

* The wait_for_edge() function

  This function blocks the calling thread until the provided edge(s) is
  detected. The function can be called as follows:

    GPIO.wait_for_edge(channel, GPIO.RISING)

  The second parameter specifies the edge to be detected and can be
  GPIO.RISING, GPIO.FALLING or GPIO.BOTH. If you only want to limit the wait
  to a specified amount of time, a timeout can be optionally set:

    # timeout is in milliseconds
    GPIO.wait_for_edge(channel, GPIO.RISING, timeout=500)

  The function returns the channel for which the edge was detected or None if a
  timeout occurred.

* The event_detected() function

  This function can be used to periodically check if an event occurred since the
  last call. The function can be set up and called as follows:

    # set rising edge detection on the channel
    GPIO.add_event_detect(channel, GPIO.RISING)
    run_other_code()
    if GPIO.event_detected(channel):
        do_something()

As before, you can detect events for GPIO.RISING, GPIO.FALLING or GPIO.BOTH.

* A callback function run when an edge is detected

  This feature can be used to run a second thread for callback functions. Hence,
  the callback function can be run concurrent to your main program in response
  to an edge. This feature can be used as follows:

    # define callback function
    def callback_fn(channel):
        print("Callback called from channel %s" % channel)

    # add rising edge detection
    GPIO.add_event_detect(channel, GPIO.RISING, callback=callback_fn)

  More than one callback can also be added if required as follows:

    def callback_one(channel):
        print("First Callback")

    def callback_two(channel):
        print("Second Callback")

    GPIO.add_event_detect(channel, GPIO.RISING)
    GPIO.add_event_callback(channel, callback_one)
    GPIO.add_event_callback(channel, callback_two)

  The two callbacks in this case are run sequentially, not concurrently since
  there is only thread running all callback functions.

  In order to prevent multiple calls to the callback functions by collapsing
  multiple events in to a single one, a debounce time can be optionally set:

    # bouncetime set in milliseconds
    GPIO.add_event_detect(channel, GPIO.RISING, callback=callback_fn,
                          bouncetime=200)

If the edge detection is not longer required it can be removed as follows:

    GPIO.remove_event_detect(channel)

10. Check function of GPIO channels

This feature allows you to check the function of the provided GPIO channel:

    GPIO.gpio_function(channel)

The function returns either GPIO.IN or GPIO.OUT.
Tags: [Raspberry Pi], [電子工作], [ディープラーニング]
●関連するコンテンツ(この記事を読んだ人は、次の記事も読んでいます)
【2020年版】NVIDIA Jetson Nano、Jetson Xavier NXの便利スクリプト
Jetsonの面倒な初期設定やミドルウェアのインストールを bashスクリプトの実行だけで簡単にできます
NVIDIA Jetson Nano 開発者キットを買ってみた。メモリ容量 4GB LPDDR4 RAM
Jetson Nanoで TensorFlow PyTorch Caffe/Caffe2 Keras MXNet等を GPUパワーで超高速で動かす!
NVIDIA Jetson Nano 開発者キットを Raspberry Pi 3と性能比較してみたベンチマークレビュー
Jetson Nanoの GPUパワーを実感して Raspberry Pi 3との置き換えは可能かを検証する
NVIDIA Jetson Nano 開発者キットを動かすのに最低限必要な物の一覧、冷却ファン、NGFF 無線カード
Jetson Nano 開発者キットに最低限必要な物、UHS-1 microSDカード、USBキーボード、電源、HDMIディスプレイ
NVIDIA Jetson Nano 開発者キットで使用する microSDカードに Ubuntu OSイメージを焼く方法を説明
Jetson Nano 開発者キットを動かすのに必要な microSDカードを作成する方法(Windows、Mac)
NVIDIA Jetson Nano 開発者キットで SDカードで起動したら一番最初にする事
ログイン操作後に各種の初期設定やパッケージのアップデートをすると良いです
NVIDIA Jetson Nano Ubuntuのパッケージがアップデート可能な場合にアップデートする方法
Ubuntuのパッケージを更新して packages can be updatedを 0にする方法
NVIDIA Jetson Nanoで nvcc command not found build CUDA app Errorの対応方法
Jetson Nanoで CUDAを使用したアプリをビルドする時に command nvcc not foundが出る場合の対処方法
NVIDIA Jetson Nanoの GUI環境を無効にして CUI環境で動く様にしてフリーメモリエリアを広げる
Ubuntuの X Window Systemを無効にして Jetson Nanoの使用できるメモリ容量を 300MB増やす方法
NVIDIA Jetson Nano 開発者キットの Tips一覧、冷却ファンが動かない、20Wモードで動かす、動作温度を知る、他
Jetson Nanoで初心者が戸惑いそうな所を Tipsとしてまとめました nvcc not found
NVIDIA Jetson Nano 開発者キットに Raspberry Pi Camera Module V2 RaspiCamを接続する方法
Jetson Nanoは Raspberry Pi Camera Module V2の IMX219 800万画素カメラモジュールを接続できます
Raspberry Piで TensorFlow Deep Learning Frameworkを自己ビルドする方法
ラズパイで TensorFlow Deep Learning Frameworkを自己ビルドする方法
Raspberry Piに PyTorch Deep Learning Frameworkをソースコードからビルドする方法、DeepDreamでキモイ絵を作成
ラズパイで PyTorch Torch Deep Learning Frameworkをビルドして Deep Dreamで悪夢を見る方法
Raspberry Piで darkflowを動かしてリアルタイムでカメラ映像を画像物体検出する方法
ラズパイで darkflowと Tensorflowを動かしてリアルタイムでカメラ映像の物体検出を行なってみる
Raspberry Piで Caffe Deep Learning Frameworkで物体認識を行なってみるテスト
ラズパイで Caffe Deep Learning Frameworkを動かして物体認識を行なってみる
Raspberry Piで Deep Learningフレームワーク Chainerをインストールしてみる
ラズパイに Deep Learningのフレームワーク Chainerを入れてみた
Raspberry Piで DeepBeliefSDKをビルドして画像認識フレームワークを動かす方法
ラズパイに DeepBeliefSDKを入れて画像の物体認識を行なう
【成功版】最新版の Darknetに digitalbrain79版の Darknet with NNPACKの NNPACK処理を適用する
ラズパイで NNPACK対応の最新版の Darknetを動かして超高速で物体検出や DeepDreamの悪夢を見る
【成功版】Raspberry Piで Darknet Neural Network Frameworkをビルドする方法
ラズパイに Darknet Neural Network Frameworkを入れて物体検出や悪夢のグロ画像を生成する
【成功版】Raspberry Piに TensorFlow Deep Learning Frameworkをインストールする方法
ラズパイに TensorFlow Deep Learning Frameworkを入れて Google DeepDreamで悪夢を見る方法
Raspberry Piに Jupyter Notebookをインストールして拡張子 ipynb形式の IPythonを動かす
ラズパイに IPython Notebookをインストールして Google DeepDream dream.ipynbを動かす
Raspberry Piで Caffe2 Deep Learning Frameworkをソースコードからビルドする方法
ラズパイで Caffe 2 Deep Learning Frameworkをソースコードから自己ビルドする方法
【ビルド版】Raspberry Piで DeepDreamを動かしてキモイ絵をモリモリ量産 Caffe Deep Learning Framework
ラズパイで Caffe Deep Learning Frameworkをビルドして Deep Dreamを動かしてキモイ絵を生成する
Raspberry Pi 3 Model Bで動画処理アプリ FFmpegをコンパイルする方法
ラズパイ3で動画音声変換処理プログラム FFmpegをセルフコンパイルしてインストールする方法
Raspberry Pi 3 Model Bで動画処理アプリ libavをコンパイルする方法
ラズパイ3で libavをセルフコンパイルしてインストールする方法
Raspberry Piで NNPACKをビルドする方法
ラズパイで NNPACKをビルドしてみるテスト、ビルドするだけ
BLAS、ベクトルと行列に関する基本線型代数操作を実行する演算ライブラリ APIのまとめ
BLAS(Basic Linear Algebra Subprograms)の線型代数演算ライブラリ APIのまとめ
Raspberry Pi 3の Linuxコンソール上で使用する各種コマンドまとめ
ラズパイの Raspbian OSのコマンドラインで使用する便利コマンド、負荷試験や CPUシリアル番号の確認方法等も
PIP機能付きの 4K対応の 4入力 1出力の HDMIセレクターを買ってみた、HDMI機器が複数有る場合に便利
ピクチャ イン ピクチャ機能付き 4K入力対応の 4入力 1出力 HDMI切り換え機 HDSFX0401P
EDID保持機能付きの 4K対応の 4入力 2出力の マトリックス切り替え HDMIセレクター、液晶画面 2台と使用で最強
TESmart HMA0402A30 マトリックス切り替えで液晶画面 2台に接続できて更に EDID保持の便利機能付き HDMI切り換え機
[HOME]
|
[BACK]
リンクフリー(連絡不要、ただしトップページ以外は Web構成の変更で移動する場合があります)
Copyright (c)
2019 FREE WING,Y.Sakamoto
Powered by 猫屋敷工房 & HTML Generator
http://www.neko.ne.jp/~freewing/raspberry_pi/nvidia_jetson_nano_gpio_blink_led_switch/