・2019/05/06
 【ビルド版】NVIDIA Jetson Nanoで Caffe DeepDreamを GPUパワーで動かしてキモイ絵をモリモリ量産
(NVIDIA Jetson Nanoで Caffe Deep Learningをビルドして CUDAで DeepDreamを動かしてキモイ絵を生成する)
Tags: [Raspberry Pi], [電子工作], [ディープラーニング]
● Jetson Nano、Jetson Xavier NXの便利スクリプト
・2020/07/03

【2020年版】NVIDIA Jetson Nano、Jetson Xavier NXの便利スクリプト
Jetsonの面倒な初期設定やミドルウェアのインストールを bashスクリプトの実行だけで簡単にできます
● 2020年追記 Caffeは OpenCV 3系を必要とします
OpenCV 4系に対応改造した Caffeを使う事で JetPack 4.3以降はハッピーに成れる!!
Qengineering / caffe
Special adapted for OpenCV 4.1 and Python 3.6+
Install OpenCV 4.1.2 and Caffe on Ubuntu 18.04 for Python 3
● NVIDIA Jetson Nanoで OpenCV 3をビルドしてインストールする方法、NVCaffe等の OpenCV 4未対応を動かす
NVIDIA Jetson Nanoに「古い」 OpenCV 3.4.10をビルドしてインストールする方法
・2020/04/25
NVIDIA Jetson Nanoで OpenCV 3をビルドしてインストールする方法、NVCaffe等の OpenCV 4未対応を動かす
NVIDIA Jetson Nanoに「古い」 OpenCV 3.4.10をビルドしてインストールする方法
● 2020/04追記 fatal error: opencv2/core/core.hpp No such file or directory
src/caffe/util/io.cpp:6:10: fatal error: opencv2/core/core.hpp: No such file or directory
 #include <opencv2/core/core.hpp>
          ^~~~~~~~~~~~~~~~~~~~~~~
原因:OpenCVが 3から 4になったから
jetson@jetson-desktop:~$ python -c "import cv2; print (cv2.__version__)"
4.1.1

jetson@jetson-desktop:~$ ls -l /usr/include/opencv4/opencv2/
drwxrwxr-x 2 root root   4096 12月 17 03:56 calib3d
-rw-r--r-- 1 root root 182567 12月 14 00:46 calib3d.hpp
drwxrwxr-x 7 root root   4096 12月 17 03:56 core
-rw-r--r-- 1 root root 151515 12月 14 00:46 core.hpp
-rw-r--r-- 1 root root   3440 12月 14 02:25 cvconfig.h
drwxrwxr-x 3 root root   4096 12月 17 03:56 dnn
-rw-r--r-- 1 root root   3347 12月 14 00:46 dnn.hpp

jetson@jetson-desktop:~$ ls -l /usr/include/opencv4/opencv2/core/
-rw-r--r-- 1 root root  21525 12月 14 00:46 affine.hpp
-rw-r--r-- 1 root root   2819 12月 14 00:46 async.hpp
-rw-r--r-- 1 root root  26499 12月 14 00:46 base.hpp
-rw-r--r-- 1 root root   1197 12月 14 00:46 bindings_utils.hpp
-rw-r--r-- 1 root root    845 12月 14 00:46 bufferpool.hpp
-rw-r--r-- 1 root root   6975 12月 14 00:46 check.hpp
-rw-r--r-- 1 root root 128652 12月 14 00:46 core_c.h
-rw-r--r-- 1 root root   2366 12月 14 00:46 core.hpp
Compile error on OpenCV 4.0.1 #6680
Fix build with OpenCV 4.0 #6625
Support OpenCV 4 compatible with older versions #6693
●解決方法:USE_OPENCVのコメントを「取る」= OpenCVを使わない
USE_OPENCV := 0

sed -i 's/# USE_OPENCV/USE_OPENCV/' Makefile.config
●駄目な解決方法:明示的に OpenCV 3をインストールする
jetson@jetson-desktop:~/nvcaffe$ apt-cache search libopencv-core3.2
libopencv-core-dev - development files for libopencv-core3.2
libopencv-core3.2 - computer vision core library

sudo apt-get install -y libopencv-core-dev libopencv-core3.2
●駄目な解決方法:/usr/include/opencv2でエラーが出ない様にシンボリックリンクを張る
jetson@jetson-desktop:~$ sudo ln -s /usr/include/opencv4/opencv2/ /usr/include/opencv2

jetson@jetson-desktop:~$ ls -l /usr/include/opencv2/core/
-rw-r--r-- 1 root root  21525 12月 14 00:46 affine.hpp
-rw-r--r-- 1 root root   2819 12月 14 00:46 async.hpp
-rw-r--r-- 1 root root  26499 12月 14 00:46 base.hpp
-rw-r--r-- 1 root root   1197 12月 14 00:46 bindings_utils.hpp
-rw-r--r-- 1 root root    845 12月 14 00:46 bufferpool.hpp
-rw-r--r-- 1 root root   6975 12月 14 00:46 check.hpp
-rw-r--r-- 1 root root 128652 12月 14 00:46 core_c.h
-rw-r--r-- 1 root root   2366 12月 14 00:46 core.hpp
error: ‘CV_FILLED’ was not declared in this scope
● NVIDIA Jetson Nanoで Google DeepDreamを動かしてキモイ絵を量産する
Raspberry Piでも動かした事の有る DeepDreamを NVIDIA Jetson Nanoの GPUパワーで動かしてみます。
下記はラズパイで Caffeを動かしたまとめ。
・2018/08/04
【ビルド版】Raspberry Piで DeepDreamを動かしてキモイ絵をモリモリ量産 Caffe Deep Learning Framework
ラズパイで Caffe Deep Learning Frameworkをビルドして Deep Dreamを動かしてキモイ絵を生成する
・2018/08/04
【インストール版】Raspberry Piで DeepDreamを動かしてキモイ絵をモリモリ量産 Caffe Deep Learning
ラズパイで Caffe Deep Learning Frameworkをインストールして Deep Dreamを動かしてキモイ絵を生成する
● NVIDIA Jetson Nanoで Google DeepDreamを動かしてキモイ絵を量産する方法
DeepDreamを動かすには Caffeと言う Deep Learning Frameworkを使用します。
Caffeは apt-getでもインストールできますが、その後に DeepDreamを動かす方法が分からないのでビルドする方法を取ります。
(apt-getでインストールした Caffeの場合は PYTHONPATHと LD_LIBRARY_PATHへのパス設定は不要)
● NVIDIA Jetson Nanoとラズパイ3B+との Caffe Deep Learning Frameworkの動作速度ベンチマーク比較
wget https://github.com/google/deepdream/raw/master/flowers.jpg
python deepdreamer.py flowers.jpg
320x240pxの画像
| Raspberry Pi 3B+ CPU | Atlas | 180秒 | 2018/8のバージョン Caffe |
| Raspberry Pi 3B+ CPU | Atlas | 160秒 | Jetsonと同じ最新バージョン Caffe |
| Raspberry Pi 3B+ CPU | OpenBLAS
1 core | 180秒 | Jetsonと同じ最新バージョン Caffe |
| Raspberry Pi 3B+ CPU | OpenBLAS
4 core | Err | Segmentation fault |
| NVIDIA CPU | Atlas | 85秒 |
| NVIDIA CPU | OpenBLAS
1 core | 35秒 |
| NVIDIA CPU | OpenBLAS
2 core | 25秒 |
| NVIDIA CPU | OpenBLAS
4 core | 22秒 |
| NVIDIA GPU | | 6秒 |
| NVIDIA GPU | | 7秒 | NVIDIA版 Caffe |
● NVIDIA Jetson Nanoで BVLC Caffe Deep Learning Frameworkをビルドする
Caffe - Deep Learning Framework
BVLC/caffe
Caffe: a fast open framework for deep learning. http://caffe.berkeleyvision.org/
BVLC = Berkeley Vision and Learning Center(カリフォルニア大学バークレー校)
Caffeの作者 Yangqing Jia氏
Facebookに入り、後継の Caffe2になった。(ざっくりな経緯解説。時系列は未確認)
● caffeのビルド方法の情報源
下記の caffe公式のインストール手順書を見ながら NVIDIA Jetson Nano環境に合わせて総合的に読み砕き応用して試行錯誤で Caffe Deep Learning Frameworkをビルドします。
Caffe - Installation
Caffe - Ubuntu Installation
● Installation
● Prerequisites
 BLAS via ATLAS, MKL, or OpenBLAS.
 Boost >= 1.55
 protobuf, glog, gflags, hdf5

● Pycaffe interfaces have their own natural needs.
 For Python Caffe: Python 2.7 or Python 3.3+, numpy (>= 1.7), boost-provided boost.python

● CPU-only Caffe
 for cold-brewed CPU-only Caffe uncomment the CPU_ONLY := 1 flag in Makefile.config to configure and build Caffe without CUDA. This is helpful for cloud or cluster deployment.

● BLAS
 OpenBLAS: free and open source; this optimized and parallel BLAS could require more effort to install, although it might offer a speedup.
 Install OpenBLAS
 Set BLAS := open in Makefile.config

● Python Caffe (optional)
 The main requirements are numpy and boost.python (provided by boost). pandas is useful too and needed for some examples.
 You can install the dependencies with
 pip install -r requirements.txt

● Compilation with Make
cp Makefile.config.example Makefile.config
# Adjust Makefile.config (for example, if using Anaconda Python, or if cuDNN is desired)
make all
make test
make runtest
● Ubuntu Installation
● General dependencies
sudo apt-get install libprotobuf-dev libleveldb-dev libsnappy-dev libopencv-dev libhdf5-serial-dev protobuf-compiler
sudo apt-get install --no-install-recommends libboost-all-dev
sudo apt-get install libgflags-dev libgoogle-glog-dev liblmdb-dev

● BLAS
 install ATLAS by
sudo apt-get install libatlas-base-dev

 install OpenBLAS by
sudo apt-get install libopenblas-dev

 MKL for better CPU performance.
※ MKLは NVIDIA Jetson Nanoでは関係有りません(Intel CPU専用)

● Python (optional)
 if you use the default Python you will need to
sudo apt-get install python-dev
 package to have the Python headers for building the pycaffe interface.
# glog
wget https://github.com/google/glog/archive/v0.3.3.tar.gz
tar zxvf v0.3.3.tar.gz
cd glog-0.3.3
./configure
make && make install

# gflags
wget https://github.com/schuhschuh/gflags/archive/master.zip
unzip master.zip
cd gflags-master
mkdir build && cd build
export CXXFLAGS="-fPIC" && cmake .. && make VERBOSE=1
make && make install

# lmdb
git clone https://github.com/LMDB/lmdb
cd lmdb/libraries/liblmdb
make && make install
● NVIDIA Jetson Nanoで Caffe Deep Learning Frameworkをビルドする。
# NVIDIA Jetson Nanoでお決まりの sudo apt-get update
sudo apt-get update

# BVLC/caffeの Gitからソースリスト一式を clone(ダウンロード)する
cd
git clone https://github.com/BVLC/caffe.git --depth 1
cd
cd caffe

# Makefile.configファイルを作成(参考例のファイルからコピー)する
cp Makefile.config.example Makefile.config
# Adjust Makefile.config (for example, if using Anaconda Python, or if cuDNN is desired)

# Makefile.configファイルを Jetson Nano環境に合わせて編集する
nano Makefile.config

# NVIDIA Jetson Nano環境は演算処理に cuDNNが使えるので USE_CUDNN := 1の行のコメント文字#を取って有効にする
USE_CUDNN := 1

# BLAS(Basic Linear Algebra Subprograms、ベクトルと行列に関する数値演算ライブラリの名称)
# 今回は BLASライブラリとして ATLAS実装(Automatically Tuned Linear Algebra Software)を使用します
# BLAS choice:
# atlas for ATLAS (default)
# mkl for MKL
# open for OpenBlas
BLAS := atlas
# BLAS := open

# hdf5関係で「ファイルが見つからないエラー」が出るのでパスを設定する
# https://support.hdfgroup.org/HDF5/
# Whatever else you find you need goes here.
INCLUDE_DIRS := $(PYTHON_INCLUDE) /usr/local/include /usr/include/hdf5/serial
LIBRARY_DIRS := $(PYTHON_LIB) /usr/local/lib /usr/lib /usr/lib/aarch64-linux-gnu/hdf5/serial

# OpenCVが OpenCV 3なので OPENCV_VERSION := 3のコメント文字#を取って有効にする
# undefined reference to `cv::imread(cv::String const&, int)'
OPENCV_VERSION := 3

# nvcc fatal   : Unsupported gpu architecture 'compute_20'
# Makefile:604: recipe for target '.build_release/cuda/src/caffe/layers/filter_layer.o' failed
# エラーが出るので CUDA_ARCHの定義で、
# -gencode arch=compute_20,code=sm_20
# -gencode arch=compute_20,code=sm_21
# を削除する

# Check failed: error == cudaSuccess (48 vs. 0)  no kernel image is available for execution on the device
# CUDA_ARCHに -gencode arch=compute_53,code=sm_53を追加する
# 下記では削除する予定の compute_20,code=sm_20を arch=compute_53,code=sm_53に文字列置換している。
CUDA_ARCH := -gencode arch=compute_53,code=sm_53 \

# undefined symbol: _ZN5caffe21PyErrReportAndForwardEv
# WITH_PYTHON_LAYER := 1のコメント文字#を取って有効にする
# Uncomment to support layers written in Python (will link against Python libs)
WITH_PYTHON_LAYER := 1

# コマンドラインでサクッと Makefile.configファイルを変更する
sed -i 's/^# USE_CUDNN/USE_CUDNN/' Makefile.config
sed -i 's/BLAS :=.*/BLAS := atlas/' Makefile.config
sed -i 's/^INCLUDE_DIRS :=.*/INCLUDE_DIRS := $(PYTHON_INCLUDE) \/usr\/local\/include \/usr\/include\/hdf5\/serial/' Makefile.config
sed -i 's/^LIBRARY_DIRS :=.*/LIBRARY_DIRS := $(PYTHON_LIB) \/usr\/local\/lib \/usr\/lib \/usr\/lib\/aarch64-linux-gnu\/hdf5\/serial/' Makefile.config
sed -i 's/# OPENCV_VERSION/OPENCV_VERSION/' Makefile.config
sed -i 's/arch=compute_20,code=sm_20/arch=compute_53,code=sm_53/' Makefile.config
# sed -i 's/-gencode arch=compute_20,code=sm_21 \\//' Makefile.config
# Makefile.config:41: *** recipe commences before first target.  Stop.
sed -i '/-gencode arch=compute_20,code=sm_21 \\/d' Makefile.config
sed -i 's/# WITH_PYTHON_LAYER/WITH_PYTHON_LAYER/' Makefile.config

# OpenBlas
# sed -i 's/BLAS :=.*/BLAS := open/' Makefile.config

# 編集内容を確認する
grep "BLAS " Makefile.config
grep "CUDA_" Makefile.config
grep "_DIRS :" Makefile.config
grep "OPENCV_" Makefile.config
grep "_CUDNN" Makefile.config
grep "CPU_" Makefile.config
grep "WITH_" Makefile.config
user@user-desktop:~/caffe$ grep "BLAS " Makefile.config
# BLAS choice:
BLAS := atlas

user@user-desktop:~/caffe$ grep "CUDA_" Makefile.config
CUDA_DIR := /usr/local/cuda
# CUDA_DIR := /usr
CUDA_ARCH := -gencode arch=compute_53,code=sm_53 \

user@user-desktop:~/caffe$ grep "_DIRS :" Makefile.config
INCLUDE_DIRS := $(PYTHON_INCLUDE) /usr/local/include /usr/include/hdf5/serial
LIBRARY_DIRS := $(PYTHON_LIB) /usr/local/lib /usr/lib /usr/lib/aarch64-linux-gnu/hdf5/serial

user@user-desktop:~/caffe$ grep "OPENCV_" Makefile.config
OPENCV_VERSION := 3

user@user-desktop:~/caffe$ grep "_CUDNN" Makefile.config
USE_CUDNN := 1

user@user-desktop:~/caffe$ grep "CPU_" Makefile.config
# CPU_ONLY := 1

user@user-desktop:~/caffe$ grep "WITH_" Makefile.config
WITH_PYTHON_LAYER := 1

user@user-desktop:~/caffe$ diff Makefile.config.example Makefile.config
5c5
< # USE_CUDNN := 1
---
> USE_CUDNN := 1
23c23
< # OPENCV_VERSION := 3
---
> OPENCV_VERSION := 3
39,40c39,40
< CUDA_ARCH := -gencode arch=compute_20,code=sm_20 \
<               -gencode arch=compute_20,code=sm_21 \
---
> CUDA_ARCH := -gencode arch=compute_53,code=sm_53 \
>
94c94
< # WITH_PYTHON_LAYER := 1
---
> WITH_PYTHON_LAYER := 1
97,98c97,98
< INCLUDE_DIRS := $(PYTHON_INCLUDE) /usr/local/include
< LIBRARY_DIRS := $(PYTHON_LIB) /usr/local/lib /usr/lib
---
> INCLUDE_DIRS := $(PYTHON_INCLUDE) /usr/local/include /usr/include/hdf5/serial
> LIBRARY_DIRS := $(PYTHON_LIB) /usr/local/lib /usr/lib /usr/lib/aarch64-linux-gnu/hdf5/serial
● (1) 事前に Caffeのビルドに必要なライブラリ等を apt-get installする
sudo apt-get -y install protobuf-compiler libprotoc-dev libboost-dev libgflags-dev libgoogle-glog-dev

# Makefile.config, BLAS := atlas
sudo apt-get -y install libatlas-base-dev
# Makefile.config, BLAS := open
# sudo apt-get -y install libopenblas-dev
sudo apt-get -y install libhdf5-dev libleveldb-dev liblmdb-dev libopencv-dev libsnappy-dev
sudo apt-get -y install libboost-system-dev libboost-filesystem-dev libboost-thread-dev
● (2) make pycaffeの実行時にエラーが出ない様に必要なライブラリ等を apt-get installする
# make pycaffe
sudo apt-get -y install libboost-python-dev
● (3) deepdreamer.pyの実行時にエラーが出ない様に必要なライブラリ等を apt-get installする
# python deepdreamer.py sample.jpg
sudo apt-get -y install python-skimage python-protobuf python-numpy python-pil
●上記の (1)~(3)の apt-get installを 1行で実行する
# Makefile.config, BLAS := atlas
sudo apt-get -y install libatlas-base-dev protobuf-compiler libprotoc-dev libboost-dev libgflags-dev libgoogle-glog-dev libhdf5-dev libleveldb-dev liblmdb-dev libopencv-dev libsnappy-dev libboost-system-dev libboost-filesystem-dev libboost-thread-dev libboost-python-dev python-skimage python-protobuf python-numpy python-pil

# Makefile.config, BLAS := open
# sudo apt-get -y install libopenblas-dev
● nvccの存在を確認
user@user-desktop:~/caffe$ nvcc
# nvcc fatal   : No input files specified; use option --help for more information

# Solution
# ~/.bashrcに CUDA関係の環境変数を追加
# /usr/local/cuda-10.0は /usr/local/cudaにシンボリックリンクが存在します
echo 'export CUDA_HOME=/usr/local/cuda' >> ~/.bashrc
echo 'export LD_LIBRARY_PATH=${CUDA_HOME}/lib64:${LD_LIBRARY_PATH}' >> ~/.bashrc
echo 'export PATH=${CUDA_HOME}/bin:${PATH}' >> ~/.bashrc
source ~/.bashrc
● Jetson Nanoを最大パフォーマンスで動かす
# 最大パフォーマンスで動かす
sudo nvpmodel -q
sudo nvpmodel -m 0
sudo nvpmodel -q

sudo /usr/bin/jetson_clocks --show
sudo /usr/bin/jetson_clocks
●実際に caffeをビルドする
# ビルド設定を初期化
make clean

# make all -j4で 4 coreを使ってビルド速度を高速化(約 30分)
time make all -j4

# real    29m21.720s
# user    73m4.716s
# sys     7m26.316s

# make testと make runtest
make test -j4
make runtest -j4

# Python用の Caffeの作成と distributeでビルド内容を反映
make pycaffe
make distribute

# ここまで成功すれば Caffeのビルドは完了
# 環境変数 CAFFE_HOMEに PATHを設定する
# export CAFFE_HOME=/home/user/caffe
export CAFFE_HOME=$(pwd)

echo ${CAFFE_HOME}

# パスにビルドで作成した Caffeを追加する
export PYTHONPATH=${CAFFE_HOME}/python:$PYTHONPATH
export LD_LIBRARY_PATH=${CAFFE_HOME}/distribute/lib:$LD_LIBRARY_PATH
user@user-desktop:~/caffe$ pwd
/home/user/caffe

user@user-desktop:~/caffe$ export CAFFE_HOME=/home/user/caffe

user@user-desktop:~/caffe$ echo $CAFFE_HOME
/home/user/caffe
● Check failed: error == cudaSuccess (48 vs. 0) no kernel image is available for execution on the device
[ RUN      ] AdamSolverTest/2.TestAdamLeastSquaresUpdateWithEverythingShare
F0506 18:24:03.250540 15245 adam_solver.cu:22] Check failed: error == cudaSuccess (48 vs. 0)  no kernel image is available for execution on the device
*** Check failure stack trace: ***
    @       0x7f8e129128  google::LogMessage::Fail()
    @       0x7f8e12af98  google::LogMessage::SendToLog()
    @       0x7f8e128c90  google::LogMessage::Flush()
    @       0x7f8e12b83c  google::LogMessageFatal::~LogMessageFatal()
    @       0x7f8c634b04  caffe::adam_update_gpu<>()
    @       0x7f8c58d284  caffe::AdamSolver<>::ComputeUpdateValue()
    @       0x7f8c5864dc  caffe::SGDSolver<>::ApplyUpdate()
    @       0x7f8c5a0af8  caffe::Solver<>::Step()
    @       0x7f8c5a11d0  caffe::Solver<>::Solve()
    @       0x55690bfce8  _ZN5caffe23GradientBasedSolverTestINS_9GPUDeviceIfEEE21RunLeastSquaresSolverB5cxx11EfffiiibPKc
    @       0x55690d457c  caffe::GradientBasedSolverTest<>::TestLeastSquaresUpdate()
    @       0x55690d5324  caffe::AdamSolverTest_TestAdamLeastSquaresUpdateWithEverythingShare_Test<>::TestBody()
    @       0x55694ed1fc  testing::internal::HandleExceptionsInMethodIfSupported<>()
    @       0x55694e63e4  testing::Test::Run()
    @       0x55694e64ac  testing::TestInfo::Run()
    @       0x55694e65dc  testing::TestCase::Run()
    @       0x55694e6aa8  testing::internal::UnitTestImpl::RunAllTests()
    @       0x55694e6c08  testing::UnitTest::Run()
    @       0x556905ed30  main
    @       0x7f8c07e6e0  __libc_start_main
    @       0x55690674dc  (unknown)
Makefile:542: recipe for target 'runtest' failed
make: *** [runtest] Aborted (core dumped)

# Solution
# -gencode arch=compute_53,code=sm_53を追加する
CUDA_ARCH := -gencode arch=compute_53,code=sm_53 \

# NVIDIA Jetson Nano CUDA Version
CUDA Device Query (Runtime API) version (CUDART static linking)
Device 0: "NVIDIA Tegra X1"
  CUDA Driver Version / Runtime Version          10.0 / 10.0
  CUDA Capability Major/Minor version number:    5.3
●この時点で Caffeを動かしてみる
user@user-desktop:~/caffe$ ./.build_release/tools/caffe -version
caffe version 1.0.0
user@user-desktop:~/caffe$ ls -l ./.build_release/tools/caffe
lrwxrwxrwx 1 user user 9  5月  6 23:59 ./.build_release/tools/caffe -> caffe.bin

user@user-desktop:~/caffe$ ls -l ./.build_release/tools/caffe.bin
-rwxrwxr-x 1 user user 138560  5月  6 23:59 ./.build_release/tools/caffe.bin

user@user-desktop:~/caffe$ ./.build_release/tools/caffe
caffe: command line brew
usage: caffe <command> <args>

commands:
  train           train or finetune a model
  test            score a model
  device_query    show GPU diagnostic information
  time            benchmark model execution time

  Flags from tools/caffe.cpp:
    -gpu (Optional; run in GPU mode on given device IDs separated by ','.Use
      '-gpu all' to run on all available GPUs. The effective training batch
      size is multiplied by the number of devices.) type: string default: ""
    -iterations (The number of iterations to run.) type: int32 default: 50
    -level (Optional; network level.) type: int32 default: 0
    -model (The model definition protocol buffer text file.) type: string
      default: ""
    -phase (Optional; network phase (TRAIN or TEST). Only used for 'time'.)
      type: string default: ""
    -sighup_effect (Optional; action to take when a SIGHUP signal is received:
      snapshot, stop or none.) type: string default: "snapshot"
    -sigint_effect (Optional; action to take when a SIGINT signal is received:
      snapshot, stop or none.) type: string default: "stop"
    -snapshot (Optional; the snapshot solver state to resume training.)
      type: string default: ""
    -solver (The solver definition protocol buffer text file.) type: string
      default: ""
    -stage (Optional; network stages (not to be confused with phase), separated
      by ','.) type: string default: ""
    -weights (Optional; the pretrained weights to initialize finetuning,
      separated by ','. Cannot be set simultaneously with snapshot.)
      type: string default: ""
● NVIDIA Jetson Nanoで Google Deep Dreamアプリを動かす
GitHub - google/deepdream
Googleの deepdreamは IPythonと言う言語で、そのままでは NVIDIA Jetson Nanoでは動きません。
IPythonの deepdreamを実行する方法。
・2018/08/10
Raspberry Piに Jupyter Notebookをインストールして拡張子 ipynb形式の IPythonを動かす
ラズパイに IPython Notebookをインストールして Google DeepDream dream.ipynbを動かす
普通の Pythonで動く様に移植した下記を使用します。
kesara/deepdreamer
Easy to configure Python program that make use of Google's DeepDream. https://deepdreamer.fq.nz/
Deep Dreamer | deepdreamer
# Python版の Google Deep Dream kesara/deepdreamerをダウンロードする
cd
git clone https://github.com/kesara/deepdreamer
cd deepdreamer

# 学習データ bvlc_googlenet.caffemodelをダウンロードする
wget http://dl.caffe.berkeleyvision.org/bvlc_googlenet.caffemodel

# deploy.prototxtをダウンロードする
# https://github.com/BVLC/caffe/tree/master/models/bvlc_googlenet
wget https://raw.githubusercontent.com/BVLC/caffe/master/models/bvlc_googlenet/deploy.prototxt

# deploy.prototxtの一番最後に force_backward: trueの行を追加する
# nano deploy.prototxt
# force_backward: true

# コマンドラインでサクッと force_backward: trueの行を追加する
echo "force_backward: true" >> deploy.prototxt

# tailコマンドで最後に追加された事を確認する
tail deploy.prototxt
※ apt-getでインストールした Caffeの場合は PYTHONPATHと LD_LIBRARY_PATHへのパス設定は不要
※ 上記でビルドした Caffeは python3では動きません。
python(python2)で動かない。
user@user-desktop:~/deepdreamer$ python deepdreamer.py sample.jpg

Traceback (most recent call last):
  File "deepdreamer.py", line 9, in <module>
    from deepdreamer.deepdreamer import deepdream, deepdream_video, list_layers
  File "/home/user/deepdreamer/deepdreamer/deepdreamer.py", line 12, in <module>
    from deepdreamer.images2gif import writeGif
ImportError: No module named images2gif
python(python2)で動かないので、
./deepdreamer/deepdreamer.py
の
images2gif import writeGifの gif動画書き出し機能を無効にする。
nano ./deepdreamer/deepdreamer.py

● 12行目をコメントにする。
# from deepdreamer.images2gif import writeGif

● 196~198行目をコメントにする。
#         writeGif(
#             "{}.gif".format(img_path), frames, duration=duration,
#             repeat=loop)

# コマンドラインでサクッと deepdreamer/deepdreamer.pyを編集する
# 196~198行目を削除する
sed '196,198d' -i ./deepdreamer/deepdreamer.py
# 12行目を削除する
sed '12d' -i ./deepdreamer/deepdreamer.py
python(python2)で動く様になる。
user@user-desktop:~/deepdreamer$ python deepdreamer.py sample.jpg
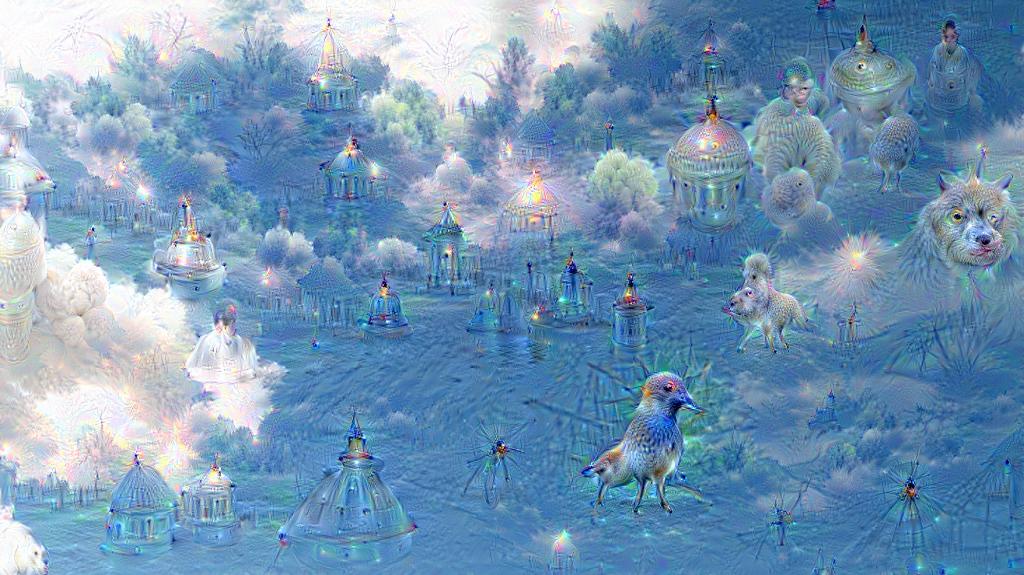
● flowers.jpgで Google DeepDreamを動かしてみる
NVIDIAの CPUパワー 85秒程度で 1枚生成されます。
※ NVIDIA版 Caffeで CUDAの GPUパワー 7秒程度で 1枚生成されます。
cd
cd deepdreamer
wget https://github.com/google/deepdream/raw/master/flowers.jpg

python deepdreamer.py flowers.jpg


user@user-desktop:~/deepdreamer$ ls -l fl*
-rw-rw-r-- 1 user user 30570  5月  7 00:46 flowers.jpg
-rw-rw-r-- 1 user user 22887  5月  7 20:48 flowers.jpg_0.jpg
-rw-rw-r-- 1 user user 22420  5月  7 20:50 flowers.jpg_1.jpg
-rw-rw-r-- 1 user user 22073  5月  7 20:51 flowers.jpg_2.jpg
-rw-rw-r-- 1 user user 21882  5月  7 20:53 flowers.jpg_3.jpg
・NVIDIA Jetson Nanoで Google DeepDreamを動かしてキモイ絵を量産する方法
● deepdreamer.pyで gpuを有効にする場合
※ NVIDIA CUDAの GPUパワー 6秒程度で 1枚生成されます。
optional arguments:
  --gpuid GPUID         enable GPU with id GPUID (default: disabled)

cp flowers.jpg gfl.jpg
python deepdreamer.py --gpuid 0 gfl.jpg

user@user-desktop:~/deepdreamer$ ls -l gfl*
-rw-rw-r-- 1 user user 30570  5月  7 20:56 gfl.jpg
-rw-rw-r-- 1 user user 22500  5月  7 20:56 gfl.jpg_0.jpg
-rw-rw-r-- 1 user user 22277  5月  7 20:56 gfl.jpg_1.jpg
-rw-rw-r-- 1 user user 22126  5月  7 20:56 gfl.jpg_2.jpg
-rw-rw-r-- 1 user user 22010  5月  7 20:56 gfl.jpg_3.jpg
-rw-rw-r-- 1 user user 22079  5月  7 20:56 gfl.jpg_4.jpg
-rw-rw-r-- 1 user user 21995  5月  7 20:56 gfl.jpg_5.jpg
-rw-rw-r-- 1 user user 22021  5月  7 20:57 gfl.jpg_6.jpg
-rw-rw-r-- 1 user user 22137  5月  7 20:57 gfl.jpg_7.jpg
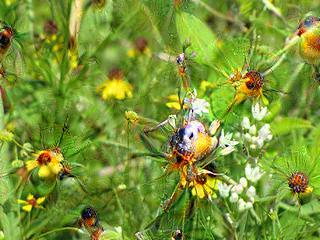
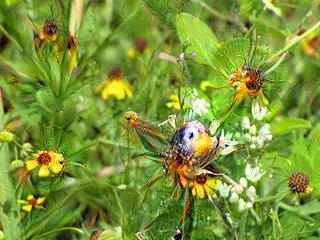
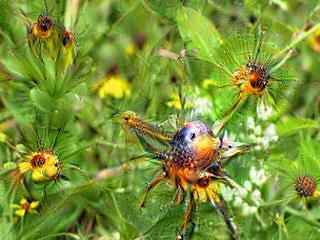
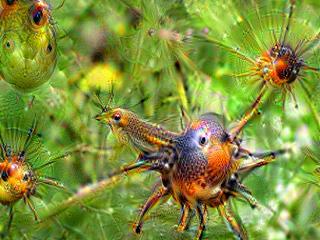
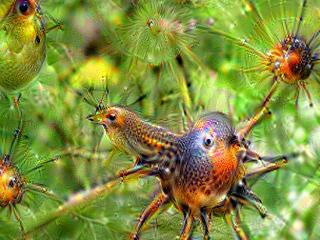
・NVIDIA Jetson Nanoで Google DeepDreamを動かしてキモイ絵を量産する方法
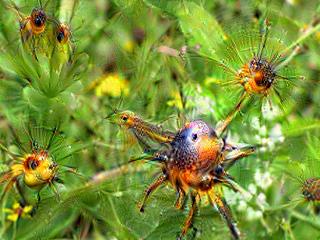
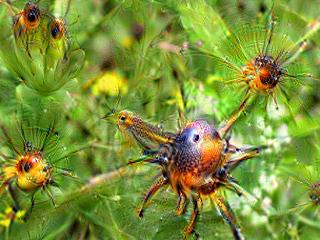
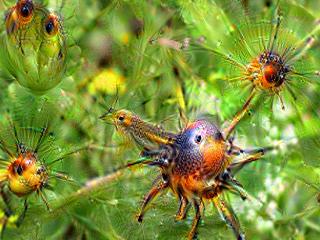
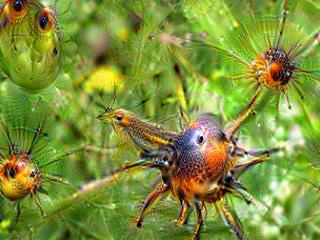
●生成したキモイ絵
元絵 https://github.com/google/deepdream/ より引用
NVIDIA CUDAの GPUパワー 30秒程度で 1枚生成されます。(ラズパイ3B+比で 120倍)
※ ラズパイ3B+は 1024x575px 1枚生成するのに 1時間
wget https://github.com/google/deepdream/raw/master/sky1024px.jpg

python deepdreamer.py --gpuid 0 sky1024px.jpg

user@user-desktop:~/deepdreamer$ ls -l sk*
-rw-rw-r-- 1 user user  65049  5月  7 21:00 sky1024px.jpg
-rw-rw-r-- 1 user user 108857  5月  7 21:01 sky1024px.jpg_0.jpg
-rw-rw-r-- 1 user user 125632  5月  7 21:01 sky1024px.jpg_1.jpg
-rw-rw-r-- 1 user user 134555  5月  7 21:02 sky1024px.jpg_2.jpg
-rw-rw-r-- 1 user user 139890  5月  7 21:02 sky1024px.jpg_3.jpg
-rw-rw-r-- 1 user user 143883  5月  7 21:03 sky1024px.jpg_4.jpg
-rw-rw-r-- 1 user user 146022  5月  7 21:03 sky1024px.jpg_5.jpg
・NVIDIA Jetson Nanoで Google DeepDreamを動かしてキモイ絵を量産する方法
● exportのディレクトリの内容の確認
user@user-desktop:~/caffe$ ls -l ${CAFFE_HOME}/distribute/lib
-rw-rw-r-- 1 user user 27615930  5月  7 00:44 libcaffe.a
lrwxrwxrwx 1 user user       17  5月  7 00:44 libcaffe.so -> libcaffe.so.1.0.0
-rw-r--r-- 1 user user 13695208  5月  7 00:44 libcaffe.so.1.0.0

user@user-desktop:~/caffe$ ls -l ${CAFFE_HOME}/python
drwxrwxr-x 5 user user 4096  5月  7 00:46 caffe
-rwxrwxr-x 1 user user 4262  5月  6 17:18 classify.py
-rw-rw-r-- 1 user user 1523  5月  6 17:18 CMakeLists.txt
-rwxrwxr-x 1 user user 5734  5月  6 17:18 detect.py
-rwxrwxr-x 1 user user 2254  5月  6 17:18 draw_net.py
-rw-rw-r-- 1 user user  261  5月  6 17:18 requirements.txt
-rw-rw-r-- 1 user user 3145  5月  6 17:18 train.py
● NVIDIA版 Caffe NVCaffeをビルドして Jetson Nanoで動かしてみる
NVCaffeとは?
オリジナルの BVLC Caffeを NVIDIAが forkして管理している Caffeで NVIDIA環境用に最適化の改造がされている。
・2019/05/06
【ビルド版】NVIDIA Jetson Nanoで NVIDIA版 Caffe NVCaffeを GPUパワーで動かしてキモイ絵をモリモリ量産
NVIDIA Jetson Nanoで NV_Caffe Deep Learningをビルドして CUDAで DeepDreamを動かしてキモイ絵を生成する
●数値演算ライブラリに OpenBLASを使うとマルチスレッドで Caffe DeepDreamが動きます
ATLASの代わりに OpenBLASの数値演算ライブラリを使う。
OpenBLASの数値演算ライブラリはマルチスレッドに対応している。
OpenBLAS - An optimized BLAS library
OpenBLAS
nano Makefile.config
BLAS := open

# Makefile.config, BLAS := open
sudo apt-get -y install libopenblas-dev

# 環境変数で OpenBLASライブラリを 4コアで動かす指定をする
export OPENBLAS_NUM_THREADS=4

# Setting the number of threads using environment variables
# The priorities are OPENBLAS_NUM_THREADS > GOTO_NUM_THREADS > OMP_NUM_THREADS .
# https://github.com/xianyi/OpenBLAS
export OPENBLAS_NUM_THREADS=4
export GOTO_NUM_THREADS=${OPENBLAS_NUM_THREADS}
export OMP_NUM_THREADS=${OPENBLAS_NUM_THREADS}

cd
cd deepdreamer

cp flowers.jpg bl4.jpg
python deepdreamer.py bl4.jpg
OpenBLASをマルチコアのマルチスレッド 4 coreで並列で動かすと、22秒程度で 1枚を生成します。
user@user-desktop:~/deepdreamer$ ls -l bl4*
-rw-rw-r-- 1 user user 30570  5月  8 23:02 bl4.jpg
-rw-rw-r-- 1 user user 22653  5月  8 23:02 bl4.jpg_0.jpg
-rw-rw-r-- 1 user user 22216  5月  8 23:03 bl4.jpg_1.jpg
-rw-rw-r-- 1 user user 21993  5月  8 23:03 bl4.jpg_2.jpg
-rw-rw-r-- 1 user user 21974  5月  8 23:03 bl4.jpg_3.jpg
-rw-rw-r-- 1 user user 21888  5月  8 23:04 bl4.jpg_4.jpg
-rw-rw-r-- 1 user user 21911  5月  8 23:04 bl4.jpg_5.jpg
-rw-rw-r-- 1 user user 21944  5月  8 23:04 bl4.jpg_6.jpg
-rw-rw-r-- 1 user user 21954  5月  8 23:05 bl4.jpg_7.jpg
-rw-rw-r-- 1 user user 21917  5月  8 23:05 bl4.jpg_8.jpg
-rw-rw-r-- 1 user user 21896  5月  8 23:05 bl4.jpg_9.jpg
-rw-rw-r-- 1 user user 21756  5月  8 23:06 bl4.jpg_10.jpg
-rw-rw-r-- 1 user user 21718  5月  8 23:06 bl4.jpg_11.jpg
-rw-rw-r-- 1 user user 21654  5月  8 23:06 bl4.jpg_12.jpg
-rw-rw-r-- 1 user user 21589  5月  8 23:07 bl4.jpg_13.jpg
-rw-rw-r-- 1 user user 21476  5月  8 23:07 bl4.jpg_14.jpg
-rw-rw-r-- 1 user user 21363  5月  8 23:07 bl4.jpg_15.jpg
-rw-rw-r-- 1 user user 21302  5月  8 23:08 bl4.jpg_16.jpg
-rw-rw-r-- 1 user user 21356  5月  8 23:08 bl4.jpg_17.jpg
-rw-rw-r-- 1 user user 21430  5月  8 23:08 bl4.jpg_18.jpg
● NVIDIA Jetson Nano、Xavier NXの Jetpack 4.4で Caffeをビルドする方法
# -- CUDA detected: 10.2
# -- Found cuDNN: ver. ??? found (include: /usr/include, library: /usr/lib/aarch64-linux-gnu/libcudnn.so)
# CMake Error at cmake/Cuda.cmake:256 (message):
#   cuDNN version >3 is required.
# Call Stack (most recent call first):
#   cmake/Cuda.cmake:284 (detect_cuDNN)
#   cmake/Dependencies.cmake:85 (include)
#   CMakeLists.txt:49 (include)

# Caffe Configuration
# 読み込むファイルを cudnn.hから cudnn_version.hに変更する
# file(READ ${CUDNN_INCLUDE}/cudnn.h CUDNN_VERSION_FILE_CONTENTS)
sed -i -e "s/cudnn.h/cudnn_version.h/g" ../cmake/Cuda.cmake

cat /usr/include/cudnn_version.h | grep CUDNN
# #ifndef CUDNN_VERSION_H_
# #define CUDNN_VERSION_H_
# #define CUDNN_MAJOR 8
# #define CUDNN_MINOR 0
# #define CUDNN_PATCHLEVEL 0
# #define CUDNN_VERSION (CUDNN_MAJOR * 1000 + CUDNN_MINOR * 100 + CUDNN_PATCHLEVEL)
# #endif /* CUDNN_VERSION_H */
Tags: [Raspberry Pi], [電子工作], [ディープラーニング]
●関連するコンテンツ(この記事を読んだ人は、次の記事も読んでいます)
NVIDIA Jetson Nano 開発者キットを買ってみた。メモリ容量 4GB LPDDR4 RAM
Jetson Nanoで TensorFlow PyTorch Caffe/Caffe2 Keras MXNet等を GPUパワーで超高速で動かす!
Raspberry Piでメモリを馬鹿食いするアプリ用に不要なサービスを停止してフリーメモリを増やす方法
ラズパイでメモリを沢山使用するビルドやアプリ用に不要なサービス等を停止して使えるメインメモリを増やす
【成功版】最新版の Darknetに digitalbrain79版の Darknet with NNPACKの NNPACK処理を適用する
ラズパイで NNPACK対応の最新版の Darknetを動かして超高速で物体検出や DeepDreamの悪夢を見る
【成功版】Raspberry Piで NNPACK対応版の Darknet Neural Network Frameworkをビルドする方法
ラズパイに Darknet NNPACK darknet-nnpackをソースからビルドして物体検出を行なう方法
【成功版】Raspberry Piで Darknet Neural Network Frameworkをビルドする方法
ラズパイに Darknet Neural Network Frameworkを入れて物体検出や悪夢のグロ画像を生成する
【成功版】Raspberry Piに TensorFlow Deep Learning Frameworkをインストールする方法
ラズパイに TensorFlow Deep Learning Frameworkを入れて Google DeepDreamで悪夢を見る方法
Raspberry Piで TensorFlow Deep Learning Frameworkを自己ビルドする方法
ラズパイで TensorFlow Deep Learning Frameworkを自己ビルドする方法
Raspberry Piで Caffe Deep Learning Frameworkで物体認識を行なってみるテスト
ラズパイで Caffe Deep Learning Frameworkを動かして物体認識を行なってみる
【ビルド版】Raspberry Piで DeepDreamを動かしてキモイ絵をモリモリ量産 Caffe Deep Learning Framework
ラズパイで Caffe Deep Learning Frameworkをビルドして Deep Dreamを動かしてキモイ絵を生成する
【インストール版】Raspberry Piで DeepDreamを動かしてキモイ絵をモリモリ量産 Caffe Deep Learning
ラズパイで Caffe Deep Learning Frameworkをインストールして Deep Dreamを動かしてキモイ絵を生成する
Raspberry Piで Caffe2 Deep Learning Frameworkをソースコードからビルドする方法
ラズパイで Caffe 2 Deep Learning Frameworkをソースコードから自己ビルドする方法
Orange Pi PC 2の 64bitのチカラで DeepDreamしてキモイ絵を高速でモリモリ量産してみるテスト
OrangePi PC2に Caffe Deep Learning Frameworkをビルドして Deep Dreamを動かしてキモイ絵を生成する
Raspberry Piに Jupyter Notebookをインストールして拡張子 ipynb形式の IPythonを動かす
ラズパイに IPython Notebookをインストールして Google DeepDream dream.ipynbを動かす
Raspberry Piで Deep Learningフレームワーク Chainerをインストールしてみる
ラズパイに Deep Learningのフレームワーク Chainerを入れてみた
Raspberry Piで DeepBeliefSDKをビルドして画像認識フレームワークを動かす方法
ラズパイに DeepBeliefSDKを入れて画像の物体認識を行なう
Raspberry Piで Microsoftの ELLをビルドする方法
ラズパイで Microsoftの ELL Embedded Learning Libraryをビルドしてみるテスト、ビルドするだけ
Raspberry Piで MXNet port of SSD Single Shot MultiBoxを動かして画像の物体検出をする方法
ラズパイで MXNet port of SSD Single Shot MultiBox Object Detectorで物体検出を行なってみる
Raspberry Piで Apache MXNet Incubatingをビルドする方法
ラズパイで Apache MXNet Incubatingをビルドしてみるテスト、ビルドするだけ
Raspberry Piで OpenCVの Haar Cascade Object Detectionでリアルタイムにカメラ映像の顔検出を行なってみる
ラズパイで OpenCVの Haar Cascade Object Detection Face & Eyeでリアルタイムでカメラ映像の顔検出をする方法
Raspberry Piで NNPACKをビルドする方法
ラズパイで NNPACKをビルドしてみるテスト、ビルドするだけ
Raspberry Pi 3の Linuxコンソール上で使用する各種コマンドまとめ
ラズパイの Raspbian OSのコマンドラインで使用する便利コマンド、負荷試験や CPUシリアル番号の確認方法等も
[HOME]
|
[BACK]
リンクフリー(連絡不要、ただしトップページ以外は Web構成の変更で移動する場合があります)
Copyright (c)
2019-2020 FREE WING,Y.Sakamoto
Powered by 猫屋敷工房 & HTML Generator
http://www.neko.ne.jp/~freewing/raspberry_pi/nvidia_jetson_nano_build_caffe_google_deep_dream/