・2019/06/05
 Visual Studio 2019 Professionalを無人インストールする方法、完全自動でインストール
(VS2019を完全オフラインインストール&コンポーネント選択の事前設定で自動インストールする)
Tags: [Windows], [無人インストール]
● Microsoft Visual Studio 2019 16.4を全自動でインストールする方法
下記にまとめました。
・2020/01/25

Visual Studio 2019 Professional v16.4を無人インストールする方法、完全自動でインストール
VS2019 v16.4を完全オフラインインストール&コンポーネント選択の事前設定で自動インストールする
● Microsoft Visual Studio 2019を全自動でインストールする方法
Microsoft Visual Studio 2019を無人インストールする方法
Visual Studio 2019 Professionalを無人インストール&オフラインインストール
Visual Studio 2019はオンデマンドインストールの場合、20GBをダウンロードします。
Visual Studio 2019 あらゆる開発者向けの優れたツール
Visual Studio 2019 製品版 2019/04/02
Visual Studio Icon Visual Studio 2019 リリース ノート
Visual Studio 95 = Ver. 5.0
Visual Studio 98 SP6 = Ver. 6.0
Visual Studio 2005 = 8
Visual Studio 2008 = 9
Visual Studio 2010 = 10
Visual Studio 2012 = 11
Visual Studio 2013 Update 5 = 12
Visual Studio 2015 Update 3 = 14
Visual Studio 2017 Update 15.9(最終版) = 15
Visual Studio 2019 = 16 ★
Visual Studio 2019 16.0.28729.10 2019/04/02
Visual Studio 2019 16.1 2019/05/21
Visual Studio 2019 16.1.1 2019/05/24
Visual Studio 2019 16.1.2 2019/06/04
● Visual Studioシリーズのシステム要件
Visual Studio 2019 製品ファミリのシステム要件
Visual Studio 2017 製品ファミリのシステム要件
Visual Studio 2015 のシステム要件
Visual Studio 2013 のシステム要件
| Visual Studioシリーズ | Visual Studio 2019 | Visual Studio 2017 | Visual Studio 2015 | Visual Studio 2013 | Visual Studio 2012 |
| Windowsバージョン | Windows 10 バージョン 1703 以降
Windows 7 SP1 | Windows 10 バージョン 1507 以降
Windows 7 SP1 | Windows 10
Windows 7 SP 1 | Windows 7 SP1 (x86 および x64) | 記載無し |
| プロセッサ | 1.8 GHz 以上 | 1.8 GHz 以上 | 1.6 GHz 以上の高速プロセッサ | 1.6 GHz 以上の高速プロセッサ | 1.6 GHz 以上のプロセッサ |
| (推奨) | クアッド コア以上を推奨 | デュアル コア以上を推奨 | | | |
| メモリ容量 | 2 GB の RAM | 2 GB の RAM | 1 GB の RAM | 1 GB の RAM | 1 GB の RAM |
| (推奨) | 8 GB の RAM を推奨 | 4 GB の RAM を推奨 | | | |
| ハード ディスク容量 | 最小 800MB、最大 210 GB の空き領域
(一般的なインストールでは、20 から 50 GB の空き領域) | 最大 130 GB の空き領域
(一般的なインストールでは、20 から 50 GB の空き領域) | 10 GB の空き容量 | 20 GB の空き容量 | 1 GB の空き容量 |
●必要な物
・Microsoft Visual Studio 2019 Professional等の Webインストーラ EXE
vs_community.exe
vs_professional.exe
● Microsoft Visual Studio 2019のオフラインインストーラの作成方法
Visual Studio 2019 ダウンロード
Visual Studio 2019 ダウンロード
Android、iOS、Windows、Web、クラウド向けのフル機能の統合開発環境 (IDE)
・コミュニティ:学生、オープンソース貢献者、個人向けの無料で強力な IDE
・Professional:小規模なチームに最適な Professional IDE
・エンタープライズ:あらゆる規模のチーム向けのスケーラブルなエンドツーエンド ソリューション
Visual Studio 2017 のオフライン インストールを作成する
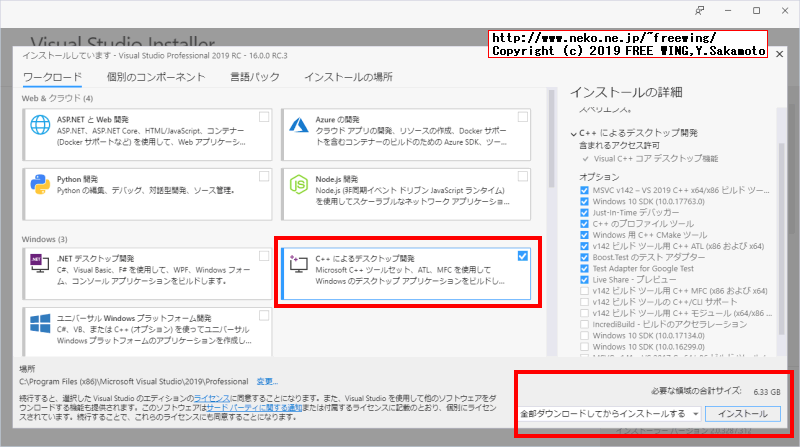
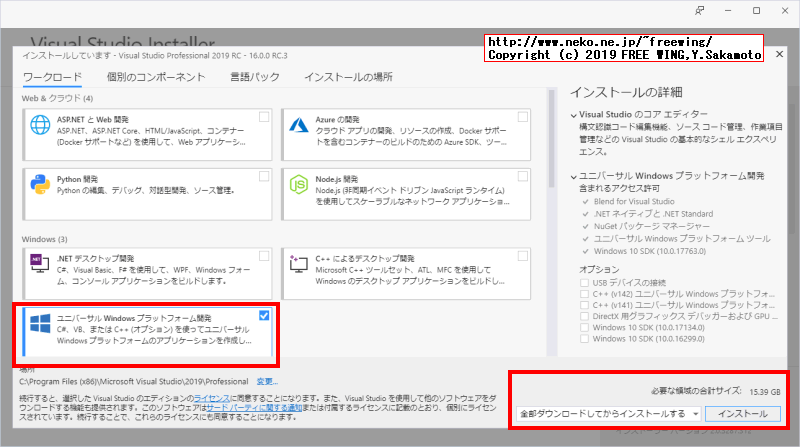
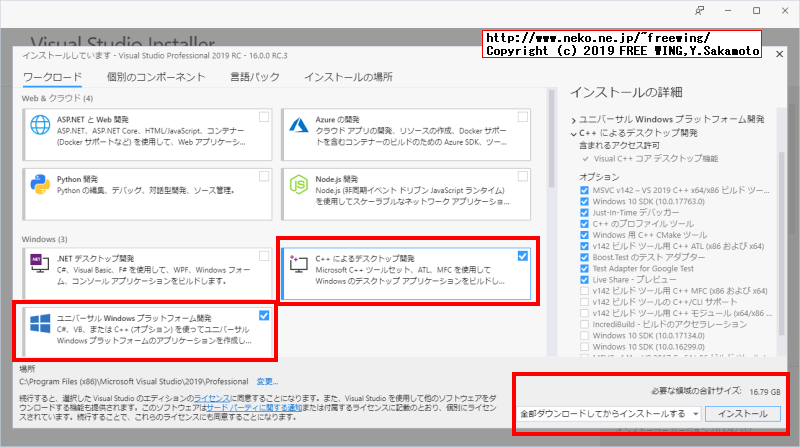
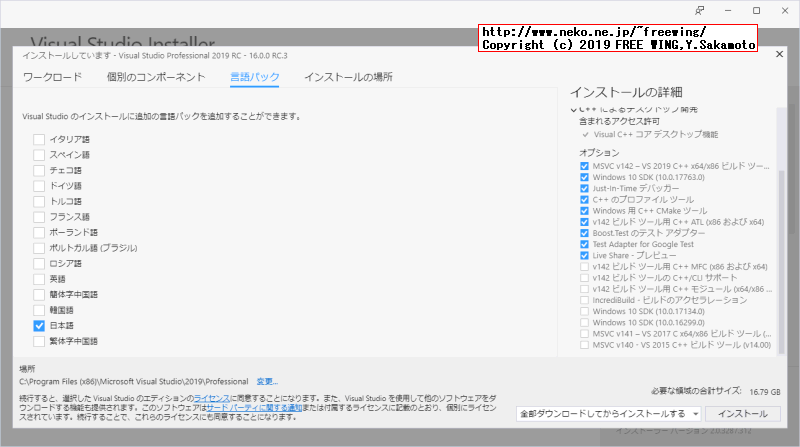
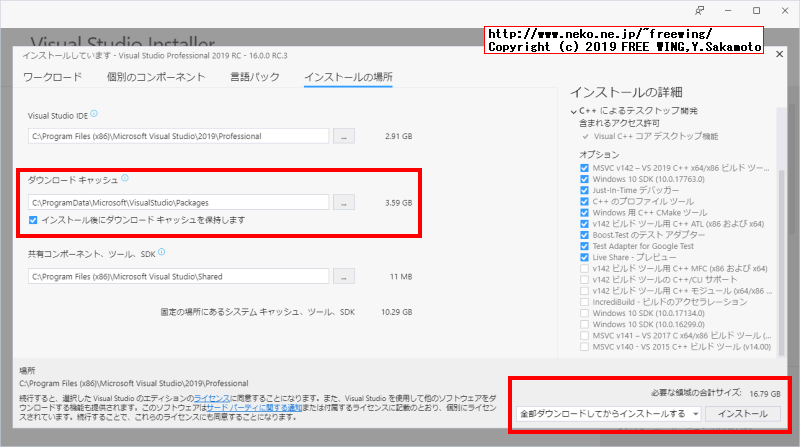
Visual Studio 2019の場合も同様に「全部ダウンロードしてからインストールする」を選択する。
・必要な「ワークロード」を選択して、
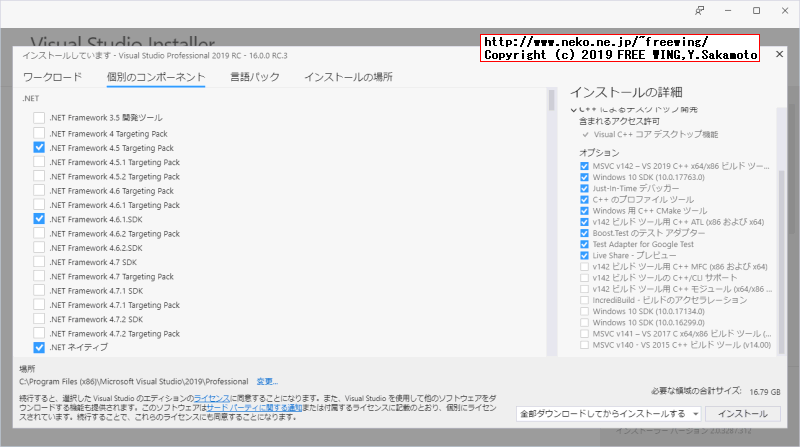
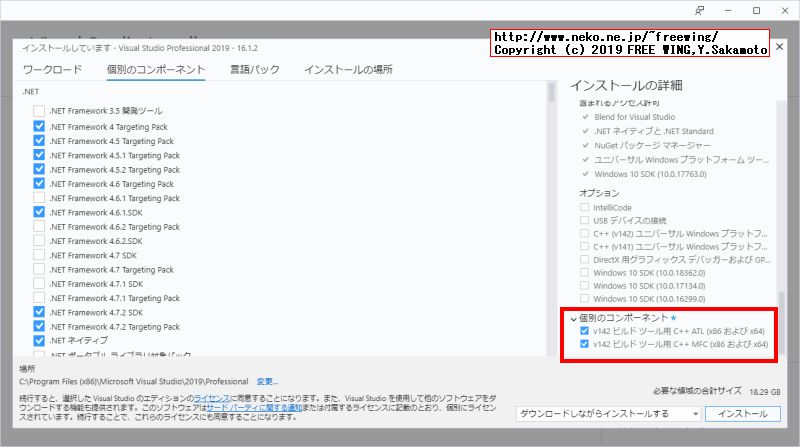
・必要な「個別のコンポーネント」を選択して、
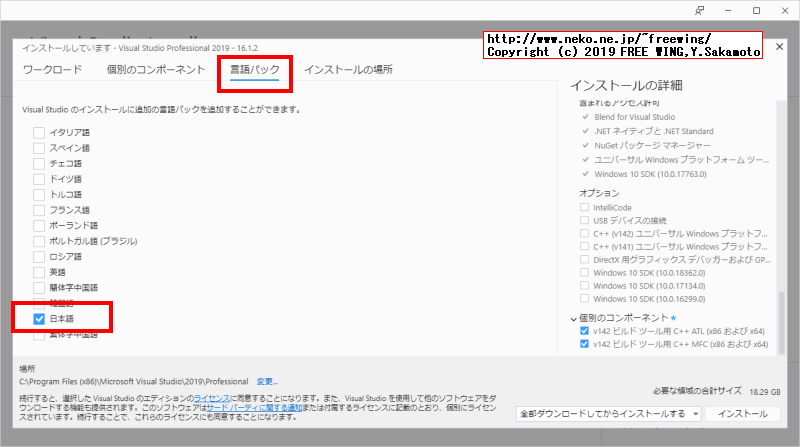
・必要な「言語パック」を選択して、
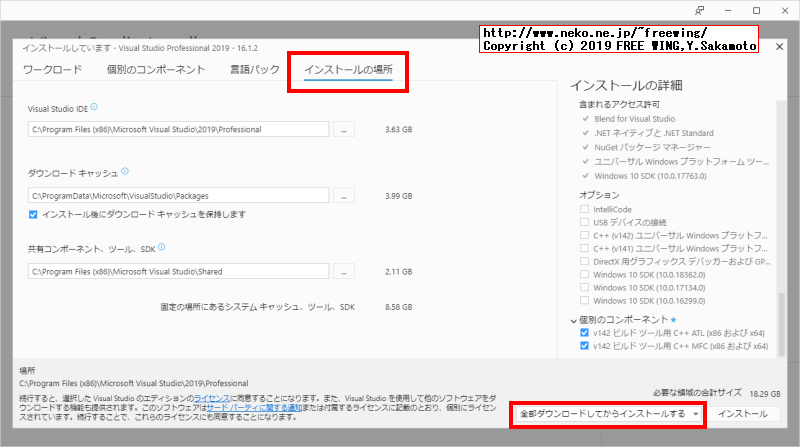
・「全部ダウンロードしてからインストールする」を選択して、
・「インストール」を押す。
● Windows XP の開発のサポート
Visual Studio 2019 プレビューでの非推奨の Visual C++ 機能
※ 非推奨ですが、VS 2017(v141)ツールの C++ Windwos XPサポートが選べます。
Visual C++ features deprecated in Visual Studio 2019 preview
Does not include support for Windows XP by using the v142 toolset
v142は Windwos XP非サポート。
Support for Windows XP development by using the v141 toolset
v141は Windwos XPサポート。
Configuring Programs for Windows XP
Configuration Properties
General
Platform Toolset property
desired Windows XP toolset
Visual Studio 2017 - Windows XP (v141_xp)
● Microsoft Visual Studio 2019のオフラインインストーラの作成方法
「全部ダウンロードしてからインストールする」を選択する。
・Microsoft Visual Studio 2019のオフラインインストーラの作成方法
・Microsoft Visual Studio 2019のオフラインインストーラの作成方法
・Microsoft Visual Studio 2019のオフラインインストーラの作成方法
・Microsoft Visual Studio 2019のオフラインインストーラの作成方法
・Microsoft Visual Studio 2019のオフラインインストーラの作成方法
・Microsoft Visual Studio 2019のオフラインインストーラの作成方法
● Microsoft Visual Studio 2019のオフラインインストーラの作成方法、コマンドライン完璧版
下記の方法で Microsoft Visual Studio 2019をオフラインで完全全自動の無人インストールができました。
但し、オフラインインストール用のファイル郡を全部ダウンロードするので 20GB程度の容量が必要になります。
本来であれば下記の構成のインストールに必要な最小限のファイルだけにしたい。
必要な最小限のファイルだけの場合は 3.04GB程度で済む。
echo ========================================
rem 任意の場所にオフラインインストール用のファイル郡をダウンロードする
rem 環境に合わせて書き換える
set VSDIR=X:\Visual_Studio_2019_Offline
set VSURI=file:///X:/Visual_Studio_2019_Offline
rem インストールに必要なファイルをダウンロードする 19.4GB
rem --layoutの指定が無い場合は C:\ProgramData\Microsoft\VisualStudio\Packages
vs_community.exe --layout %VSDIR% --lang Ja-jp
rem ディレクトリを移動する
cd /d %VSDIR%
rem ディレクトリを確認する 19.4GB
dir .
rem Visual Studio 2019を手動インストールする(オフラインインストール)
rem 最初の1台目は普通に手動でインストールする
rem vs_setup.exeを実行する
rem --noWeb でネット接続しないでインストールする
vs_setup.exe --noWeb
echo ========================================
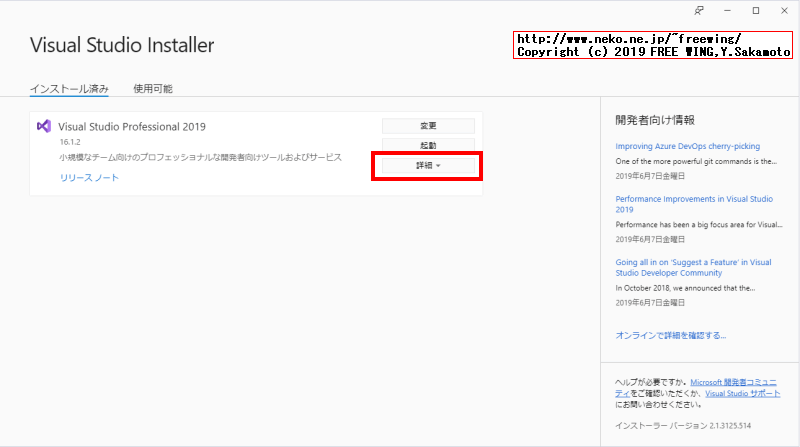
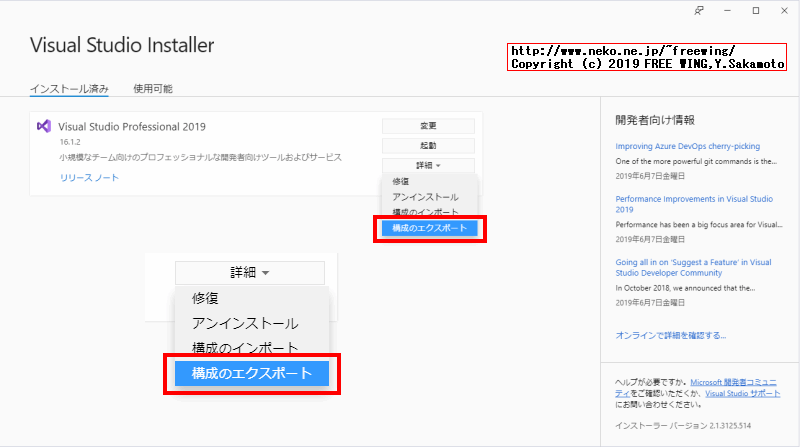
rem 既存のインストール内容の設定でコンフィグファイルを生成する(既にインストールしてある構成から生成する)
rem ※ /CreateAdminFile オプションは無くなった
cd /d %VSDIR%
vs_community.exe export --config vs2019.config
echo ========================================
rem 2台目以降は下記で無人インストールする
rem Visual Studio 2019を無人インストールする(全自動インストール)
rem --passive で入力操作が不要になる
rem --wait で実行が完了するまで待つ(インストール終了までコマンドラインに戻らない)
rem --productKey xxxxx-xxxxx-xxxxx-xxxxx-xxxxx
cd /d %VSDIR%
echo vs_community.exe --noWeb --config %VSDIR%\vs2019.config --installCatalogUri "%VSURI%/Catalog.json" --installChannelUri "%VSURI%/ChannelManifest.json" --norestart --passive --wait
vs_community.exe --noWeb --config %VSDIR%\vs2019.config --installCatalogUri "%VSURI%/Catalog.json" --installChannelUri "%VSURI%/ChannelManifest.json" --norestart --passive --wait
rem https://download.visualstudio.microsoft.com/download/pr/47c93a19-9c3d-4825-bf1e-3e5469adb6d4/f52adc0391edba2aa582a0337d1b51cd/visualstudio.vsman
rem Catalog.json
rem visualstudio.vsman
rem Catalog.jsonと visualstudio.vsmanの中身は同一
rem https://aka.ms/vs/16/release/channel
rem ChannelManifest.json
rem visualstudio.16.release.chman
rem ChannelManifest.jsonと visualstudio.16.release.chmanの中身は同一
echo ========================================
rem Visual Studio 2019 disable CEIP VSCEIP
rem Visual Studio 2019 のテレメトリ情報送信を無効にする
REG ADD HKEY_LOCAL_MACHINE\SOFTWARE\Wow6432Node\Microsoft\VSCommon\16.0\SQM /v OptIn /t REG_DWORD /d 0 /f
●インストールに必要なファイルをダウンロードしながら VS 2019を無人インストールする
コマンドラインの「%~dp0」を使用しているのでバッチファイルを作成する事。
そのままコマンドラインで実行する場合は --config指定のファイルパスを絶対パスで指定します。(相対パス指定ではエラーが発生して動きません)
install_vs_community_custom_settings.bat
echo ========================================
rem あらかじめ vs2019.configファイルを作成して、
rem vs_community.exeと同じディレクトリにコピーしておく

echo ========================================
rem インストールに必要なファイルをダウンロードしながら無人インストールする
echo %~dp0
cd /d %~dp0
set CurDir=%~dp0
vs_community.exe --config %CurDir%vs2019.config --nocache --norestart --passive --wait
● Microsoft Visual Studio 2019のオフラインインストーラの作成方法、コマンドライン
Use command-line parameters to install Visual Studio
 以下は試行錯誤のメモ。

echo ========================================
rem インストールに必要なファイルをダウンロードする 19.4GB
rem --layoutの指定が無い場合は C:\ProgramData\Microsoft\VisualStudio\Packages
vs_community.exe --layout C:\Visual_Studio_2019_Offline --lang Ja-jp

rem ディレクトリを確認する 19.4GB
dir C:\Visual_Studio_2019_Offline

rem ディレクトリを移動する
cd /d C:\Visual_Studio_2019_Offline

rem Visual Studio 2019を手動インストールする(オフラインインストール)
rem 最初の1台目は普通に手動でインストールする
rem vs_setup.exeを実行する
vs_setup.exe --noWeb --path cache="C:\Visual_Studio_2019_Offline"

echo ========================================
rem ※ /CreateAdminFile オプションは無くなった
rem 既存のインストール内容の設定でコンフィグファイルを生成する(既にインストールしてある構成から生成する)
vs_community.exe export --config vs2019.config

echo ========================================
rem 2台目以降は下記で無人インストールする
rem Visual Studio 2019を無人インストールする(全自動インストール)
rem --passive で入力操作が不要になる
rem --productKey xxxxx-xxxxx-xxxxx-xxxxx-xxxxx
エラー vs_community.exe --noWeb --path cache="C:\Visual_Studio_2019_Offline" --config C:\Visual_Studio_2019_Offline\vs2019.config --passive --norestart

echo ========================================
rem ダウンロードしながら vs2019.configの設定でインストール(手動操作でインストール)
vs_community.exe --path cache="C:\Visual_Studio_2019_Offline" --config C:\Visual_Studio_2019_Offline\vs2019.config

rem ダウンロードしながら vs2019.configの設定でインストール(全自動インストール)
rem --passive で入力操作が不要になる
vs_community.exe --path cache="C:\Visual_Studio_2019_Offline" --config C:\Visual_Studio_2019_Offline\vs2019.config --cache --passive

rem C:\Visual_Studio_2019_Offline の内容をコピーする

rem 2台目以降をオフラインでインストール
エラー vs_community.exe --path cache="C:\Visual_Studio_2019_Offline" --config C:\Visual_Studio_2019_Offline\vs2019.config --noWeb

echo ========================================
rem その場でダウンロードしながら vs2019.configの設定でインストール(全自動でインストール)
rem ダウンロードサイズ 3.48GB
vs_community.exe --config C:\Visual_Studio_2019_Offline\vs2019.config --nocache --passive

rem Visual Studio コマンド ライン
vs_community.exe --help

rem --wait
rem --installCatalogUri "file:///C:/Visual_Studio_2019_Offline/Catalog.json"
rem --installChannelUri "file:///C:/Visual_Studio_2019_Offline/ChannelManifest.json"
rem --channelUri "file:///C:/Visual_Studio_2019_Offline/visualstudio.16.release.chman"
rem https://aka.ms/vs/16/release/channel
rem visualstudio.16.release.chman

rem vs_community.exe --path cache="C:\Visual_Studio_2019_Offline" --config C:\Visual_Studio_2019_Offline\vs2019.config --noWeb --installCatalogUri "file:///C:/Visual_Studio_2019_Offline/Catalog.json" --installChannelUri "file:///C:/Visual_Studio_2019_Offline/ChannelManifest.json" --channelUri "file:///C:/Visual_Studio_2019_Offline/visualstudio.16.release.chman" --norestart --passive

rem 不要
rem 不要 --channelUri "file:///C:/Visual_Studio_2019_Offline/visualstudio.16.release.chman"

echo ========================================
rem 不要
rem bitsadminコマンドで
rem https://aka.ms/vs/16/release/channel
rem  にアクセスして
rem visualstudio.16.release.chman
rem  ファイルを取得する。
rem bitsadmin /TRANSFER /DOWNLOAD https://aka.ms/vs/16/release/channel C:\Visual_Studio_2019_Offline\visualstudio.16.release.chman
● Visual Studio 2019の俺仕様の無人インストール用のコンフィグファイル
Visual Studio 2019 16.0.28729.10
・.NET デスクトップ開発
・C++ によるデスクトップ開発
・ユニバーサル Windows プラットフォーム開発
vs2019.config
{
  "version": "1.0",
  "components": [
    "Microsoft.VisualStudio.Component.CoreEditor",
    "Microsoft.VisualStudio.Workload.CoreEditor",
    "Microsoft.VisualStudio.Component.NuGet",
    "Microsoft.VisualStudio.Component.Roslyn.Compiler",
    "Microsoft.VisualStudio.Component.Roslyn.LanguageServices",
    "Microsoft.Net.Core.Component.SDK.2.1",
    "Microsoft.VisualStudio.ComponentGroup.WebToolsExtensions",
    "Microsoft.Net.Component.4.7.2.SDK",
    "Microsoft.Net.Component.4.7.2.TargetingPack",
    "Microsoft.Net.ComponentGroup.DevelopmentPrerequisites",
    "Microsoft.VisualStudio.Component.TypeScript.3.3",
    "Microsoft.VisualStudio.Component.JavaScript.TypeScript",
    "Microsoft.VisualStudio.Component.JavaScript.Diagnostics",
    "Microsoft.Component.MSBuild",
    "Microsoft.VisualStudio.Component.TextTemplating",
    "Microsoft.VisualStudio.Component.SQL.CLR",
    "Microsoft.VisualStudio.Component.ManagedDesktop.Core",
    "Microsoft.Net.Component.4.5.TargetingPack",
    "Microsoft.VisualStudio.Component.DiagnosticTools",
    "Microsoft.VisualStudio.Component.AppInsights.Tools",
    "Microsoft.Net.Component.4.6.1.SDK",
    "Microsoft.VisualStudio.Component.VC.CoreIde",
    "Microsoft.VisualStudio.Component.VC.Tools.x86.x64",
    "Microsoft.VisualStudio.Component.Windows10SDK.17763",
    "Microsoft.VisualStudio.Component.ManagedDesktop.Prerequisites",
    "Microsoft.ComponentGroup.Blend",
    "Microsoft.VisualStudio.Workload.ManagedDesktop",
    "Microsoft.VisualStudio.Component.VC.Redist.14.Latest",
    "Microsoft.VisualStudio.ComponentGroup.NativeDesktop.Core",
    "Microsoft.VisualStudio.Component.VC.CMake.Project",
    "Microsoft.VisualStudio.Component.VC.ATL",
    "Microsoft.VisualStudio.Component.VC.ATLMFC",
    "Microsoft.VisualStudio.Workload.NativeDesktop",
    "Microsoft.Component.NetFX.Native",
    "Microsoft.VisualStudio.ComponentGroup.UWP.NetCoreAndStandard",
    "Microsoft.VisualStudio.Component.Graphics",
    "Microsoft.VisualStudio.ComponentGroup.UWP.Xamarin",
    "Microsoft.VisualStudio.ComponentGroup.UWP.Support",
    "Microsoft.VisualStudio.Workload.Universal"
  ]
}
VS2013と VS2019で行くか。
● Visual Studio 2015、2017、2019のテレメトリ(情報送信)を停止する
● Visual Studio 2015、2017、2019 disable PerfWatson PerfWatson2.exe
Visual Studio PerfWatson
Help - Send Feedback - Settings
Visual Studio Experience Improvement Program
No, I would not like to participate.
● Visual Studio 2019 disable CEIP VSCEIP 16.1.2
REG ADD HKEY_LOCAL_MACHINE\SOFTWARE\Wow6432Node\Microsoft\VSCommon\16.0\SQM /v OptIn /t REG_DWORD /d 0 /f
● Visual Studio 2019 disable CEIP VSCEIP 16.0
REG ADD HKEY_LOCAL_MACHINE\SOFTWARE\Wow6432Node\Microsoft\VSCommon\16.0\SQM /v OptIn /t REG_DWORD /d 0 /f
● Visual Studio 2017 disable CEIP VSCEIP
REG ADD HKEY_LOCAL_MACHINE\SOFTWARE\Wow6432Node\Microsoft\VSCommon\15.0\SQM /v OptIn /t REG_DWORD /d 0 /f
● Visual Studio 2015 disable CEIP VSCEIP
REG ADD HKEY_CURRENT_USER\Software\Microsoft\VSCommon\14.0\SQM /v OptIn /t REG_DWORD /d 0 /f
Customer Experience Improvement Program (CEIP)
Visual Studio Customer Experience Improvement Program
CEIP
Customer Experience Improvement Program for SQL Server Data Tools
CEIP
● Visual Studio 2019 How to define settings in a response file
Visual Studio 応答ファイルの設定を定義する方法
ここに書かれている内容はエラーが発生して動きません。
Visual Studio 2017でも同様のエラーが発生して動きませんでした。
動かない
vs_enterprise.exe --in customInstall.json
「続行」後に Errorダイアログで終了

動かない
vs_enterprise.exe --in customInstall.json --layout C:\VS2019

Visual Studio Setup Command Line Utility, version 2.0.3295.64571
c Microsoft Corporation. All rights reserved.

Failed to delete temporary manifest: 値を Null にすることはできません。
パラメーター名:path
Error: Failed to parse the response file "customInstall.json"
   場所 Microsoft.VisualStudio.Setup.Commands.LayoutCommand.InvokeCommand(CancellationToken token)
   場所 Microsoft.VisualStudio.Setup.Program.Main(String[] args)

続行するには何かキーを押してください...

動かない --in コマンドに相対パスを指定しても駄目
vs_enterprise.exe --in .\customInstall.json --layout C:\VS2019

Visual Studio Setup Command Line Utility, version 2.0.3295.64571
c Microsoft Corporation. All rights reserved.

Failed to delete temporary manifest: 値を Null にすることはできません。
パラメーター名:path
Error: Failed to parse the response file ".\customInstall.json"
   場所 Microsoft.VisualStudio.Setup.Commands.LayoutCommand.InvokeCommand(CancellationToken token)
   場所 Microsoft.VisualStudio.Setup.Program.Main(String[] args)

続行するには何かキーを押してください...

動かない --in コマンドにフルパスを指定しても駄目、と言うか「ファイルが見つかりません。」
cd /d C:\Hoge\
vs_enterprise.exe --in C:\Hoge\customInstall.json --layout C:\VS2019

Visual Studio Setup Command Line Utility, version 2.0.3295.64571
c Microsoft Corporation. All rights reserved.

Failed to delete temporary manifest: 値を Null にすることはできません。
パラメーター名:path
Error: File download failed: ファイルが見つかりません。
   場所 Microsoft.VisualStudio.Setup.Download.DownloadManager.DownloadWithRetry(IDownloadEngine[] engines, Uri uri, Stream outputStream, ProgressUpdateCallback progress, CancellationToken cancellationToken, DownloadContext downloadContext, Boolean verifySignature)
   場所 Microsoft.VisualStudio.Setup.Download.DownloadManager.<>c__DisplayClass23_1.<Download>b__0()
   場所 System.Threading.Tasks.Task`1.InnerInvoke()
   場所 System.Threading.Tasks.Task.Execute()
--- 直前に例外がスローされた場所からのスタック トレースの終わり ---
   場所 System.Runtime.ExceptionServices.ExceptionDispatchInfo.Throw()
   場所 System.Runtime.CompilerServices.TaskAwaiter.HandleNonSuccessAndDebuggerNotification(Task task)
   場所 Microsoft.VisualStudio.Setup.ChannelManager.<DownloadJsonFileAsync>d__79.MoveNext()
--- 直前に例外がスローされた場所からのスタック トレースの終わり ---
   場所 System.Runtime.ExceptionServices.ExceptionDispatchInfo.Throw()
   場所 System.Runtime.CompilerServices.TaskAwaiter.HandleNonSuccessAndDebuggerNotification(Task task)
   場所 Microsoft.VisualStudio.Setup.ChannelManager.<DownloadChannelManifestAsync>d__61.MoveNext()

続行するには何かキーを押してください...

動かない
vs_enterprise.exe --in "C:\Hoge\customInstall.json" --layout C:\V2019
「続行」後に Errorダイアログで終了

動かない --in コマンドに URI指定しても駄目
vs_enterprise.exe --in file:///C:/Hoge/customInstall.json --layout C:\VS2019

Visual Studio Setup Command Line Utility, version 2.0.3295.64571
c Microsoft Corporation. All rights reserved.

Failed to delete temporary manifest: 値を Null にすることはできません。
パラメーター名:path
Error: Failed to parse the response file "file:///C:/Hoge/customInstall.json"
   場所 Microsoft.VisualStudio.Setup.Commands.LayoutCommand.InvokeCommand(CancellationToken token)
   場所 Microsoft.VisualStudio.Setup.Program.Main(String[] args)

続行するには何かキーを押してください...

動かない、--layout と --in の順番を逆にした
vs_enterprise.exe --layout C:\VS2019 --in customInstall.json

Visual Studio Setup Command Line Utility, version 2.0.3295.64571
c Microsoft Corporation. All rights reserved.

Failed to delete temporary manifest: 値を Null にすることはできません。
パラメーター名:path
Error: Failed to parse the response file "customInstall.json"
   場所 Microsoft.VisualStudio.Setup.Commands.LayoutCommand.InvokeCommand(CancellationToken token)
   場所 Microsoft.VisualStudio.Setup.Program.Main(String[] args)

続行するには何かキーを押してください...
● Microsoft Visual Studio 2019のオフラインインストーラの作成方法
2019/06/05 追記 この方法を参考にして、必要最小限のオフラインファイルのダウンロードで完全オフライン、全自動無人インストールができました。
Visual Studio のオフライン インストールを作成する
別のコンピューターに転送する目的のオフライン キャッシュを作成するために "全部ダウンロードしてからインストールする" 機能を使わないでください。
これは、そのように動作するようには設計されていません。
別のコンピューターに Visual Studio をインストールするためにオフライン キャッシュを作成したい場合、ローカル キャッシュを作成する方法について詳しくは、下記のこれ。
コマンドラインを使用してローカル キャッシュを作成する
・ステップ 1 - Visual Studio ブートストラップをダウンロードする
Visual Studio コミュニティ vs_community.exe
・ステップ 2 - ローカル インストール キャッシュを作成する
C++ デスクトップ開発の場合、次を実行します。
vs_community.exe --layout c:\vslayout --add Microsoft.VisualStudio.Workload.NativeDesktop --includeRecommended --lang ja-JP
Visual Studio Community のコンポーネント ディレクトリ
.NET デスクトップ開発
ID: Microsoft.VisualStudio.Workload.ManagedDesktop
C++ によるデスクトップ開発
ID: Microsoft.VisualStudio.Workload.NativeDesktop
ユニバーサル Windows プラットフォーム開発
ID: Microsoft.VisualStudio.Workload.Universal
関連付けられていないコンポーネント
ID: Microsoft.VisualStudio.Component.WinXP
VS 2017 (v141) ツールの C++ Windows XP サポート [非推奨]
・ステップ 3 - ローカル キャッシュから Visual Studio をインストールする
vs_community.exe --layout c:\vslayout --add Microsoft.VisualStudio.Workload.ManagedDesktop --add Microsoft.VisualStudio.Workload.NetWeb --add Component.GitHub.VisualStudio --includeOptional --lang en-US

c:\vslayout\vs_community.exe --add Microsoft.VisualStudio.Workload.ManagedDesktop --add Microsoft.VisualStudio.Workload.NetWeb --add Component.GitHub.VisualStudio --includeOptional
見易く複数行に分割してコマンドラインで実行する場合。
※ Windowsのコマンドラインで長い1行を複数行に分割して実行する場合は ^を使って記述します。
vs_community.exe ^
 --layout c:\vslayout ^
 --add Microsoft.VisualStudio.Workload.NativeDesktop ^
 --includeRecommended ^
 --lang ja-JP

c:\vslayout\vs_community.exe ^
 --add Microsoft.VisualStudio.Workload.ManagedDesktop ^
 --add Microsoft.VisualStudio.Workload.NetWeb ^
 --add Component.GitHub.VisualStudio ^
 --includeOptional
● Visual Studio 2019 16.1.2 完全オフライン、全自動無人インストーラの作成方法
2019/06/05 追記 この方法で目的とする「Visual Studio 2019 完全オフライン、全自動無人インストール」ができました。
オフラインインストール用のファイルの必要最小限の 4.33GBで済みます。
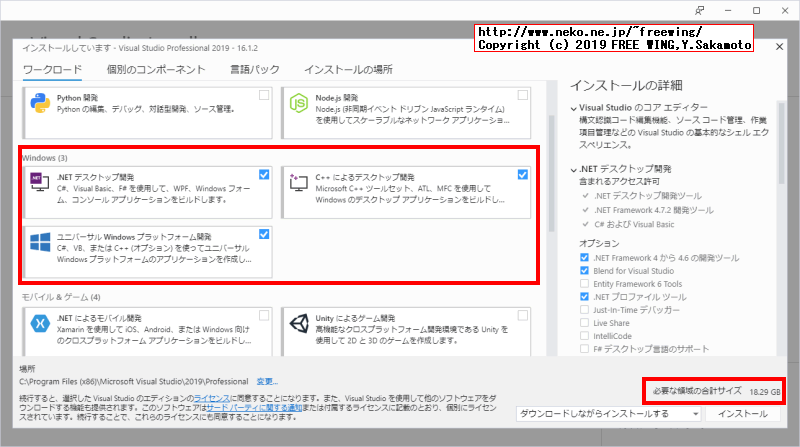
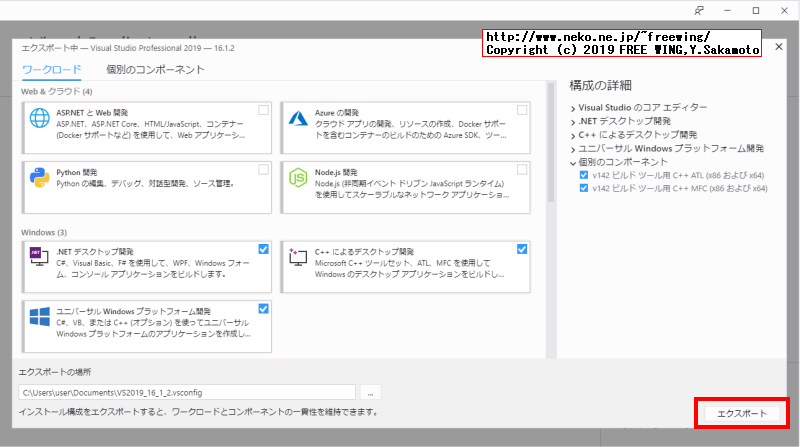
1) 最初に普通に手動でインストールする。今回は下記の 3個を選択した。
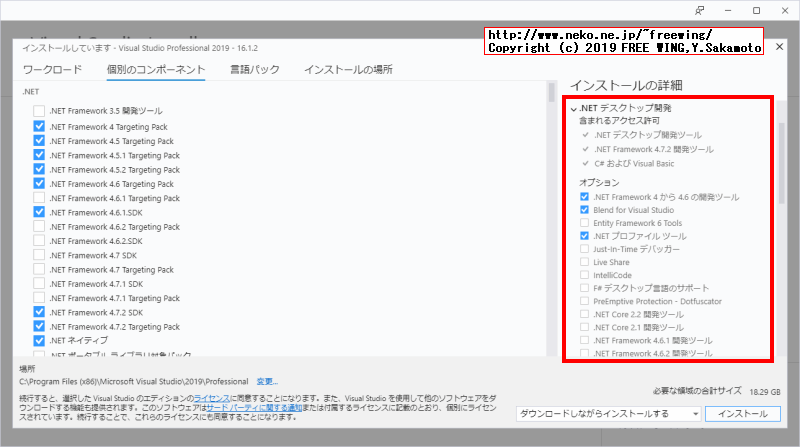
・.NET デスクトップ開発
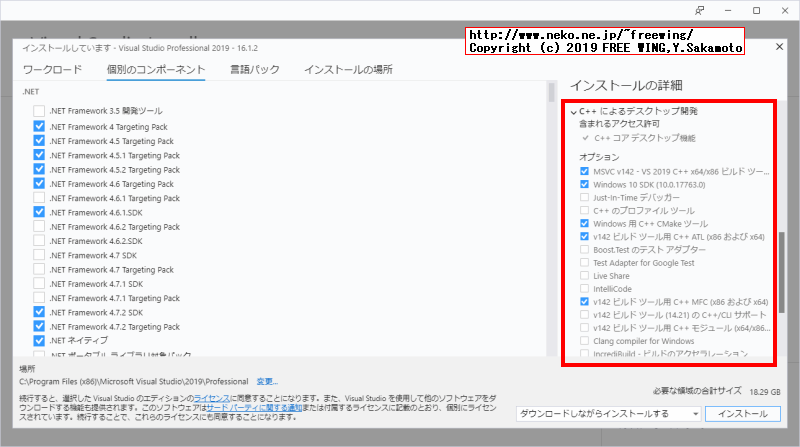
・C++ によるデスクトップ開発
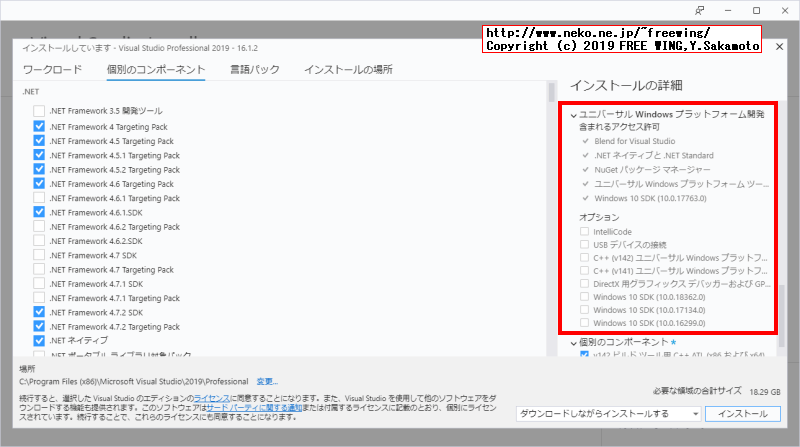
・ユニバーサル Windows プラットフォーム開発
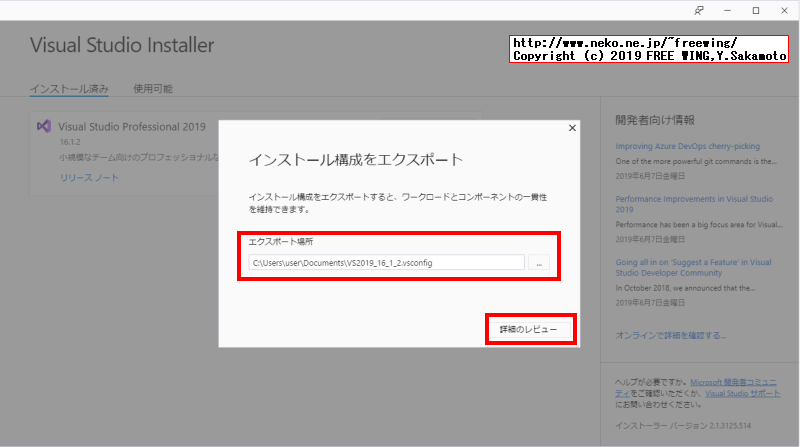
2) vsconfigファイルを作成する。(インストールした内容を exportする)
3) vsconfigファイルの中の componentsの行を抜き出してバッチファイルを作成する。
4) 完全オフラインインストール用のファイルをダウンロードする。(4.33GB)
5) 全自動インストーラでインストールする。
6) 全自動インストーラでインストールした内容を exportする。
7) (2)と (6)の内容が同じ事を確認する。
Visual Studio 2019 16.1.2 16.1.29001.49
VS2019_16_1_2.vsconfig
{
  "version": "1.0",
  "components": [
    "Microsoft.VisualStudio.Component.CoreEditor",
    "Microsoft.VisualStudio.Workload.CoreEditor",
    "Microsoft.VisualStudio.Component.NuGet",
    "Microsoft.VisualStudio.Component.Roslyn.Compiler",
    "Microsoft.VisualStudio.Component.Roslyn.LanguageServices",
    "Microsoft.Net.Core.Component.SDK.2.1",
    "Microsoft.VisualStudio.ComponentGroup.WebToolsExtensions",
    "Microsoft.Net.Component.4.7.2.SDK",
    "Microsoft.Net.Component.4.7.2.TargetingPack",
    "Microsoft.Net.ComponentGroup.DevelopmentPrerequisites",
    "Microsoft.Component.MSBuild",
    "Microsoft.VisualStudio.Component.TextTemplating",
    "Microsoft.VisualStudio.Component.SQL.CLR",
    "Microsoft.VisualStudio.Component.ManagedDesktop.Core",
    "Microsoft.Net.Component.4.5.2.TargetingPack",
    "Microsoft.Net.Component.4.5.TargetingPack",
    "Microsoft.Net.Component.4.TargetingPack",
    "Microsoft.Net.Component.4.5.1.TargetingPack",
    "Microsoft.Net.Component.4.6.TargetingPack",
    "Microsoft.Net.ComponentGroup.TargetingPacks.Common",
    "Microsoft.VisualStudio.Component.DiagnosticTools",
    "Microsoft.VisualStudio.Component.AppInsights.Tools",
    "Microsoft.Net.Component.4.6.1.SDK",
    "Microsoft.VisualStudio.Component.VC.CoreIde",
    "Microsoft.VisualStudio.Component.VC.Tools.x86.x64",
    "Microsoft.VisualStudio.Component.Windows10SDK.17763",
    "Microsoft.VisualStudio.Component.ManagedDesktop.Prerequisites",
    "Microsoft.ComponentGroup.Blend",
    "Microsoft.VisualStudio.Workload.ManagedDesktop",
    "Microsoft.VisualStudio.Component.VC.Redist.14.Latest",
    "Microsoft.VisualStudio.ComponentGroup.NativeDesktop.Core",
    "Microsoft.VisualStudio.Component.VC.CMake.Project",
    "Microsoft.VisualStudio.Component.VC.ATL",
    "Microsoft.VisualStudio.Component.VC.ATLMFC",
    "Microsoft.VisualStudio.Workload.NativeDesktop",
    "Microsoft.Component.NetFX.Native",
    "Microsoft.VisualStudio.ComponentGroup.UWP.NetCoreAndStandard",
    "Microsoft.VisualStudio.Component.Graphics",
    "Microsoft.VisualStudio.ComponentGroup.UWP.Xamarin",
    "Microsoft.VisualStudio.ComponentGroup.UWP.Support",
    "Microsoft.VisualStudio.Workload.Universal"
  ]
}
Visual Studio 2019 16.1.2 完全オフラインインストール用ファイルのダウンロードのバッチファイル。
@echo off
echo Download VS 2019 16.1.2
pause
vs_professional.exe ^
 --layout E:\VS_2019_16_1_2 ^
 --lang ja-JP ^
 --add Microsoft.Component.MSBuild ^
 --add Microsoft.Component.NetFX.Native ^
 --add Microsoft.ComponentGroup.Blend ^
 --add Microsoft.Net.Component.4.5.1.TargetingPack ^
 --add Microsoft.Net.Component.4.5.2.TargetingPack ^
 --add Microsoft.Net.Component.4.5.TargetingPack ^
 --add Microsoft.Net.Component.4.6.1.SDK ^
 --add Microsoft.Net.Component.4.6.TargetingPack ^
 --add Microsoft.Net.Component.4.7.2.SDK ^
 --add Microsoft.Net.Component.4.7.2.TargetingPack ^
 --add Microsoft.Net.Component.4.TargetingPack ^
 --add Microsoft.Net.ComponentGroup.DevelopmentPrerequisites ^
 --add Microsoft.Net.ComponentGroup.TargetingPacks.Common ^
 --add Microsoft.Net.Core.Component.SDK.2.1 ^
 --add Microsoft.VisualStudio.Component.AppInsights.Tools ^
 --add Microsoft.VisualStudio.Component.CoreEditor ^
 --add Microsoft.VisualStudio.Component.DiagnosticTools ^
 --add Microsoft.VisualStudio.Component.Graphics ^
 --add Microsoft.VisualStudio.Component.ManagedDesktop.Core ^
 --add Microsoft.VisualStudio.Component.ManagedDesktop.Prerequisites ^
 --add Microsoft.VisualStudio.Component.NuGet ^
 --add Microsoft.VisualStudio.Component.Roslyn.Compiler ^
 --add Microsoft.VisualStudio.Component.Roslyn.LanguageServices ^
 --add Microsoft.VisualStudio.Component.SQL.CLR ^
 --add Microsoft.VisualStudio.Component.TextTemplating ^
 --add Microsoft.VisualStudio.Component.VC.ATL ^
 --add Microsoft.VisualStudio.Component.VC.ATLMFC ^
 --add Microsoft.VisualStudio.Component.VC.CMake.Project ^
 --add Microsoft.VisualStudio.Component.VC.CoreIde ^
 --add Microsoft.VisualStudio.Component.VC.Redist.14.Latest ^
 --add Microsoft.VisualStudio.Component.VC.Tools.x86.x64 ^
 --add Microsoft.VisualStudio.Component.Windows10SDK.17763 ^
 --add Microsoft.VisualStudio.ComponentGroup.NativeDesktop.Core ^
 --add Microsoft.VisualStudio.ComponentGroup.UWP.NetCoreAndStandard ^
 --add Microsoft.VisualStudio.ComponentGroup.UWP.Support ^
 --add Microsoft.VisualStudio.ComponentGroup.UWP.Xamarin ^
 --add Microsoft.VisualStudio.ComponentGroup.WebToolsExtensions ^
 --add Microsoft.VisualStudio.Workload.CoreEditor ^
 --add Microsoft.VisualStudio.Workload.ManagedDesktop ^
 --add Microsoft.VisualStudio.Workload.NativeDesktop ^
 --add Microsoft.VisualStudio.Workload.Universal
Visual Studio 2019 16.1.2 完全オフラインインストールの全自動インストールのバッチファイル。
@echo off
echo Install VS 2019 16.1.2
pause
vs_professional.exe ^
 --noWeb ^
 --norestart --passive --wait ^
 --productKey xxxxx-xxxxx-xxxxx-xxxxx-xxxxx ^
 --add Microsoft.Component.MSBuild ^
 --add Microsoft.Component.NetFX.Native ^
 --add Microsoft.ComponentGroup.Blend ^
 --add Microsoft.Net.Component.4.5.1.TargetingPack ^
 --add Microsoft.Net.Component.4.5.2.TargetingPack ^
 --add Microsoft.Net.Component.4.5.TargetingPack ^
 --add Microsoft.Net.Component.4.6.1.SDK ^
 --add Microsoft.Net.Component.4.6.TargetingPack ^
 --add Microsoft.Net.Component.4.7.2.SDK ^
 --add Microsoft.Net.Component.4.7.2.TargetingPack ^
 --add Microsoft.Net.Component.4.TargetingPack ^
 --add Microsoft.Net.ComponentGroup.DevelopmentPrerequisites ^
 --add Microsoft.Net.ComponentGroup.TargetingPacks.Common ^
 --add Microsoft.Net.Core.Component.SDK.2.1 ^
 --add Microsoft.VisualStudio.Component.AppInsights.Tools ^
 --add Microsoft.VisualStudio.Component.CoreEditor ^
 --add Microsoft.VisualStudio.Component.DiagnosticTools ^
 --add Microsoft.VisualStudio.Component.Graphics ^
 --add Microsoft.VisualStudio.Component.ManagedDesktop.Core ^
 --add Microsoft.VisualStudio.Component.ManagedDesktop.Prerequisites ^
 --add Microsoft.VisualStudio.Component.NuGet ^
 --add Microsoft.VisualStudio.Component.Roslyn.Compiler ^
 --add Microsoft.VisualStudio.Component.Roslyn.LanguageServices ^
 --add Microsoft.VisualStudio.Component.SQL.CLR ^
 --add Microsoft.VisualStudio.Component.TextTemplating ^
 --add Microsoft.VisualStudio.Component.VC.ATL ^
 --add Microsoft.VisualStudio.Component.VC.ATLMFC ^
 --add Microsoft.VisualStudio.Component.VC.CMake.Project ^
 --add Microsoft.VisualStudio.Component.VC.CoreIde ^
 --add Microsoft.VisualStudio.Component.VC.Redist.14.Latest ^
 --add Microsoft.VisualStudio.Component.VC.Tools.x86.x64 ^
 --add Microsoft.VisualStudio.Component.Windows10SDK.17763 ^
 --add Microsoft.VisualStudio.ComponentGroup.NativeDesktop.Core ^
 --add Microsoft.VisualStudio.ComponentGroup.UWP.NetCoreAndStandard ^
 --add Microsoft.VisualStudio.ComponentGroup.UWP.Support ^
 --add Microsoft.VisualStudio.ComponentGroup.UWP.Xamarin ^
 --add Microsoft.VisualStudio.ComponentGroup.WebToolsExtensions ^
 --add Microsoft.VisualStudio.Workload.CoreEditor ^
 --add Microsoft.VisualStudio.Workload.ManagedDesktop ^
 --add Microsoft.VisualStudio.Workload.NativeDesktop ^
 --add Microsoft.VisualStudio.Workload.Universal

echo 全自動インストーラでインストールした内容を exportする
vs_professional.exe export --config vs2019_auto_offline_install.vsconfig

echo Visual Studio 2019 disable CEIP VSCEIP 16.1.2
REG ADD HKEY_LOCAL_MACHINE\SOFTWARE\Wow6432Node\Microsoft\VSCommon\16.0\SQM /v OptIn /t REG_DWORD /d 0 /f
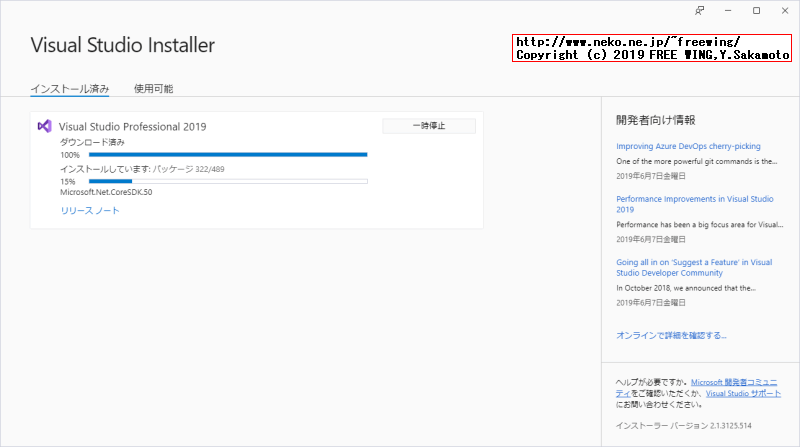
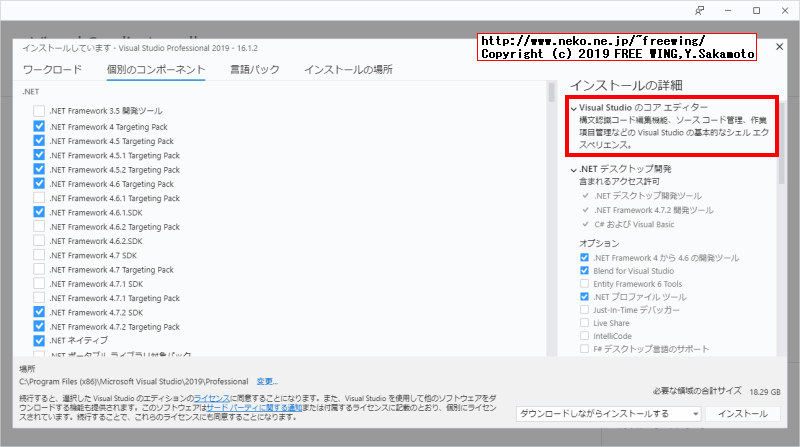
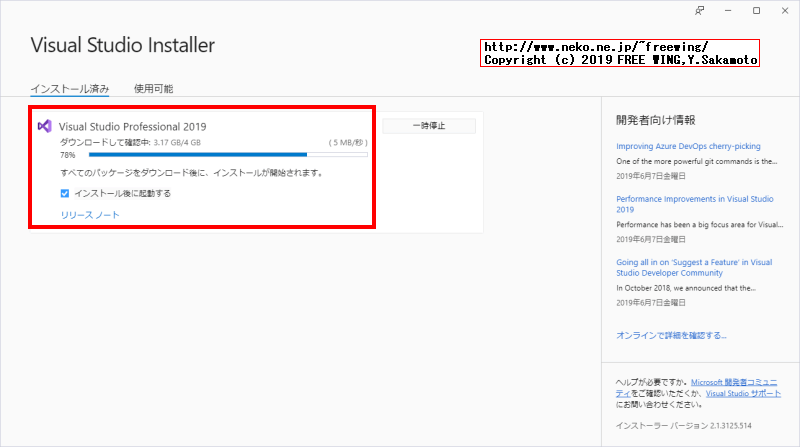
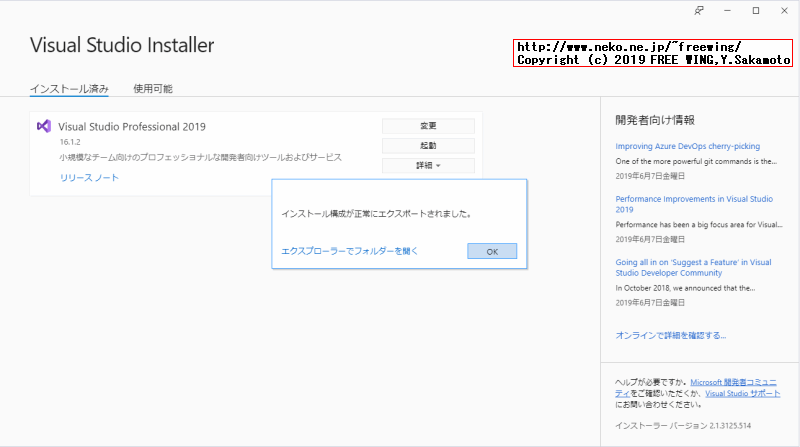
上記のバッチファイルでインストール中の画面。
・Microsoft Visual Studio 2019のオフラインインストーラの作成方法
● Microsoft Visual Studio 2019 16.1.2 下記の内容でインストールしました
・Microsoft Visual Studio 2019のオフラインインストーラの作成方法
・Microsoft Visual Studio 2019のオフラインインストーラの作成方法
・Microsoft Visual Studio 2019のオフラインインストーラの作成方法
・Microsoft Visual Studio 2019のオフラインインストーラの作成方法
・Microsoft Visual Studio 2019のオフラインインストーラの作成方法
・Microsoft Visual Studio 2019のオフラインインストーラの作成方法
・Microsoft Visual Studio 2019のオフラインインストーラの作成方法
・Microsoft Visual Studio 2019のオフラインインストーラの作成方法
・Microsoft Visual Studio 2019のオフラインインストーラの作成方法
・Microsoft Visual Studio 2019のオフラインインストーラの作成方法
・Microsoft Visual Studio 2019のオフラインインストーラの作成方法
・Microsoft Visual Studio 2019のオフラインインストーラの作成方法
・Microsoft Visual Studio 2019のオフラインインストーラの作成方法
・Microsoft Visual Studio 2019のオフラインインストーラの作成方法
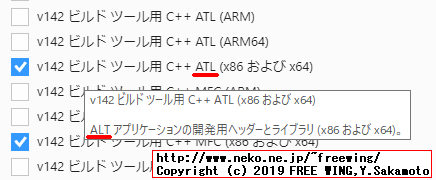
● Microsoft Visual Studio 2019のインストーラで誤植を発見!
・Microsoft Visual Studio 2019のインストーラで誤植を発見!
ATLが ALTに間違っている。
● Mac版の Visual Studio完全オフライン、全自動無人インストーラの作成方法
待て。
Visual Studio for Mac のオフライン インストーラーを作成する
重要:オフライン インストーラー機能は将来のバージョンの Visual Studio for Mac で導入される予定です。
Tags: [Windows], [無人インストール]
●関連するコンテンツ(この記事を読んだ人は、次の記事も読んでいます)
【2023年対応】 Microsoft Visual C++ ランタイムライブラリ 再頒布可能パッケージのまとめ 2005~2022まで
Microsoft Visual C++ 2005、2008、2010、2012、2013、2015、2017、2019、2022の各バージョンの最新版 MSVC Runtime librariesのまとめ
Visual Studioの C#で開発した .Netアプリの難読化をする方法
C#で開発した .Netアプリの難読化は必須事項です、素の状態では簡単に内部を解析されます
Visual Studioの C#で開発した .Netアプリを逆コンパイルして、中身の実装を覗き見る方法
C#で開発した .Netアプリは比較的簡単に元のソースコードに戻せます
Visual Studio 2019 Professional v16.4を無人インストールする方法、完全自動でインストール
VS2019 v16.4を完全オフラインインストール&コンポーネント選択の事前設定で自動インストールする
Visual Studio 2017 Professional 15.9を無人インストールする方法、完全自動でインストール
VS2017を完全オフラインインストール&コンポーネント選択の事前設定で自動インストールする
Visual Studio 2015 Professionalを無人インストールする方法、完全自動でインストール
VS2015を Update 3適用済みとコンポーネント選択の事前設定でインストール時の手間を省く
Visual Studio 2013 Professionalを無人インストールする方法、完全自動でインストール
VS2013を Update 5適用済みとコンポーネント選択の事前設定でインストール時の手間を省く
Visual Studio 2005 Professionalに Service Pack 1を統合して無人インストールする方法
VS2005に SP1を統合 & 完全自動でインストール、SP1の適用とコンポーネントの事前設定でインストールの手間を省く
Visual Studio 98を Windows 10 1903にインストールする方法
VS98 Visual Studio 98を Windows 10 19H1にインストールする方法
Visual Studio Communityのまとめ Professional と同等機能が無償
Visual Studio Communityの 2013 Update 5、2015 Update 3、2017 version 15.6のまとめ
C# .NETで ZIPファイル解凍ツール UnZipをソースリスト 1行で自作する方法、Windows .NET専用
Visual Studio 2013の C# .NET 4.5で ZipFile.ExtractToDirectoryを使い、UnZip解凍ツールを作成
Visual Studio 2013に Windows 10 SDK + UwpDesktopで UWPの機能を素の Windowsアプリから使用
VS2013に Win 10 SDKをインストールして Uwp Desktopで UWPの機能を従来の Windowsアプリで動かす
Visual Studio 2013の C# .NETで 日本語対応の OCR文字認識アプリを自作する方法
オフライン環境で動作可能な 世界各国語対応の OCR文字認識アプリを C# .NETで作成、MS製 OCRライブラリを使用
Visual Studio 2013の C#で日本語対応の手書き文字認識アプリを自作する方法
オフライン環境で動作する世界各国語対応の手書き文字認識アプリを作成、MS製 手書き認識ライブラリを使用
Open XML SDKを使用して Officeのファイルを C#で自在に操る方法
Microsoft Officeのファイルをプログラムで生成したり直接中身の読み取りができます
Visual Studioの各バージョンと開発できる .NET Frameworkの各バージョンのまとめ
.Microsoft.NET Framework Developer Packの各バージョンのダウンロードまとめ。言語パック等
Windows 10対応 Microsoft Speech使用の音声認識アプリ
SpeechRecognizeApp 音声認識エンジンを使用してマイク入力の音声を認識します
Windows 10の音声合成エンジンを使用して入力した文字列を喋る & Waveファイル書き出し
SpeechApp Windows 10用 Speech 音声合成 Text-to-Speech TTSのアプリ
Visual Studioの C#や MFC C++用のサンプルアプリのリンク集
Visual Studioの C#や MFC C++でアプリを作る時の参考資料として
Windowsの Input Method Manager IMEや TSF Text Services Frameworkの公式情報源のまとめ
Windowsで IME Input Method Manager関連のアプリを作成する時の情報 ImeTrayもこの辺を必死に読んだ
Microsoft Office 2016を無人インストール(自動インストール)する方法
インストールするコンポーネントを事前に設定する事で同一環境の構築が楽にできます MSオフィス 2016
Windows 10を全自動で最後まで手間要らずでインストールする方法
autounattend.xmlの応答ファイルを使用して Windows 10を無人インストールする。大量展開時に便利
Adobe Acrobat Reader関係のまとめ 2018年版、自動インストール、無人インストール方法
アップデート手順など、Adobe Reader XI、X、Acrobat Reader 9、Acrobat Reader 8
[HOME]
|
[BACK]
リンクフリー(連絡不要、ただしトップページ以外は Web構成の変更で移動する場合があります)
Copyright (c)
2019 FREE WING,Y.Sakamoto
Powered by 猫屋敷工房 & HTML Generator
http://www.neko.ne.jp/~freewing/software/visual_studio_2019_unattend_auto_install/