・2018/03/14
 Raspberry Piに Laravel 5.6 PHP 7.1のフレームワークで Webサーバを構築する方法
(ラズパイで Hello Laravel 5.6 + PHP7.1 PHPサーバを構築する、PHP7.1インストール方法も解説)
Tags: [Raspberry Pi], [電子工作]
● Raspberry Pi 3 Model Bを遂に購入
Raspberry Pi3 Model B RPI2 RPI3
大人気の CPUボードの Raspberry Piに WiFiと Bluetoothが搭載されたモデルが新発売となりました。
以前から Raspberry Pi 2を買おうかどうか迷っていましたが、Raspberry Pi 3 Model Bの発売を機に購入を決意してラズベリアンになる事にしました。
※ ラズパイの OS Raspbianはバージョンが上がる毎に過去の版と OSの内部の作りが変わり、過去に書かれた製作記事(例えば Raspbian Wheezyの時代の記事)がそのままではエラーが出たりして動かない事が有ります。
※ 当方のホームページのラズパイ記事は全て Raspberry Pi 3 Model Bと Raspbian Jessieの組み合わせで動作確認をしております。
(ただし、将来的に新しい Raspbian OSが出た場合に、当方の Raspbian Jessieを基にした内容がそのままでは動かない可能性が有ります。)
※ 2017/08/16から Raspbian OSは Raspbian Jessieから Raspbian Stretchに変わりました。
※ 2019/06/20から Raspbian OSは Raspbian Stretchから Raspbian Busterに変わりました。
Download Raspbian for Raspberry Pi
ちなみに、歴代のバージョンと名称は
| Debian | コードネーム | 年月 | 備考 | (参考)Ubuntuでの該当名称 |
| Debian 11 | Bullseye | 2021/08/14~ | 2021/11からラズパイにリリース | Focal Fossa 20.04 LTS ? |
| Debian 10 | Buster | 2019/06/20~ | 2019/06からラズパイ4対応 | Bionic 18.04 LTS |
| Debian 9 | Stretch | 2017/08/16~ | 2018/03からラズパイ3B+対応 | Xenial 16.04 LTS |
| Debian 8 | Jessie | 2015~ | 2016/02からラズパイ3対応 | Trusty 14.04 LTS |
| Debian 7 | Wheezy | 2013~2016 | | |
| Debian 6.0 | Squeeze | 2011~2014 | | |
| Debian GNU/Linux 5.0 | Lenny | 2009~2012 | | |
● Laravel 7.0での構築手順
Laravel 7.0を使いたい場合
・2020/03/01

Raspberry Pi Busterに Laravel 7 PHP 7.3のフレームワークで Webサーバを構築する方法
ラズパイで Hello Laravel 7 + PHP7.3 PHPサーバを構築する、PHP7.3インストール方法も解説
●ラズパイで PHPフレームワークの Laravelサーバを構築する方法
使用した Raspbian OSのバージョン
Release date: 2018-03-13
2018-03-13-raspbian-stretch.img
pi@raspberrypi:~ $ uname -a
Linux raspberrypi 4.9.80-v7+ #1098 SMP Fri Mar 9 19:11:42 GMT 2018 armv7l GNU/Linux

pi@raspberrypi:~ $ lsb_release -a
No LSB modules are available.
Distributor ID: Raspbian
Description:    Raspbian GNU/Linux 9.3 (stretch)
Release:        9.3
Codename:       stretch
Release date: 2017-11-29
2017-11-29-raspbian-stretch.img
pi@raspberrypi:~ $ uname -a
Linux raspberrypi 4.9.59-v7+ #1047 SMP Sun Oct 29 12:19:23 GMT 2017 armv7l GNU/Linux

pi@raspberrypi:~ $ lsb_release -a
No LSB modules are available.
Distributor ID: Raspbian
Description:    Raspbian GNU/Linux 9.1 (stretch)
Release:        9.1
Codename:       stretch
● Laravelとは?
Laravelとは Symfonyをベースにした PHPフレームワーク。
ウェブ職人のためのPHPフレームワーク。
必要になりそうなので自分専用の実験環境を作成します。
● Laravelのバージョンと必要な PHPのバージョンの関係
| Laravelのバージョン | 時期 | 必要な PHPのバージョン |
| Laravel v5.4 | 2017年1月 | PHP 5.6.4以上 |
| Laravel v5.5 | 2017年8月 LTS | PHP 7.0以上 |
| Laravel v5.6 | 2018年2月 | PHP 7.1.3以上 |
Laravel 5.5は PHP 7.0以降を
Laravel 5.6は PHP 7.1.3以降を必要とします。
それで、ラズパイの Raspbian Stretch OSは 2018年 3月現在 PHP7.1に対応していませんが、下記の設定をする事で公式の raspbian.orgサーバから PHP 7.1を apt-getでインストールできます。
●公式の raspbian.orgサーバから取得するメリット
※ 第三者のビルドした PHP 7.1を組み込まなくても良い(悪意の有る第三者が配布している場合、ウイルス混入等のおそれがある)
※ PHP 7.1を自分でビルドしなくても良い(ポリシーとして自分でビルドしたい人はそちらでどうぞ。)
公式の Raspbian Repositoryサーバから 2019年リリース予定の時期 OSの "Buster"から PHP 7.1をインストールします。
Raspbian Repository
http://archive.raspbian.org/ Index of /raspbian/dists/buster/
Clean install Rasbian buster
2017/8/28
You're about eighteen months too early. I wouldn't expect to be testing Buster before February 2019 as there will be nothing built for it until there's an early release candidate.
「18ヶ月もはえーよ!」
DougieLawsonさんは並々ならぬサポートで大変だなぁ。
Raspbian Buster
2018/1/28
Q: Raspbian Buster
A: You're about eighteen months too early.
上記の "eighteen months"は時期の計算的にコピペミスでしょうか?
● Laravel 5.6
Laravel 5.6
Server Requirements
PHP >= 7.1.3
OpenSSL PHP Extension
PDO PHP Extension
Mbstring PHP Extension
Tokenizer PHP Extension
XML PHP Extension
Ctype PHP Extension
JSON PHP Extension
5.6/composer.json
    "require": {
        "php": "^7.1.3",
        "ext-mbstring": "*",
        "ext-openssl": "*",
        "doctrine/inflector": "~1.1",
        "dragonmantank/cron-expression": "~2.0",
        "erusev/parsedown": "~1.7",
        "league/flysystem": "^1.0.8",
        "monolog/monolog": "~1.12",
        "nesbot/carbon": "^1.24.1",
        "psr/container": "~1.0",
        "psr/simple-cache": "^1.0",
        "ramsey/uuid": "^3.7",
        "swiftmailer/swiftmailer": "~6.0",
        "symfony/console": "~4.0",
        "symfony/debug": "~4.0",
        "symfony/finder": "~4.0",
        "symfony/http-foundation": "~4.0",
        "symfony/http-kernel": "~4.0",
        "symfony/process": "~4.0",
        "symfony/routing": "~4.0",
        "symfony/var-dumper": "~4.0",
        "tijsverkoyen/css-to-inline-styles": "^2.2.1",
        "vlucas/phpdotenv": "~2.2"
    },
● Laravelに必要なパッケージ
PHP
PHP is a popular general-purpose scripting language
Composer
Composer - Dependency Manager for PHP
MySQLまたは MariaDBデータベース
MySQL データベース
MySQL
MariaDB creates open source database
MariaDB creates open source database
HTTP Serverは任意(PHPビルトインサーバ機能でも動かせる)
PHPのビルトインサーバで動かしたい
Apacheまたは nginx HTTP Server
Apache HTTP Server
Apache HTTP Server
nginx HTTP Server
nginx HTTP Server
● Laravel 5.5での構築手順
Laravel 5.5を使いたい場合
Raspberry Pi Raspbian Stretch OSに PHP 7.0を追加する方法。
・2018/03/14
Raspberry Piに Laravel 5.5 PHP 7.0フレームワークで Webサーバを構築する方法
ラズパイで Hello Laravel 5.5 + PHP7.0サーバを構築する、Apache2で PHP-FPMを有効にする方法
● Laravel 5.6での構築手順
Laravel 5.6を使いたい場合
Raspberry Pi Raspbian Stretch OSに PHP 7.1を追加する方法。
下記の PHP7.1対応を行なうと MySQLのインストールで「E: Unable to correct problems, you have held broken packages.」が出るので先に MySQLをインストールする。
# お決まりの sudo apt-get update
sudo apt-get update

# MySQLのインストール
sudo apt-get -y install mysql-server

# MySQLのバージョンの確認
mysqld -V
# mysqld  Ver 10.1.23-MariaDB-9+deb9u1 for debian-linux-gnueabihf on armv7l (Raspbian 9.0)
mysql -V
# mysql  Ver 15.1 Distrib 10.1.23-MariaDB, for debian-linux-gnueabihf (armv7l) using readline 5.2
# PHP 7.1のパッケージの存在を確認
apt-cache search php7.1
# (何も出てこない)

# sources.listに下記の行を追加する
sudo nano /etc/apt/sources.list
deb http://mirrordirector.raspbian.org/raspbian/ buster main contrib non-free rpi

# 再度 sudo apt-get updateして変更を有効にする
sudo apt-get update

# PHP 7.1のパッケージの存在を確認
apt-cache search php7.1
# (色々出てくる)
# php7.1 - server-side, HTML-embedded scripting language (metapackage)

# PHP 7.1のインストールを一行で一括で行なう場合
sudo apt-get -y install php7.1 php7.1-common php7.1-mbstring php7.1-xml php7.1-mysql php7.1-zip php7.1-gd php7.1-curl php7.1-json mcrypt php7.1-mcrypt
# libc-bin
# Configuring libc6:armhf

# PHPのバージョンの確認
php -v
# PHP 7.1.15-1 (cli) (built: Mar  6 2018 10:50:10) ( NTS )
# Copyright (c) 1997-2018 The PHP Group
# Zend Engine v3.1.0, Copyright (c) 1998-2018 Zend Technologies
#     with Zend OPcache v7.1.15-1, Copyright (c) 1999-2018, by Zend Technologies
# Apache 2 Web Serverのインストール(不要)
# sudo apt-get -y install apache2

# Apache 2 Web Serverのバージョンの確認
apache2 -v
# Server version: Apache/2.4.29 (Raspbian)
# Server built:   2018-01-14T11:01:58
# Composerのインストール
sudo apt-get -y install composer

# Composerのバージョンの確認
composer -V
# Composer 1.6.3 2018-01-31 16:28:17
# Composerを使って Laravelをインストールする
# /var/www/laravelに作成する
sudo mkdir /var/www/laravel
# 本来であれば chownでファイル権限のユーザーで許可を与えるが、自分だけの開発環境なので chmodで安易に済ませている。
sudo chmod 777 /var/www/laravel
composer create-project laravel/laravel /var/www/laravel
# Installing laravel/laravel (v5.6.12)
#   - Installing laravel/laravel (v5.6.12): Downloading (100%)

# Created project in /var/www/laravel
# > @php -r "file_exists('.env') || copy('.env.example', '.env');"
# Writing lock file
# Generating optimized autoload files
# > Illuminate\Foundation\ComposerScripts::postAutoloadDump
# > @php artisan package:discover
# Discovered Package: fideloper/proxy
# Discovered Package: laravel/tinker
# Discovered Package: nunomaduro/collision
# Package manifest generated successfully.
# > @php artisan key:generate
# Application key [base64:xxxxxxxxxxxxxxxxxxxxxxxxxxxxxxxxxxxxxxxxxxx=] set successfully.
# Laravelのバージョンを確認する
cd /var/www/laravel/
php artisan --version
# Laravel Framework 5.6.12
# 000-default.confの DocumentRoot設定を書き換える
sudo nano /etc/apache2/sites-available/000-default.conf
<VirtualHost *:80>
# DocumentRoot /var/www/html
DocumentRoot /var/www/laravel/public
# apache2の設定ファイルを書き換えたので apache2を再起動する
sudo systemctl restart apache2
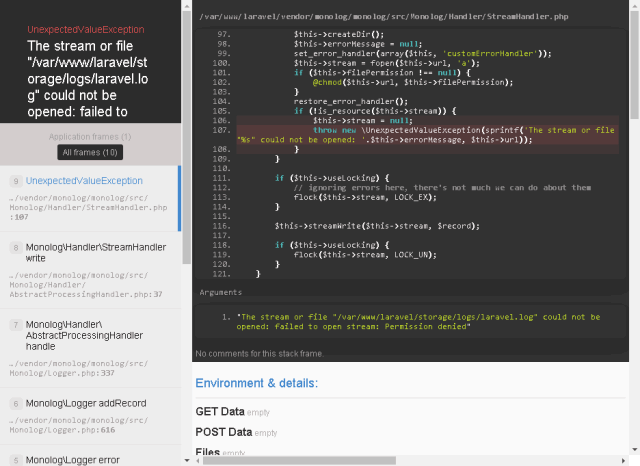
# failed to open stream: Permission deniedになるので 757にする
# UnexpectedValueException
# The stream or file "/var/www/laravel/storage/logs/laravel.log" could not be opened: failed to open stream: Permission denied
# 本来であれば chownでファイル権限のユーザーで許可を与えるが、自分だけの開発環境なので chmodで安易に済ませている。
# sudo chown -R www-data:www-data /var/www/laravel/storage
sudo chmod -R 757 /var/www/laravel/storage
# apache2の mod_rewriteモジュールを a2enmodコマンドで有効化する
# これを有効化しないと /のルートディレクトリ以外にアクセスすると 404 Not Foundになる
# (間違った使い方だが /index.php/hogeとするとアクセスできる)
sudo a2enmod rewrite

# apache2の mod_rewriteモジュールの有効化を確認する
ls -l /etc/apache2/mods-enabled/ | grep rewrite
# lrwxrwxrwx 1 root root 30 Jul  6 15:08 rewrite.load -> ../mods-available/rewrit .load

# 000-default.confの DocumentRoot設定を書き換える
# 000-default.confの DocumentRoot設定の下に AllowOverride All設定を追加する
sudo nano /etc/apache2/sites-available/000-default.conf

<VirtualHost *:80>
#       DocumentRoot /var/www/html
        DocumentRoot /var/www/laravel/public

        <Directory "/var/www/laravel/public">
          AllowOverride All
        </Directory>

# apache2の設定ファイルを書き換えたので apache2を再起動する
sudo systemctl restart apache2
パソコンの Webブラウザでラズパイの IPアドレスにアクセスする。
http://192.168.1.123

 Bonjourを入れている場合は(sudo apt-get install avahi-daemon)
http://raspberrypi.local
白い画面に灰色の文字で下記が出れば成功。
Laravel
DOCUMENTATION LARACASTS NEWS FORGE GITHUB
・ラズパイで PHPフレームワークの Laravelサーバを構築する方法
● phpinfoでサーバの PHPの状態を確認する方法
cd /var/www/laravel/public
nano /var/www/laravel/public/phpinfo.php
<?php
  phpinfo();
?>
sudo echo '<?php phpinfo(); ?>' > /var/www/laravel/public/phpinfo.php
# Server API: Apache 2.0 Handler
● Apache 2サーバで php-fpmを使う場合
# php7.1-fpmのインストール
sudo apt-get -y install php7.1-fpm
# NOTICE: Not enabling PHP 7.1 FPM by default.
# NOTICE: To enable PHP 7.1 FPM in Apache2 do:
# NOTICE: a2enmod proxy_fcgi setenvif
# NOTICE: a2enconf php7.1-fpm
# NOTICE: You are seeing this message because you have apache2 package installed.

# php7.1-fpmの有効化
sudo a2enmod proxy_fcgi setenvif
sudo a2enconf php7.1-fpm
# Enabling conf php7.1-fpm.
# To activate the new configuration, you need to run:
#   systemctl reload apache2

# PHPの www.confファイルを書き換える
sudo nano /etc/php/7.1/fpm/pool.d/www.conf

; listen = /run/php/php7.1-fpm.sock
listen = 127.0.0.1:9000

# php-fpmのサービスを再起動する
sudo service php7.1-fpm stop
sudo service php7.1-fpm start

# apache2の 000-default.confファイルを書き換える
sudo nano /etc/apache2/sites-available/000-default.conf

#       DocumentRoot /var/www/html
        DocumentRoot /var/www/laravel/public

        <FilesMatch "\.php$">
            SetHandler "proxy:fcgi://127.0.0.1:9000/"
        </FilesMatch>

# apache2の設定を変更したので apache2を再起動する
sudo systemctl restart apache2
phpinfo()で下記になっていれば Apache 2の php-fpm化が成功
# Server API: FPM/FastCGI
通常は下記(php-fpmが動いていない)
# Server API: Apache 2.0 Handler
●ファイルのアクセス権限が無いので Laravel実行時にブラウザにエラー画面が出る
UnexpectedValueException
The stream or file "/var/www/laravel/storage/logs/laravel.log" could not be opened: failed to open stream: Permission denied

ErrorException (E_WARNING)
file_put_contents(/var/www/laravel/storage/framework/sessions/xxxxxxxxxxxxxxxxxxxxxxxxxxxxxxxxxxxxxxxx): failed to open stream: Permission denied

sudo chmod 777 -R /var/www/laravel/storage/
 本来であれば chownでファイル権限のユーザーで許可を与えるが、自分だけの開発環境なので chmodで安易に済ませている。

pi@raspberrypi:~ $ ls -l /var/www/laravel/.env
-rw-r--r-- 1 pi pi 702 Mar 16 14:20 /var/www/laravel/.env

pi@raspberrypi:~ $ ls -l /var/www/laravel/storage/framework/sessions/
total 4
-rw-r--r-- 1 www-data www-data 178 Mar 16 14:30 xxxxxxxxxxxxxxxxxxxxxxxxxxxxxxxxxxxxxxxx
・Laravel UnexpectedValueException failed to open stream: Permission denied
● /etc/apt/sources.listに "buster"を追加後は mysql-serverのインストールに失敗する
Buster版の mysql-serverのインストールパッケージと Stretch版とに互換性が無い?
sudo apt-get -y install mysql-server

pi@raspberrypi:~ $ sudo apt-get -y install mysql-server
Reading package lists... Done
Building dependency tree
Reading state information... Done
Some packages could not be installed. This may mean that you have
requested an impossible situation or if you are using the unstable
distribution that some required packages have not yet been created
or been moved out of Incoming.
The following information may help to resolve the situation:

The following packages have unmet dependencies:
 mysql-server : Depends: default-mysql-server but it is not going to be installd
E: Unable to correct problems, you have held broken packages.
● PHP 7.1をインストール中に libc6パッケージの自動更新を聞いてきます
sudo apt-get -y install php7.1 php7.1-xml php7.1-mbstring php7.1-mysql php7.1-json php7.1-curl php7.1-cli php7.1-common php7.1-mcrypt php7.1-gd libapache2-mod-php7.1 php7.1-zip

Configuring libc6:armhf

 x There are services installed on your system which need to be restarted    x
 x when certain libraries, such as libpam, libc, and libssl, are upgraded.   x
 x Since these restarts may cause interruptions of service for the system,   x
 x you will normally be prompted on each upgrade for the list of services    x
 x you wish to restart.  You can choose this option to avoid being           x
 x prompted; instead, all necessary restarts will be done for you            x
 x automatically so you can avoid being asked questions on each library      x
 x upgrade.                                                                  x
 x                                                                           x
 x Restart services during package upgrades without asking?                  x
 x                                                                           x
 x                    <Yes>                       <No>                       x


 x Running services and programs that are using NSS need to be restarted,    x
 x otherwise they might not be able to do lookup or authentication any more  x
 x (for services such as ssh, this can affect your ability to login).        x
 x Please review the following space-separated list of init.d scripts for    x
 x services to be restarted now, and correct it if needed.                   x
 x                                                                           x
 x Note: restarting sshd/telnetd should not affect any existing              x
 x connections.                                                              x
 x                                                                           x
 x Services to restart for GNU libc library upgrade:                         x
 x                                                                           x
 x ssh cron_________________________________________________________________ x
 x                                                                           x
 x                                  <Ok>                                     x
● composerを sudo付きで実行すると「警告」が出ます
pi@raspberrypi:~ $ sudo composer create-project laravel/laravel /var/www/html/laravel
Do not run Composer as root/super user! See https://getcomposer.org/root for details
Tags: [Raspberry Pi], [電子工作]
●関連するコンテンツ(この記事を読んだ人は、次の記事も読んでいます)
Raspberry Piで Googleの Go言語 + Gin Webフレームワークをインストールして Webアプリを作る
Raspberry Piで Googleの Go言語 + Gin Webフレームワークをインストールして Webアプリを作る
Raspberry Piで WebAPIモックサーバー JSON Serverを動かしてみるテスト
Raspberry Piで APIモックサーバー JSON Serverを動かしてみるテスト
Raspberry Piに LAMP構成の Apache MySQL PHP Perl phpMyAdminの Webサーバを構築する方法
ラズパイで一般的な Webサービスを動かす場合に必要なアプリが入った LAMP stackを構築
Raspberry Piに LLMP Lighttpd + MySQL + PHP + Perl 構成の Webサーバを構築する方法
ラズパイで Webサービスを動かす、Lighttpd + PHP + Perl + Python + Ruby CGIの LLMP stackを構築
Raspberry Piに nginx + MySQL + PHP + Perl 構成の LEMP Webサーバを構築する方法
ラズパイで Webサービス LEMP Stackを構築、nginx + PHP + Perl(UNIXドメインソケット方式)
Raspberry Piの Webサーバに PHP MySQL PDOを入れて PHP CGIから MySQLを操作する方法
Raspberry Piの Webサーバに PHP MySQL PDOを入れて PHP CGIから MySQLを操作する方法
Raspberry Pi 3 Model Bで CMSフレームワーク WordPressをセットアップする方法
ラズパイ3で WordPressをインストールする方法
Raspberry Pi3を Gitサーバとして設定する方法、Git単体と GitLabを使用する方法
ラズパイ3でローカルの Gitサーバを動かす方法。GitLabをインストールする方法
Raspberry Pi3に Postfixメールサーバーを Gmailの SMTPをリレーとして立てる方法
Raspbian Jessieで Postfix Mail serverを Gmailの SMTPを中継サーバとして設定する方法
Gitでリモートにプッシュした内容を完全に無かった事にする方法
いわゆる Gitでやらかした時に使える最強奥義 git reset --hard HEAD~; git push -f
Raspberry Piに Avahi Bonjourサービスを入れて、ホスト名で接続できる様にする方法
ラズパイに Bonjourサービスを入れて IPアドレスが分からなくてもホスト名で簡単に接続する方法
Raspberry Piや Jetson NANO等をネットワークに接続した場合の IPアドレスの便利ツール xfinder
DHCPで自動で IPアドレスが割り当てられる場合に、ワンボードマイコンの IPアドレスを調べる場合に便利
Apache Webサーバを過剰なアクセスや DoS攻撃から守る modモジュールの紹介
対 DoS攻撃用の Apache2モジュール mod_evasive、mod_dosdetector、mod_limitipconn、fail2ban等の紹介
Raspberry Pi Zero Wを海外通販の Pimoroni等での購入方法、購入できる通販ショップ一覧まとめ
ラズパイゼロW ワイヤレスモデルを海外通販でサクッと簡単に個人輸入で入手。技適通過でも国内販売は常に品切れ
Raspberry Pi 3で安定して使える相性の無い最適な microSDカードの種類のまとめ
ラズパイ3で安定して使える microSDカードを購入する Teamと SanDiskは絶対に買わない
Raspberry Pi 3 Model Bに専用カメラモジュール RaspiCamを接続する方法
ラズパイに専用カメラモジュールを接続して Raspbianで写真の静止画撮影や動画を録画する方法
Raspberry Pi 3の Linuxコンソール上で使用する各種コマンドまとめ
ラズパイの Raspbian OSのコマンドラインで使用する便利コマンド、負荷試験や CPUシリアル番号の確認方法等も
Raspberry Pi 3公式フォーラムの FAQの内容の日本語訳
ラズパイ公式フォーラムの「The Raspberry Pi 3 Model B Q&A thread」の日本語訳
ラズパイを意識した別物製品 Orange Pi Zeroを買ってみた、Allwinner H2+ Cortex-A7 4core
オレンジパイはラズパイよりもコスパは良いが情報が無いので利用者側に一定のスキルが必要
Orange Pi PC 2を買ってみた、Allwinner H5 Cortex-A53 4core ARM64
ラズパイを意識した別物製品、オレンジパイはラズパイよりもコスパが良い、でも情報が無い
Espressif ESP8266 Arduino互換でスケッチが使える ESP-12Eモジュール基板
Espressif ESP8266 ESP-12-E NodeMCU V1 ESP12 CP2102
BangGood通販はドローン以外にも面白い商品がまだまだ有った(電子工作編)
レーザー彫刻機、カラー液晶の DIYオシロ、Arduinoや Raspberry Pi用の小型カラー液晶
[HOME]
|
[BACK]
リンクフリー(連絡不要、ただしトップページ以外は Web構成の変更で移動する場合があります)
Copyright (c)
2018 FREE WING,Y.Sakamoto
Powered by 猫屋敷工房 & HTML Generator
http://www.neko.ne.jp/~freewing/raspberry_pi/raspberry_pi_web_server_php_laravel_5_6/