・2019/01/23
 macOSのスクリーンキャプチャ機能を便利にカスタマイズする。周囲の影無し、数秒後にキャプチャ等
(macOSのスクリーンキャプチャで周囲の影を無くす、任意のファイル名で保存、キャプチャ後に加工等)
Tags: [Apple], [MacBook], [Hackintosh]
● macOSのスクリーンキャプチャ機能を便利にカスタマイズする。周囲の影無し、数秒後にキャプチャ等
macOSのスクリーンキャプチャで周囲の影を無くす、任意のファイル名で保存、キャプチャ後に加工等
macOSに付属の Automatorでタスクを作成して、キーボードのショートカットキーに割り当てます。
Automator ユーザガイド
Mac でアプリケーションのキーボードショートカットを作成する
●任意のウィンドウをキャプチャする
mkdir -p ~/Desktop/00_SC
sleep 0.1
yy=$(date +%Y)
mkdir -p ~/Desktop/00_SC/${yy}
nm=$(date +%m%d_%H%M%S)
/usr/sbin/screencapture -xoW ~/Desktop/00_SC/${yy}/sc_${nm}.png
●任意のウィンドウを 3秒後にキャプチャする
mkdir -p ~/Desktop/00_SC
# sleep 3
yy=$(date +%Y)
mkdir -p ~/Desktop/00_SC/${yy}
nm=$(date +%m%d_%H%M%S)
/usr/sbin/screencapture -T3 -xoW ~/Desktop/00_SC/${yy}/sc_${nm}.png
●画面全体を 3秒後にキャプチャする
mkdir -p ~/Desktop/00_SC
# sleep 3
yy=$(date +%Y)
mkdir -p ~/Desktop/00_SC/${yy}
nm=$(date +%m%d_%H%M%S)
/usr/sbin/screencapture -T3 -xo ~/Desktop/00_SC/${yy}/sc_${nm}.png
● macOSに元々有るスクリーンキャプチャコマンド
キャプチャ後に線を描いたり、文字を埋め込んだりの加工も可能。
-o ウィンドウの周囲に影を付けない
-x スクリーンキャプチャ時にシャッター音を出さない
-U キャプチャのモードを選択できるツールバーを表示する
$ /usr/sbin/screencapture -h

screencapture: illegal option -- h
usage: screencapture [-icMPmwsWxSCUtoa] [files]
  -c         force screen capture to go to the clipboard
  -b         capture Touch Bar - non-interactive modes only
  -C         capture the cursor as well as the screen. only in non-interactive modes
  -d         display errors to the user graphically
  -i         capture screen interactively, by selection or window
               control key - causes screen shot to go to clipboard
               space key   - toggle between mouse selection and
                             window selection modes
               escape key  - cancels interactive screen shot
  -m         only capture the main monitor, undefined if -i is set
  -D<display> screen capture or record from the display specified. -D 1 is main display, -D 2 secondary, etc.
  -o         in window capture mode, do not capture the shadow of the window
  -p         screen capture will use the default settings for capture. The files argument will be ignored
  -M         screen capture output will go to a new Mail message
  -P         screen capture output will open in Preview or QuickTime Player if video
  -I         screen capture output will open in Messages
  -B<bundleid> screen capture output will open in app with bundleid
  -s         only allow mouse selection mode
  -S         in window capture mode, capture the screen not the window
  -J<style>  sets the starting of interfactive capture
               selection       - captures screen in selection mode
               window          - captures screen in window mode
               video           - records screen in selection mode
  -t<format> image format to create, default is png (other options include pdf, jpg, tiff and other formats)
  -T<seconds> take the picture after a delay of <seconds>, default is 5
  -w         only allow window selection mode
  -W         start interaction in window selection mode
  -x         do not play sounds
  -a         do not include windows attached to selected windows
  -r         do not add dpi meta data to image
  -l<windowid> capture this windowsid
  -R<x,y,w,h> capture screen rect
  -v        capture video recording of the screen
  -V<seconds> limits video capture to specified seconds
  -A<id>    captures audio during a video recording using default input. Optional specify the id of the audio source
  -k        show clicks in video recording mode
  -U        Show interactive toolbar in interactive mode
  -u        present UI after screencapture is complete. files passed to command line will be ignored
  files   where to save the screen capture, 1 file per screen
● macOSの Automatorアプリの機能でスクリーンキャプチャ機能を便利にカスタマイズする
● macOSの Automatorアプリを起動する
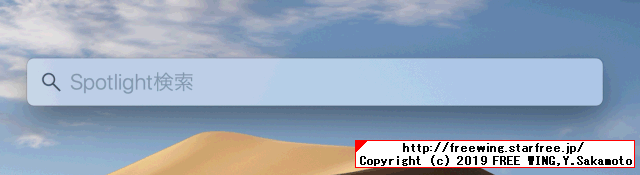
・Spotlightで Automatorアプリを検索する

器 Command + スペースキーで Spotlightを起動できます。
・Spotlightで Automatorアプリを検索する
automatorの automaを Spotlightの検索窓に入力する。
Automatorアプリを起動します。
● macOSの Automatorアプリの機能でスクリーンキャプチャ機能を便利にカスタマイズする
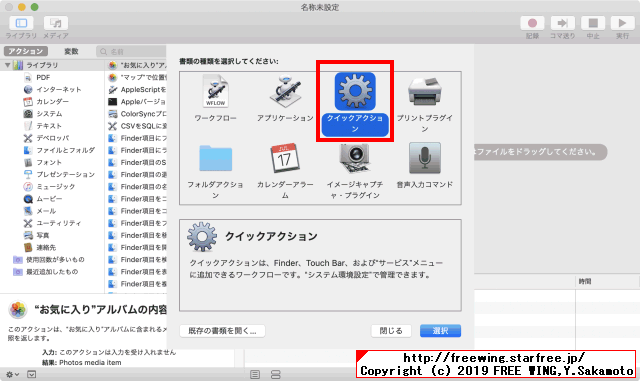
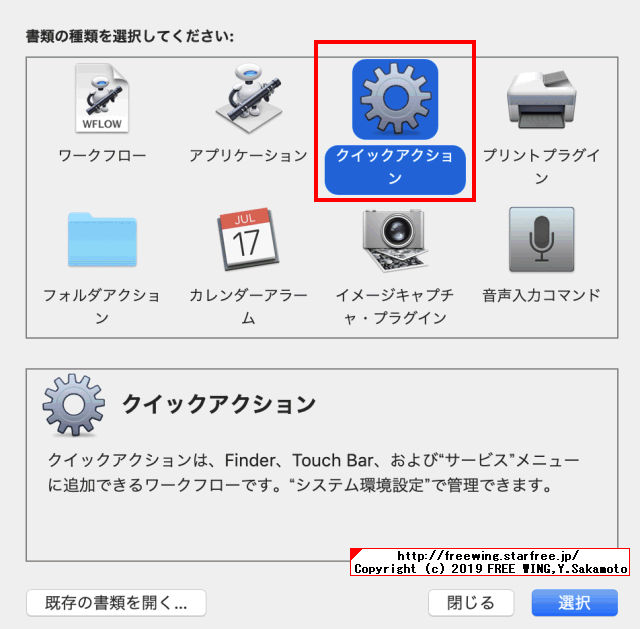
・macOSの Automatorアプリの機能でスクリーンキャプチャ機能を便利にカスタマイズする
・macOSの Automatorアプリの機能でスクリーンキャプチャ機能を便利にカスタマイズする
Automatorアプリを起動したら、クイックアクションを選択する。
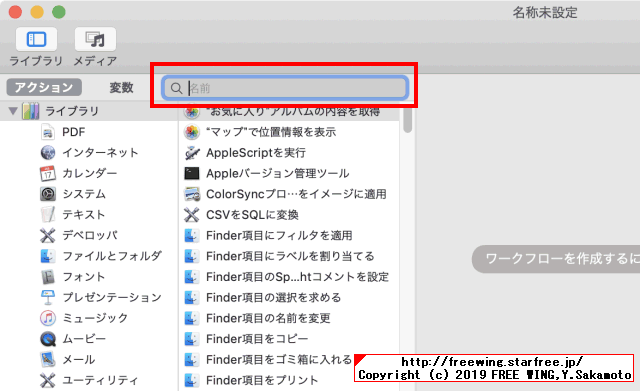
・macOSの Automatorアプリの機能でスクリーンキャプチャ機能を便利にカスタマイズする
・macOSの Automatorアプリの機能でスクリーンキャプチャ機能を便利にカスタマイズする
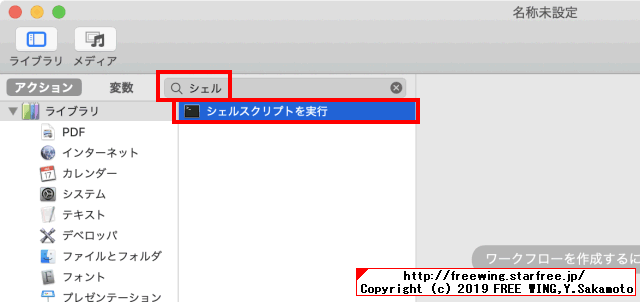
Automatorアプリの左上の検索欄に「シェル」と入力する。
「シェルスクリプトを実行」を選択する。
・macOSの Automatorアプリの機能でスクリーンキャプチャ機能を便利にカスタマイズする
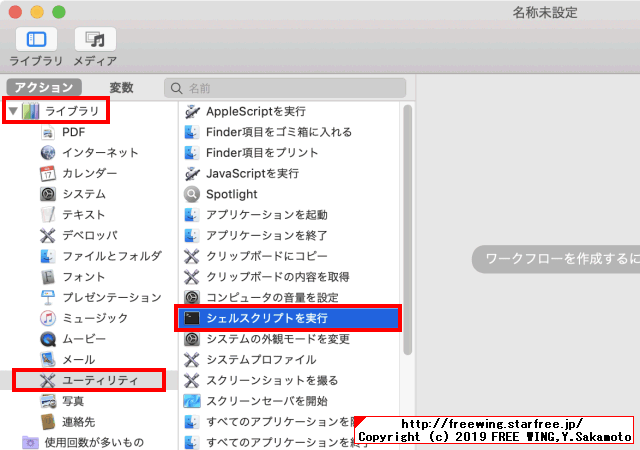
または、「ライブラリ」「ユーティリティ」を選択して、
「シェルスクリプトを実行」を選択する。
・macOSの Automatorアプリの機能でスクリーンキャプチャ機能を便利にカスタマイズする
・macOSの Automatorアプリの機能でスクリーンキャプチャ機能を便利にカスタマイズする
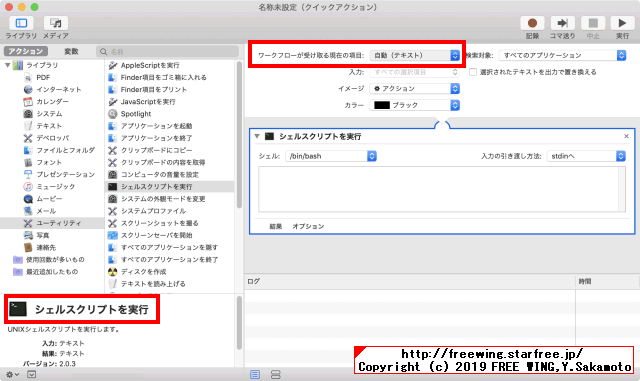
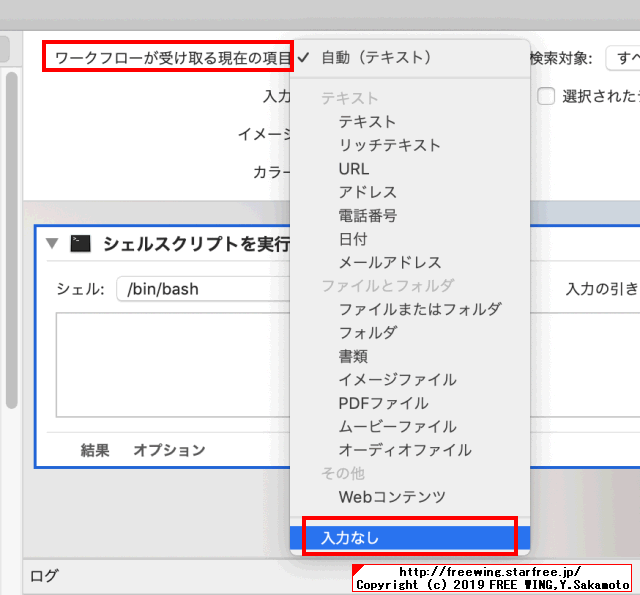
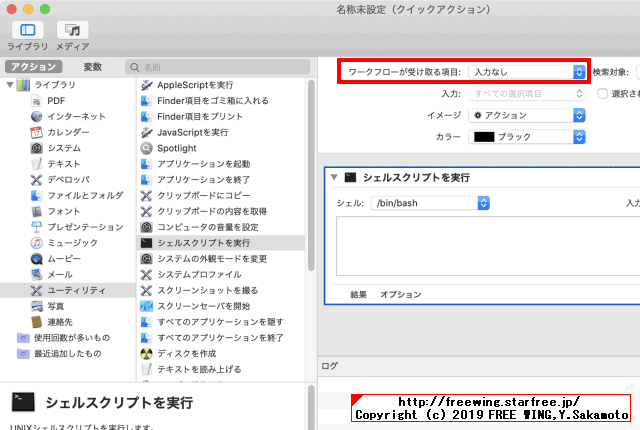
ワークフローが受け取る現在の項目を「入力なし」に設定する。
・macOSの Automatorアプリの機能でスクリーンキャプチャ機能を便利にカスタマイズする
ワークフローが受け取る現在の項目を「入力なし」に設定する。
・macOSの Automatorアプリの機能でスクリーンキャプチャ機能を便利にカスタマイズする
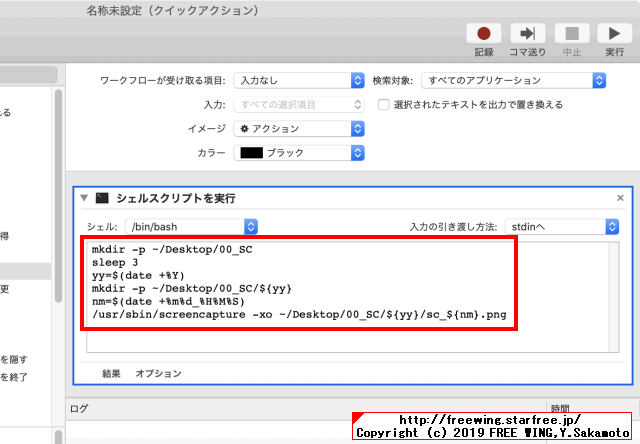
シェルスクリプトを記述する。
・macOSの Automatorアプリの機能でスクリーンキャプチャ機能を便利にカスタマイズする
・macOSの Automatorアプリの機能でスクリーンキャプチャ機能を便利にカスタマイズする
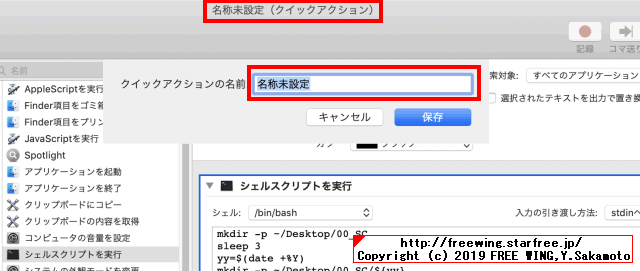
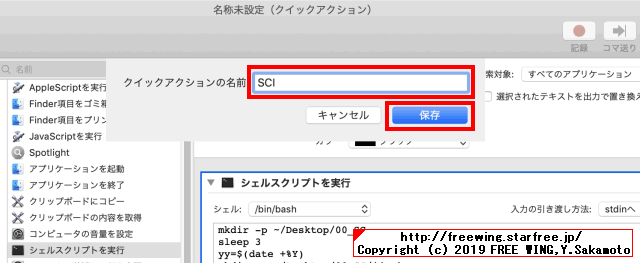
クイックアクションの名前を入力して保存する。
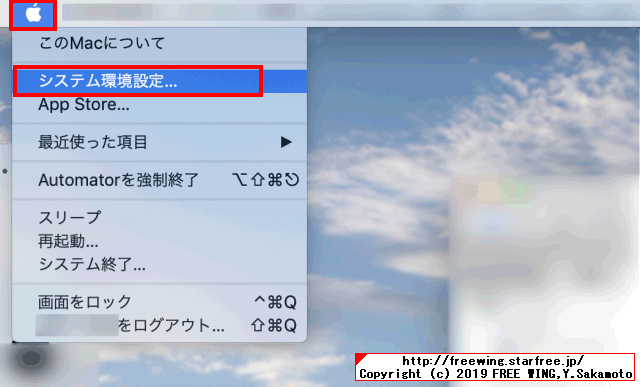
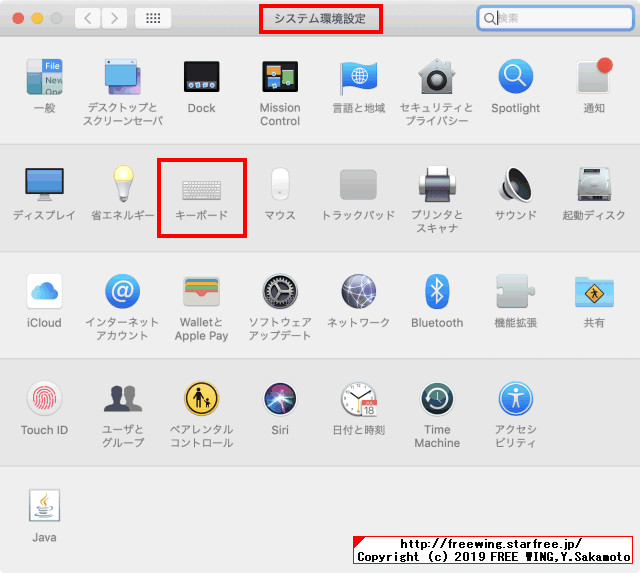
● macOSの システム環境設定で「キーボード」を開く
・macOSの システム環境設定で「キーボード」を開く
macOSの システム環境設定で「キーボード」を開く。
・macOSの システム環境設定で「キーボード」を開く
macOSの システム環境設定で「キーボード」を開く。
・macOSの システム環境設定で「キーボード」を開く
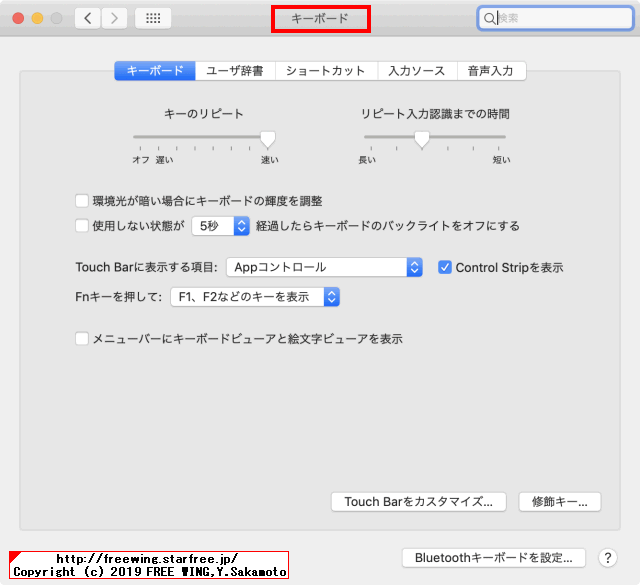
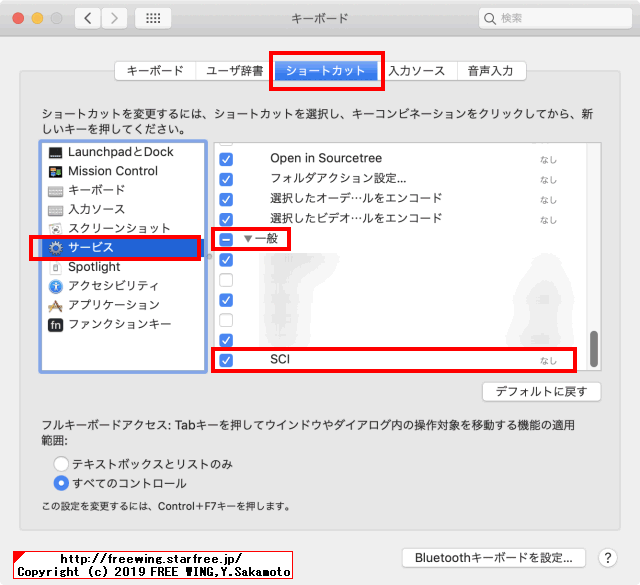
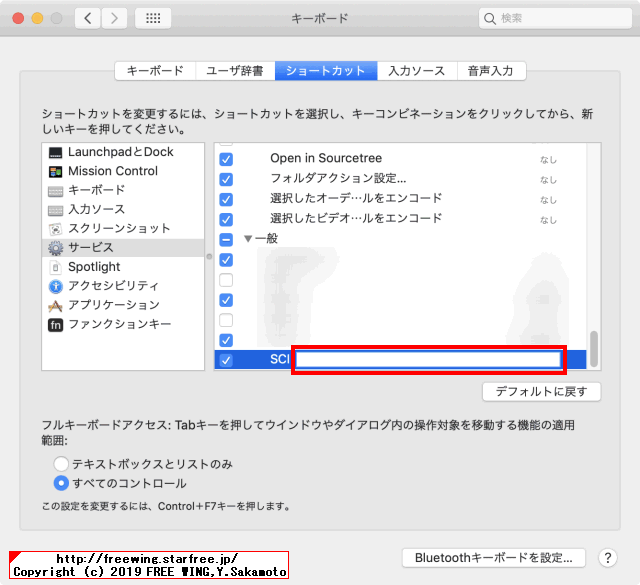
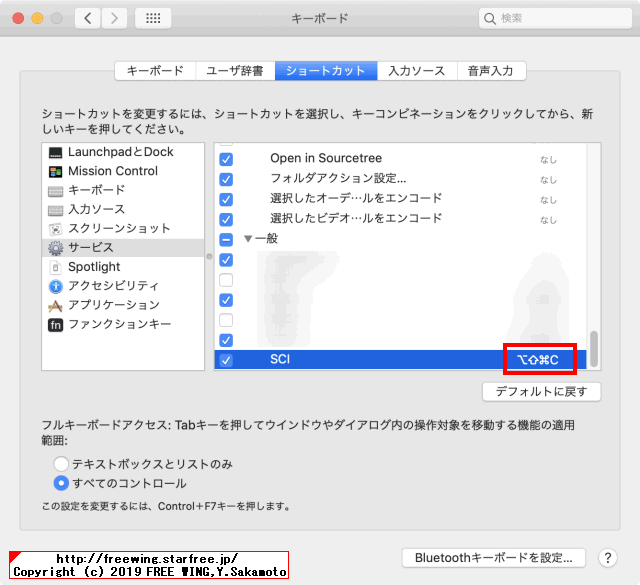
● Automatorで作成した「サービス」にキーボード操作の「ショートカット」を設定する
・Automatorで作成した「サービス」にキーボード操作の「ショートカット」を設定する
ショートカットタブを選択する。
・Automatorで作成した「サービス」にキーボード操作の「ショートカット」を設定する
左側の一覧から「サービス」を選択して、一番下の「一般」欄を表示する。
・Automatorで作成した「サービス」にキーボード操作の「ショートカット」を設定する
Automatorアプリで保存したクイックアクションの名前が有るのでショートカットキーを設定する。
・Automatorで作成した「サービス」にキーボード操作の「ショートカット」を設定する
Automatorアプリで保存したクイックアクションの名前が有るのでショートカットキーを設定する。
設定例は √ option + 器 command + ↑ shift + Cキーで Automatorアプリで保存したクイックアクションの SCIのスクリプトを実行する。
● macOSの AppleScriptで任意のアプリを起動する方法、任意のアプリを終了させる方法
AppleScript を使って Mac 用 iWork のタスクを自動化する
Introduction to AppleScript Overview
Chromeブラウザを起動させる場合。
tell application "Google Chrome"
    activate
end tell
iTunesを終了させる場合。
tell application "iTunes"
    quit
end tell
Tags: [Apple], [MacBook], [Hackintosh]
●関連するコンテンツ(この記事を読んだ人は、次の記事も読んでいます)
macOS Mojaveを高速化する 20の効果的な設定、Macを買ったら最初に設定する俺チューン設定項目
macOSの無駄なアニメーション効果や半透明処理を無効化してメモリ節約と高速化する方法
macOS Mojaveの「コントラストを上げる」「透明度を下げる」をターミナルのコマンドラインで設定する方法
Macを買ったら最初に設定する項目、コントラストを上げて視認性を向上、半透明処理を無効化して高速化
最近の macOSで 32bitアプリを起動した時に出る警告「最適化されていません」を無効にする方法
macOS Mojaveでは 32bitアプリ起動時に「このMac用に最適化されていません。アップデートが必要です」警告が出ます
Windows 10、macOS Mojave対応のキーボード、マウス共用アプリ
マウスとキーボードを 1台で複数のパソコンを操作できます
macOSでキーボードの修飾キーの設定変更をターミナルのコマンドラインから行なう方法、Caps Lockを Controlキーに変更
macOSのキーボードの修飾キーの設定変更をコマンドラインから行なう方法、スクリプトで全自動で行ないたい!
MacBook Proのタッチパッドの設定をターミナルのコマンドラインで行なう方法
Macのタッチパッドの設定変更をコマンドラインで簡単に行なう方法、スクリプトで全自動で行ないたい
Macのマウスホイールの加速度を無効にして Windowsと同じ動きにする方法、macOSのクソな UI動作仕様を修正
macOSのマウスホイールのスクロールの加速度の動きにはイラついている人が世界中に大勢居ます
macOS用の無料で使える Diffアプリの一覧 TextWrangler、FileMerge、KDiff3か?
Mac用の高性能のテキストファイル差分表示アプリ、テキスト比較で差分を表示するアプリ
macOS OSX86で使用する各種パッチの kext拡張をワンクリックで最新に保つアプリ Kext Updater
Kext Updater - Hackintosh Kexts up to Date
Chromeブラウザを快適に使用する設定方法、チョイ技、プロセス数の制限方法
Google Chromeの高速化、使用メモリを減らす方法、文字化け回避、UA変更等
Chromeブラウザが 69から嫌なデザインになったので 68版の昔のデザインに戻す方法
Chrome 69の新デザインを元に戻す chrome://flags/#top-chrome-md の設定項目を Normalに変更する
[HOME]
|
[BACK]
リンクフリー(連絡不要、ただしトップページ以外は Web構成の変更で移動する場合があります)
Copyright (c)
2019 FREE WING,Y.Sakamoto
Powered by 猫屋敷工房 & HTML Generator
http://www.neko.ne.jp/~freewing/software/macos_screen_capture_customize/