2023/02/10 電子工作 ]● ESP32のプログラムを ESP8266に移植する方法、Arduinoでも微妙に互換性が無い所が有ります ● ESP8266で Slackに「勤怠管理」メッセージをワンボタン操作で投稿する方法 2023/01/30
ESP32の場合 ESP8266の場合 #include <HTTPClient.h> #include <ESP8266HTTPClient.h> #include <WiFi.h> #include <ESP8266WiFi.h> #include "NTPClient.h" #include "NTPClient.h" ARDUINO_ISR_ATTR ICACHE_RAM_ATTR
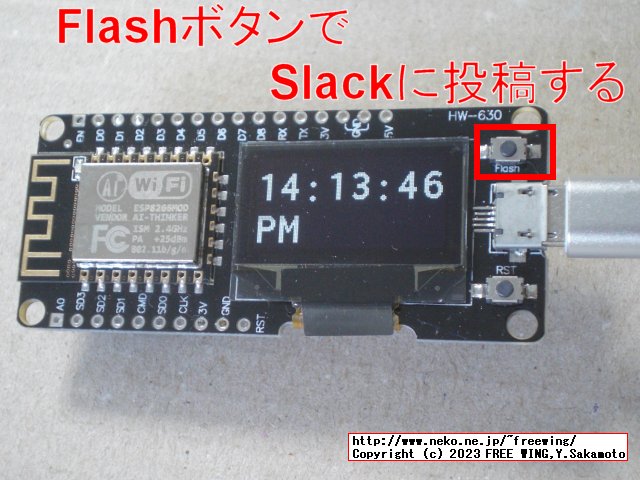
ESP8266で Slackにメッセージをワンボタンで投稿する方法
VIDEO
● error: 'WiFiUDP' does not name a type; did you mean 'WiFi'?
error: 'WiFiUDP' does not name a type; did you mean 'WiFi'?

WiFiUDP udp;
// Japan timeOffset 9 hours, updateInterval 12 hours
NTPClient ntp(udp, "ntp.nict.jp", 9 * 60 * 60, 12 * 60 * 60 * 1000);

●Solution
 Add
#include <WiFiUdp.h>
● error: call to 'HTTPClient::begin' declared with attribute error: obsolete API, use ::begin(WiFiClient, url)
error: call to 'HTTPClient::begin' declared with attribute error: obsolete API, use ::begin(WiFiClient, url)

  httpClient.begin("http://hogehoge.hoge/");

●Solution
  WiFiClient wifiClient;
  httpClient.begin(wifiClient, "http://hogehoge.hoge/");
Issues HTTPCLIENT_1_1_COMPATIBLE
#define HTTPCLIENT_1_1_COMPATIBLE
 を
platform.local.txt
 に追加する。

platform.txt
● https error code -5 connection lost BasicHttpsClient.ino
https error code -5 connection lost
WiFiClient wifiClient;
httpClient.begin(wifiClient, "https://hogehoge.hoge/");
int status_code = httpClient.POST((uint8_t *)buf, strlen(buf));
if (status_code == 200)
{
Serial.print("OK");
}
else
{
Serial.printf("ERR %d", status_code);
if (status_code <= 0)
{
Serial.printf("ERR %s", httpClient.errorToString(status_code).c_str());
}
}
●Solution
#include <WiFiClientSecureBearSSL.h>
std::unique_ptr<BearSSL::WiFiClientSecure> wifiClient(new BearSSL::WiFiClientSecure);
// ignore the SSL certificate
wifiClient->setInsecure();
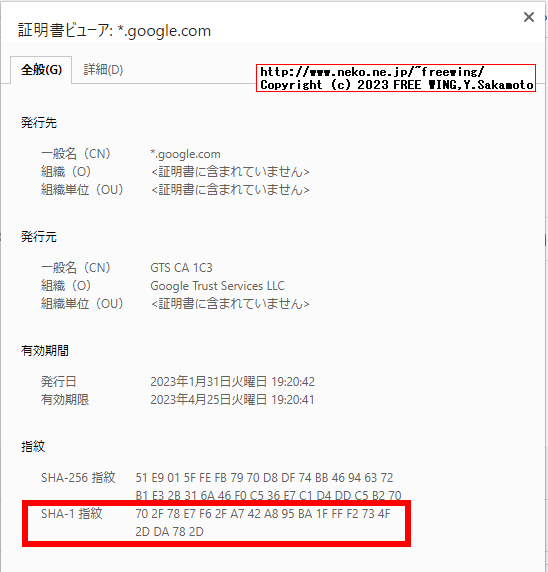
// or SSL certificate SHA-1 Fingerprint
// const uint8_t fingerprint[20] = { 0x00, 0x11, 0x22, 0x33, 0x44, 0x55, 0x66, 0x77, 0x88, 0x99, 0xaa, 0xbb, 0xcc, 0xdd, 0xee, 0xff, 0x00, 0x11, 0x22, 0x33 };
// client->setFingerprint(fingerprint);
HTTPClient httpClient;
httpClient.begin(*wifiClient, "https://hogehoge.hoge/");
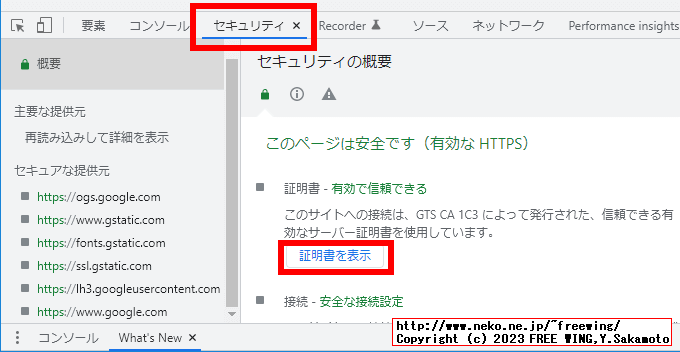
● Chromeブラウザで https通信の SHA-1の SSL certificate Fingerprintを確認する方法 ● error: expected initializer before 'isr' c_types.h
esp32-hal.h
error: expected initializer before 'isr'

void ARDUINO_ISR_ATTR isr() {
    hasButtonPushed = true;
}

●Solution
void ICACHE_RAM_ATTR isr() {
    hasButtonPushed = true;
}
● ESP8266版の Slack投稿プログラム
// #define HTTPCLIENT_1_1_COMPATIBLE true は使えないっぽい
#include <ESP8266WiFi.h>
#include <ESP8266HTTPClient.h>
#include <WiFiClientSecureBearSSL.h>
#include <WiFiUdp.h>
#include "NTPClient.h"
#include <ArduinoJson.h>
#include <Arduino.h>
#include <SPI.h>
#include <Wire.h>
#define BOARD_SW 0 /* Flash */
#define SW_ON LOW
#define SW_OFF HIGH
#define HAS_DISPLAY
#define I2C_SDA 5 /* GPIO 5 (D1) */
#define I2C_SCL 4 /* GPIO 4 (D2) */
#ifdef HAS_DISPLAY
#include <U8g2lib.h>
U8G2_SSD1306_128X64_NONAME_F_HW_I2C *u8g2 = nullptr;
#endif
StaticJsonDocument<512> doc;
// WiFi Internet Router
const char* ssid = "WiFi_ssid";
const char* password = "WiFi_password";
// Slack API
const char* slack_user_oauth_token = "xoxp-xxxx";
const char* slack_channel = "#general";
// 1675256424.526809
char saved_ts[20] = "";
WiFiUDP udp;
// Japan timeOffset 9 hours, updateInterval 12 hours
NTPClient ntp(udp, "ntp.nict.jp", 9 * 60 * 60, 12 * 60 * 60 * 1000);
volatile bool hasButtonPushed = false;
// ESP32 ARDUINO_ISR_ATTR
void ICACHE_RAM_ATTR isr() {
hasButtonPushed = true;
}
void setup() {
// put your setup code here, to run once:
Serial.begin(115200);
Serial.println("initBoard");
Wire.begin(I2C_SDA, I2C_SCL);
delay(20);
#ifdef HAS_DISPLAY
Wire.beginTransmission(0x3C);
if (Wire.endTransmission() == 0) {
Serial.println("Started OLED");
u8g2 = new U8G2_SSD1306_128X64_NONAME_F_HW_I2C(U8G2_R0, U8X8_PIN_NONE);
u8g2->begin();
u8g2->clearBuffer();
u8g2->setFlipMode(0);
u8g2->setFontMode(1); // Transparent
u8g2->setDrawColor(1);
u8g2->setFontDirection(0);
u8g2->firstPage();
do {
u8g2->setFont(u8g2_font_inb19_mr);
u8g2->drawStr(0, 30, "Time");
u8g2->drawHLine(2, 35, 47);
u8g2->drawHLine(3, 36, 47);
u8g2->drawVLine(45, 32, 12);
u8g2->drawVLine(46, 33, 12);
u8g2->setFont(u8g2_font_inb19_mf);
u8g2->drawStr(58, 60, "Card");
} while ( u8g2->nextPage() );
u8g2->sendBuffer();
u8g2->setFont(u8g2_font_fur11_tf);
delay(100);
}
#endif
#ifdef BOARD_SW
pinMode(BOARD_SW, INPUT_PULLUP);
#endif
// When the power is turned on, a delay is required.
delay(1500);
Serial.println("WiFi Begin");
WiFi.begin(ssid, password);
while (WiFi.status() != WL_CONNECTED) {
Serial.print(".");
delay(1000);
}
Serial.print("WiFi Connected: ");
Serial.println(WiFi.localIP());
#ifdef HAS_DISPLAY
if (u8g2) {
u8g2->sleepOff();
u8g2->clearBuffer();
u8g2->setContrast(1);
u8g2->setFontMode(0); // Transparent
u8g2->setDrawColor(1);
}
#endif
attachInterrupt(BOARD_SW, isr, FALLING);
}
void(* resetFunc) (void) = 0; //declare reset function @ address 0
unsigned long past_epochTime = 0UL;
void loop() {
// put your main code here, to run repeatedly:
if (WiFi.status() != WL_CONNECTED) {
Serial.println("!= WL_CONNECTED");
// WiFi.disconnect();
// WiFi.reconnect();
resetFunc(); // call reset
return;
}
ntp.update();
unsigned long epochTime = ntp.getEpochTime();
if (past_epochTime == epochTime && !hasButtonPushed) {
return;
}
past_epochTime = epochTime;
String formattedTime = ntp.getFormattedTime(); // hh:mm:ss
char message[256];
boolean isSyussya;
int hours = ntp.getHours();
int seconds = ntp.getSeconds();
if (hours < 12) {
isSyussya = true;
Serial.println("[午前]");
} else {
isSyussya = false;
Serial.println("[午後]");
}
if ((hours >= 8 && hours <= 20) || seconds <= 4) {
if (epochTime % 2L != 0L) {
u8g2->sleepOn();
} else {
u8g2->sleepOff();
}
} else {
u8g2->sleepOn();
}
#ifdef HAS_DISPLAY
if (u8g2) {
do {
u8g2->setFont(u8g2_font_inb19_mr);
u8g2->drawStr(0, 30, formattedTime.c_str());
// u8g2->setCursor(0, 16);
// u8g2->println(formattedTime.c_str());
u8g2->drawStr(0, 60, isSyussya ? "AM" : "PM");
u8g2->drawStr(60, 60, hasButtonPushed ? "**" : " ");
} while ( u8g2->nextPage() );
}
#endif
if (!hasButtonPushed) {
return;
}
u8g2->sleepOff();
if (isSyussya) {
char* ts = sendSlackMessage(slack_user_oauth_token, slack_channel, "始めるにゃん🐈", "");
} else {
char* ts = sendSlackMessage(slack_user_oauth_token, slack_channel, "終わるにゃん🐈", "");
}
if (false) {
char buf[256];
sprintf(buf, "今の時刻: %s", formattedTime.c_str());
sendSlackMessage(slack_user_oauth_token, slack_channel, buf, "");
}
delay(5000);
hasButtonPushed = false;
return;
}
char* sendSlackMessage(const char* token, const char* channel, const char* message, const char* thread_ts)
{
static char ts[20];
strcpy(ts, "");
// Slack Messaging API
// WiFiClient wifiClient;
std::unique_ptr<BearSSL::WiFiClientSecure> wifiClient(new BearSSL::WiFiClientSecure);
// ignore the SSL certificate
wifiClient->setInsecure();
// or SSL certificate SHA-1 Fingerprint
// const uint8_t fingerprint[20] = { 0x00, 0x11, 0x22, 0x33, 0x44, 0x55, 0x66, 0x77, 0x88, 0x99, 0xaa, 0xbb, 0xcc, 0xdd, 0xee, 0xff, 0x00, 0x11, 0x22, 0x33 } ;
// client->setFingerprint(fingerprint);
HTTPClient httpClient;
// httpClient.begin("https://slack.com/api/chat.postMessage");
httpClient.begin(*wifiClient, "https://slack.com/api/chat.postMessage");
httpClient.addHeader("Content-Type", "application/x-www-form-urlencoded");
char buf[256];
sprintf(buf, ""
"token=%s"
"&channel=%s"
"&text=%s"
"&thread_ts=%s"
"&reply_broadcast=%s",
token,
channel,
message,
thread_ts,
strlen(thread_ts) > 0 ? "True" : "False"
);
Serial.print("thread_ts = ");
Serial.println(thread_ts);
Serial.println(buf);
strcpy(ts, "");
int status_code = httpClient.POST((uint8_t *)buf, strlen(buf));
if (status_code == 200)
{
Serial.print("OK");
String json = httpClient.getString();
Serial.println(json);
deserializeJson(doc, json);
if (doc.containsKey("ts"))
{
strcpy(ts, doc["ts"]);
Serial.println(ts);
}
}
else
{
Serial.printf("ERR %d", status_code);
if (status_code <= 0)
{
Serial.printf("ERR %s", httpClient.errorToString(status_code).c_str());
}
}
httpClient.end();
return ts;
}
電子工作 ]●関連するコンテンツ (この記事を読んだ人は、次の記事も読んでいます)[HOME]
|
[BACK]
猫屋敷工房 & HTML Generator